
In order to deploy applications with Docker and publish images, it has been necessary to study the following tutorials throughout this Docker course:
- Docker in theory, a necessary section to establish a solid foundation and knowledge to then move on to practice without any gaps.
- Docker practice with the most important commands. Although in real projects files are used more than commands, this section helped us to understand how the system works underneath.
- Dockerfile in practice to create images, before using docker-compose.yml this section is necessary since compose builds images based on Dockerfile files.
- docker-compose.yml tutorial with real examples where we have managed to introduce a real and full example of an application composed of three projects into containers.
Now it’s time to take the final step, publishing your Docker images so that anyone can download them and deploy your application so that users can use it.
How to publish images on Docker Hub with commands?
To publish an image we will use Docker Hub which, like GitHub, allows us to create image repositories for our projects. They can be public or private.
The steps to publish an image on Docker Hub are:
- Log in to Docker Hub or create an account if you don’t have one.
- Go to the menu and select the “Repositories” section.
- Select “Create repository” and give it a descriptive name. This is where you can set whether it is public or private.
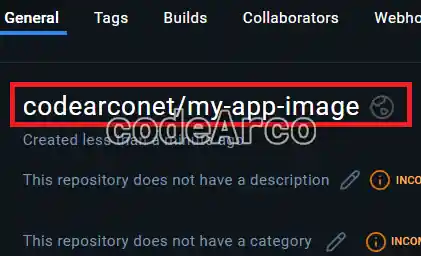
- Write down the full name of the repository, in our case it is “codearconet/my-app-image”.

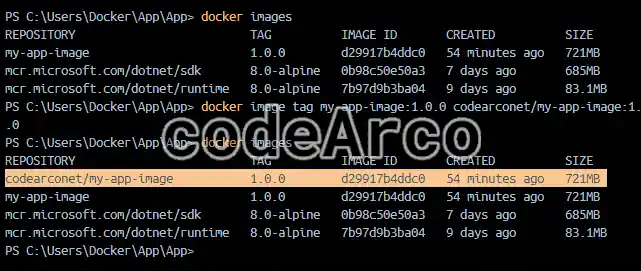
Publish image to Docker Hub - List the images you have and, for the image you want to publish, assign it the same name as in the previous point with the command
image tag old-name:tag new-name:tag.
Rename Docker image - Log in to the console with the command
docker login. - Upload the image to Docker Hub with the command
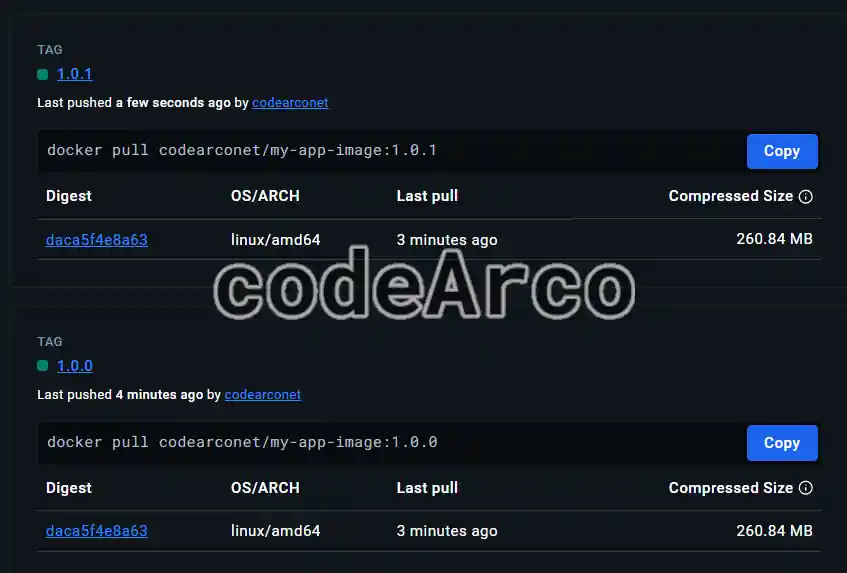
docker push codearconet/my-app-image:1.0.0. - Verify that the image has been uploaded correctly through the “Tags” tab.
- If you wanted to upload another version/tag, all you would have to do would be to create it in your terminal with the
buildcommand and a different tag, and then push it. We can check it in the following screenshot:
How to publish images to Docker Hub with commands
How to generate private Docker images locally?
If you don’t want to use Docker Hub, an alternative to share Docker images is to use the docker image save command, in our case we will use docker image save -o my-app-image-100.tar my-app-image:1.0.0.
What this does is create a compressed file in the directory you are in and then share it with other people in a completely private way.
To create the image from the .tar file generated previously, we will use the command docker image load -i file.tar, in our case it would be docker image load -i my-app-image-100.tar.

As you can see, it is an extremely simple process to generate images locally and send them to colleagues without having to go through an external platform in the cloud.
Ways and services to deploy Docker applications
There are several ways to deploy Docker applications with multiple containers, among them we find:
- Kubernetes, as we already mentioned, will allow us to deploy our set of containers on multiple servers. It is such a large and complex tool that it is outside the scope of this course.
- Docker Swarm, an alternative similar to Kubernetes.
- Manual deployment, where we will simply have a server where we will download our images and do a
docker compose upto deploy the application. This is what we will see in the following sections.
In addition to the above, we can deploy Docker applications on the following services or providers:
- AWS or Amazon Web Services.
- Azure.
- Google Cloud.
- Digital Ocean.
An important point to keep in mind is that docker-compose.yml is for local use, it is not used as much in real deployments, for real deployments we should use more complex things like Kubernetes. However, in the examples that we will see below we will use it, but remember, in real projects it is not usually used much.
The docker-compose.yml file that we will use is the one I link to and that is hosted on the Github of our example Docker project.
Previous steps to deploy applications in the cloud
The previous steps required to deploy docker-compose.yml on any platform are the following:
- Reformat the file, remove the quotes from any value that appears in the file.
If we do not make these corrections, we will not be able to deploy containers to the cloud, such as Azure, since it will throw errors related to the format of the docker-compose.yml file.--> We will replace the lines similar to this one: ACCEPT_EULA: "Y" --> With the same line but without double quotes: ACCEPT_EULA: Y --> We must also correct the healthcheck line so that it appears on a single line, without breaks: healthcheck: test: ["CMD-SHELL", "/opt/mssql-tools18/bin/sqlcmd -S localhost -U sa -P myStrongP@ssword -C -b -Q \"SELECT * FROM INFORMATION_SCHEMA.TABLES WHERE TABLE_TYPE='BASE TABLE'\""] - Upload the images to Docker Hub of our APP and API and replace it in the docker-compose.yml. You can use the ones I have already uploaded (codearconet/app:1.0.0 and codearconet/api:1.0.0) or use your own.
Once published, we will replace the build lines with image lines with the name of the uploaded image.
With this point we achieve a fairly important step when deploying and will not be necessary to build the image and, therefore, the process will be much faster.api: build: ./Api/Api app: build: ./App/Appapi: image: codearconet/api:1.0.0 app: image: codearconet/app:1.0.0
Deploying docker-compose.yml in Azure AppServices
Before starting, you should keep in mind an important point, Azure AppService does not support volumes with docker-compose.yml. What does this mean? That our database will not have persistent storage. Alternatives that we can take:
- Forget about persistent storage for this example and comment, within docker-compose.yml, the volume lines, both in the database service and in the
volumessection. - Create a database anywhere (for example on your own server or in Azure SQL Database) and change the connection string in the
environmentsection of the db service.
This is the recommended option, in real applications the databases should not be deployed in a container with a volume, but separately.
In our case we will implement both options.
Now, the steps to deploy docker-compose.yml in Azure AppService are:
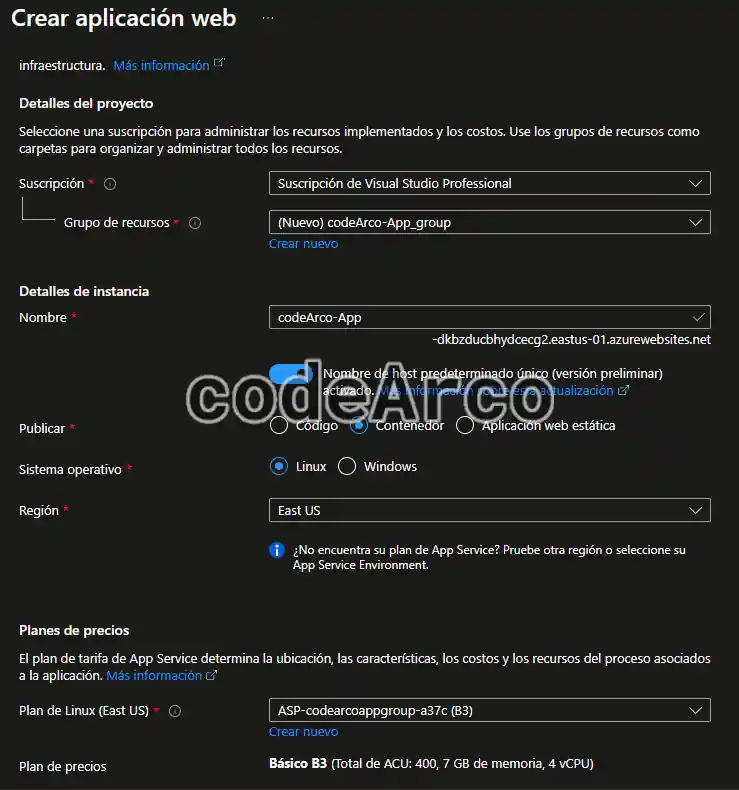
- Create a web application in AppServices. Select the “Container” option of type Linux.
It is also very important to select an appropriate pricing plan, at least B2 or B3, otherwise the SQL Server database will not start and you will have quite a few problems due to lack of RAM.
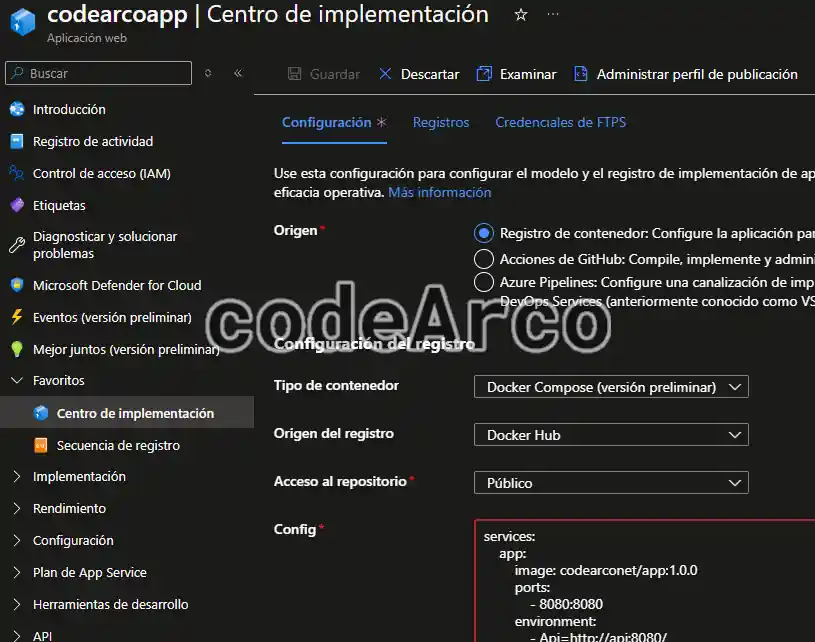
Create AppService in Azure to deploy containers - Enter the AppService and within the “Deployment Center” section we select “Docker Compose” as the container type, “Docker Hub” as the registry source and “Public”. We must also select, within “Config”, our docker-compose.yml file. We save the changes.

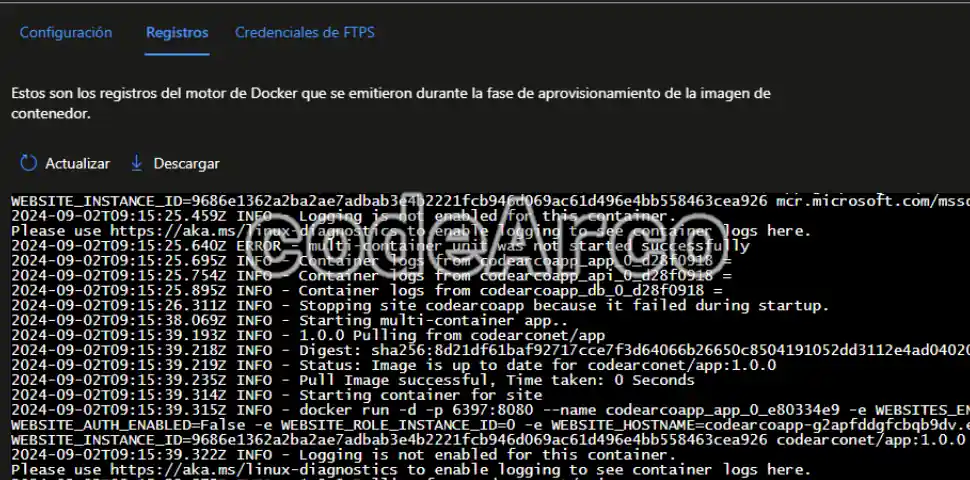
Configuration to deploy docker-compose yml in AppServices - Go to the deployment center logs and wait for the images to download and the containers to start:

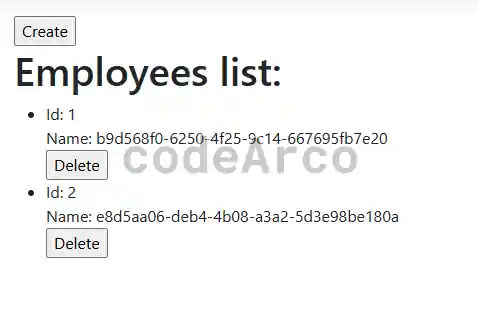
Logs in AppService for containers with docker-compose yml - After waiting a while for everything to start correctly we can see that our application works as we expected except for the persistent storage:

Docker compose yml in AppService example
Docker, AppServices and persistent storage
In real projects it is not a good idea to deploy a database engine in a container and, much less, its data in volumes. We have done this only for educational purposes.
That is why in this section we are going to create an external database with Azure SQL Server and change the necessary configurations in our project to have persistent storage with AppService and docker-compose.yml:
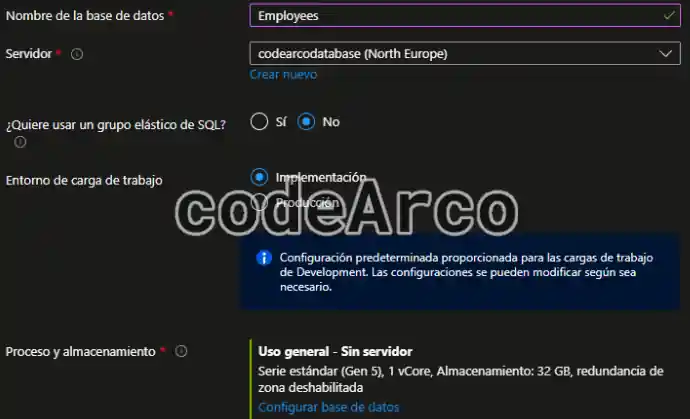
- Create an Azure SQL database, make sure to use “SQL Authentication” and save the user and password:

Create AppService database and docker-compose yml - Also make sure to give it a name, select the appropriate workload environment (in our case we have selected “Deployment”) and, finally, select the appropriate series and resources (since it is for educational purposes the lowest and most adjusted series would be sufficient, the same does not happen with AppService where the plan had to be increased due to RAM issues).

AppService database configuration and docker-compose yml - Then change the connection string in the API to the one that appears in the “Configuration” section, “Connection strings”, “ADO.NET (SQL authentication)” section. It is very important to use exactly the connection string provided by Azure, modifying only the password, without changing parameters because it will most likely not work for you.
api: image: codearconet/api:1.0.0 # ports: # - 50000:8080 environment: #- ConnectionStrings__DefaultConnection=Server=tcp:codearcodatabase.database.windows.net,1433;Initial Catalog=Employees;Persist Security Info=False;User ID=codeArcoUser;Password=password;MultipleActiveResultSets=False;Encrypt=True;TrustServerCertificate=False;Connection Timeout=30; - Then comment the service db section within docker-compose.yml and the volumes because now we are not going to create or deploy the database, it is external.
- Go to the “Security”, “Networks” configuration and allow public access, to do this create a “Firewall rule” and allow from the IP “0.0.0.0” to “255.255.255.255”.

Allow public access to SQL Server database

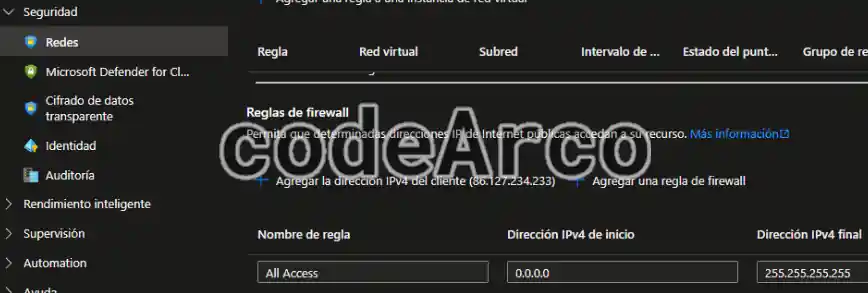
Once you have done all of the above, you can access the application to verify that it works correctly and, additionally, through SQL Server Management Studio you can verify that data is inserted and deleted.
The advantage in this case is that the data is persistent and, in addition, deploying the containers takes much less time, we have removed the most cumbersome part. In fact, we can see this section as another Docker optimization.
Azure container instances ACI and docker-compose.yml
Azure container instances ACI is a service that allows you to deploy containers with their images in the cloud, however Docker Compose no longer has support for ACI. This means that if we follow any docker-compose.yml and ACI tutorial the commands will not work and we will not be able to create the containers simply with our file and the docker compose up command, apart from the previous necessary steps.
As a consequence of the above, we will have to create a complex and elaborate .json file and Azure commands instead of using and running our file.
Since this has more to do with Azure than with what we are studying, it does not add much value to the Docker course, we will leave it aside, I simply mention it because I tried to do it and realized that it is currently not possible.
How to deploy applications in virtual machines?
Now we are going to follow a completely different process, we are going to deploy our application in an Azure virtual machine, although it can be from any other provider. The main disadvantage of a virtual machine is the difficulties when scaling resources when demand increases.
The steps to deploy docker-compose.yml in an Azure virtual machine are:
- Create an Azure virtual machine, make sure it has all the input ports open, download the SSH private key, point the user and that it has at least 3 or 4 GB of RAM. The rest of the options will be left by default:

How to deploy docker-compose yml on an Azure virtual machine - Connect to the virtual machine through the method you prefer, in my case I will use Putty with SSH.
- Transfer the docker-compose.yml file to the virtual machine through the method you consider appropriate, in my case I will use the pscp tool that comes with Putty, for which I will enter the following command in the directory on my premises where the file is located:
pscp -scp -i C:\your_privateKey.ppk docker-compose.yml your_vm_user@your_vm_ip:/home/your_vm_user - Inside the virtual machine we run the command
sudo apt-get update. - Install Docker on your Linux distribution using the linked tutorial.
- If you get the error “Cannot connect to the Docker daemon” look for ways to solve it, in my case I had to run the command
sudo service docker start. - In the folder where we copied our docker-compose.yml file, run the command
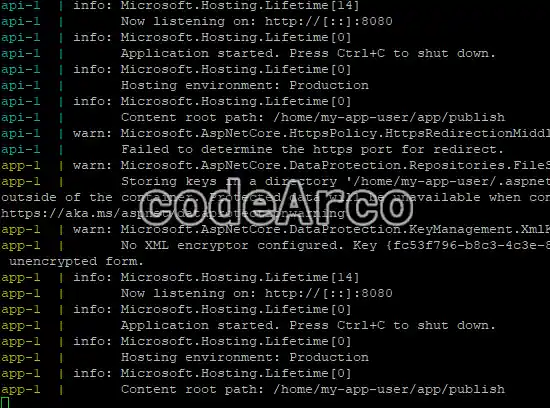
sudo docker compose up. Wait for the containers to start:
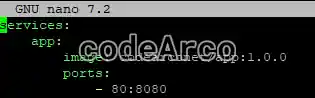
Docker compose up on Azure virtual machine - Change the port through which the application starts. Note that the application is being launched on port 8080 of the virtual machine, but the virtual machine only has port 80 open. We need to modify the file and change the port of the host machine of the app to 80. To modify the file, use the
nano docker-compose.yml command:
Modify docker-compose yml ports for virtual machine - Restart the containers. Use the
docker compose downcommands to stop and remove the containers anddocker compose upto launch the containers with the new configuration. - Access the url “virtual_machine_ip:80” from your computer and check that the application is accessible and works correctly.

Please note that you can also (and it is actually advisable) to create the external database as before, change the connection string in the compose file and comment out all the database and volume lines. This will make your virtual machine take up less space and require fewer resources (such as RAM) since it will not be necessary to host a full SQL Server.
As you have seen, there are many ways to deploy applications with containers in the cloud, in fact there are much better and more elaborate ones than those we have seen here, such as Kubernetes. However, I think that what we have seen is enough. Now it is up to you to try to deploy in other services such as Digital Ocean or Amazon Web Services.
It would also be a good practice to try to automate all this with some DevOps system such as Azure pipelines or Github Actions so that when someone commits to the code repository, the images are automatically generated, published and updated in the containers you have created. Since this is not directly related to the course we are watching, I leave it as extra practice.