
As we saw in the Docker theory, images and containers can be created through commands or through files. Regarding Docker files there are two types:
- Dockerfile defines the instructions necessary to create an image.
- docker-compose.yml contains the commands to create and run a set of containers. These containers will in turn use the images created through the Dockerfile.
In this post we will focus on the first file and we will see a practical and full example of a Dockerfile. You have available the code of the project that we will use as an example on GitHub which has the following structure:
- MVC .NET application that shows employees and allows them to be inserted and deleted.
- This application communicates with an API to perform operations on employees.
- The API in turn communicates with a SQL Server database to persist the data.
- There are two branches in the project, “WithoutDocker” which contains the application code without any Docker and “WithDocker” which contains the final result of implementing all the tutorials in this Docker course.
What is a Dockerfile file?
As we have already mentioned, the Dockerfile is used to create images that we will later put into containers. It is a file without an extension that we insert into the root of our project created with your favorite text editor. The basic structure of the Dockerfile is:
- FROM image:tag. Indicates the base image of our image. Remember that an image is nothing more than a set of layers and, therefore, we will need a base on which to install and run our application.
Establishes that our image will use as a base the image of the .NET SDK which, in turn, is installed on the Alpine operating system. Example:FROM mcr.microsoft.com/dotnet/sdk:8.0-alpine AS sdk - WORKDIR path. Allows you to change the working directory. Like the terminal of any operating system, the current directory is changed so that it later affects the commands that follow.
Changes the current directory to the “/home/my-app-user/app/src/” path of the container. Example:WORKDIR /home/my-app-user/app/src/ - COPY source destination. Allows you to copy files from the host machine to the container.
After changing the working directory to “/home/my-app-user/app/src/” the file “./Api.csproj” will be copied from the host machine to the “home/my-app-user/app/src/” directory of the container. Example:WORKDIR /home/my-app-user/app/src/ COPY ./Api.csproj . - RUN command. Used to run commands (Linux or Windows, depending on the type of container we have) during image creation.
Once we have copied the “Api.csproj” file, we will run the .NET “restore” command on that file to install dependencies and packages. Example:RUN dotnet restore "Api.csproj" - ARG Variable=Value. Used to define parameters that we will use while creating the image, not after.
These arguments can be set when running thedocker buildcommand, which allows us to create an image from a Dockerfile (we will see this later). Example:ARG NODE_VERSION="20" ARG ALPINE_VERSION="3.20" FROM node:${NODE_VERSION}-alpine${ALPINE_VERSION} AS basedocker build --build-arg NODE_VERSION=current . - ENV Variable=Value. To set the value of the environment variables.
The difference between ARG and ENV in Docker is that ARG are variables that we will use during the creation of the image while ENV are variables that we will use during the execution of the application inside the container.
If you have doubts about this difference on the Internet you can find a diagram with the difference between ARG and ENV. - EXPOSE port. Indicates the ports through which we can access our application. Remember that in Docker there are private and public ports and, by default, a container is not accessible from outside.
However, keep in mind that this command is only for informational purposes and has no effect, what really exposes ports is the -p XX:YY parameter in the run command or its equivalent in the docker-compose.yml file as we will see later.
This line informs (but does not expose) that the container that uses this image must be exposed through port 8080. Example:EXPOSE 8080 - USER my-user. Indicates the user under which the commands that follow will be executed. It only applies to the RUN, CMD or ENTRYPOINT commands. In the rest of the lines, such as COPY, if we want to define the owner user, we must indicate it explicitly with the
--chownargument.
This causes all the lines that follow, as long as they are RUN, CMD or ENTRYPOINT, to be executed with the user my-app-user. Example:USER my-app-user - CMD [“command1”, “command2”]. Command that will be executed when the image is started inside a container, always goes at the end.
These lines change the working directory to the publishing folder, inform that it will be exposed on port 8080, and finally launch the application with the command “dotnet App.dll”. Example:WORKDIR /home/my-app-user/app/publish EXPOSE 8080 CMD ["dotnet","App.dll"]
You may not have understood some of the commands, don’t worry, below we will see simple examples and we will advance little by little and analyze each of the lines of the Dockerfile. This section is a summary.
Previous steps to creating a Dockerfile
The previous steps to creating a Dockerfile for any application can be summarized in the following points:
- Knowing how to publish or generate the application that we are going to introduce into a container. Each system will have its own way and it depends on the framework/language you are using.
- Knowing how to run the application and what it needs to do so that it is accessible to users and/or machines.
In the case at hand, which is a .NET MVC application, the steps necessary to generate and run the application are:
- The first step is to know what we need to convert the application code into an executable. Note that what we currently have is the code, but in most cases, a process is needed to convert it into an executable package.
In the .NET example, we will need to build or restore the application so that its packages and dependencies are restored and then do a publish. In both cases, it is necessary to use the appropriate .NET SDK. - In the second step, we will need to know which base to use for the application to run.
In the case of .NET, all we need is to use a Linux operating system (for example, Alpine because it is a very light distribution) and on this we need to install the appropriate .NET runtime to run the published application. Afterwards, it will only be necessary to run the command “dotnet App.dll”. - Other necessary steps will be, for example, how to run the application or expose ports to allow access to our application from outside.
In the .NET example, to run the application, you only need the “dotnet App.dll” command and expose it through port 8080.
Dockerfile example easy and basic
Before starting with a real and complex Docker example, to avoid the complexity of any compiled language, we are going to follow a basic example with Docker and HTML. The first step, as I mentioned before, is to ask ourselves the following questions:
- What image or base system do we need?. Any that has a web server to be able to serve the files, such as Apache, for this we can search for it on Docker Hub. In our case we will use this Apache image.
- What do we need to convert the code into an executable package? Absolutely nothing, the only thing we need is to copy the HTML files of our project to the corresponding folder on the web server.
- What additional steps do we need? Simply map and expose the Apache port to a public port in order to access the container and, consequently, our HTML files.
Once we have all the above information, it is time to move on to practice with a Docker example with the following steps:
- Create a folder called “HTML App” on your computer.
- Inside this, create a file called “index.html” with the following content:
<h1>Hello Word !!!</h1> - On the command line, move to the project folder with the html file.
- Also create a file called Dockerfile without extension with the following content.
FROM indicates the base image (which is the Apache server) and COPY copies all the documents in the current directory (we only have index.html) to the corresponding Apache folder.FROM httpd COPY ./ /usr/local/apache2/htdocs/ - Execute the build command to generate the image. This command allows us to generate the image not only with Apache, but also with our index.html file copied to the corresponding folder on the server. We can see it as a command to create custom images.
The-tparameter allows us to give a name to the image so that we can reference it later when we create the container and the “.” at the end indicates where the Dockerfile is located, in this case it is in the current directory.docker build -t my-app-image . - Create a container with the previous image, to do this use the run command.
As we saw in another article, we give a name to the container, we indicate that port 8080 of our machine corresponds to port 80 of the server and, at the end, we indicate the image to use, which is the one we just created.
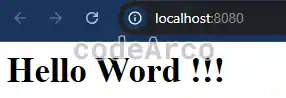
docker run --name MyContainer -p 8080:80 my-app-image - Finally, access the route http://localhost:8080/ through the browser and you will be able to see the result. Congratulations, you have dockerized your first application!

Basic Dockerfile example
Be careful with tags in Docker images!
If you have noticed, in the previous example, within the Dockerfile we have used the image “FROM httpd”, without a tag. If you remember in previous sections we mentioned that if a tag is not specified Docker will use the “latest” tag by default and this is a serious error.
Let’s suppose that, instead of being a simple HTML web page, we are creating the file for a .NET Core 3 application. Let’s also suppose that we do not use any tag and that the application works correctly when creating the container.
After a while, .NET Core 5 is released and we follow all the steps again (create image, container, publish application in container… etc.) but surprise!, our application does not work…
This is because the application has gone from running on .Net Core 3 to .Net Core 5 and all this without realizing it.
Therefore we should always use tags and, in addition, use tags that are as specific as possible to allow our application to work. For example, it’s better to use the .NET core tag “3.5.18” than the “3.5” tag because, again, the “3.5” tag may currently point to “3.5.18” but may change to “3.5.24” in the future.
Let’s modify our previous example to use a specific version of Apache:
FROM httpd:2.4.62
COPY ./ /usr/local/apache2/htdocs/
And we’ll also set our image to version 1.0.0 in the build command, so we get used to following good practices:
docker build -t my-app-image:1.0.0 .
docker run --name MyContainer -p 8080:80 my-app-image:1.0.0
Finally, keep in mind that one of the goals of containers is to make our application work always and everywhere, and we achieve this by using the most specific tags possible.
How to enable interactive mode and terminal in a Docker container
Now we are going to run Docker’s interactive mode and launch the terminal to be able to see what is inside the container as if it were a terminal on any server.
To do this we will use the docker run command with the -i parameter, remember that we must first delete the container we have created:
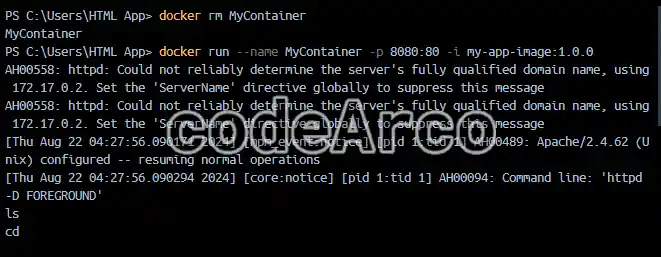
docker run --name MyContainer -p 8080:80 -i my-app-image:1.0.0As you can see, all the output of our container appears, but even if we enter commands, they are not executed, the terminal does not pay attention to us… Why? Because it is necessary to indicate a Docker command to launch the terminal, this depends on the operating system that the container has, in our case it would be sh. In addition, we must add the -t parameter to the -i parameter so that the final command would be:
docker run --name MyContainer -p 8080:80 -it my-app-image:1.0.0 sh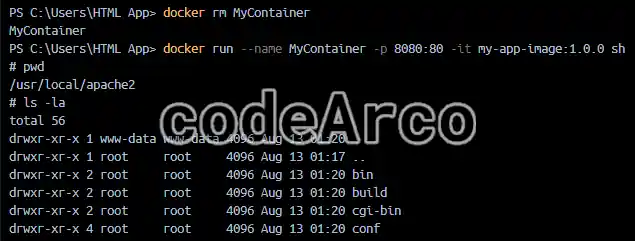
As you can see, we can now run commands inside the container and move around inside it as if it were any Linux server.
This functionality is very powerful and useful because it will allow us to debug errors and perform checks inside the container.
Security and users in Docker containers
Now that we can access the terminal, we are going to see which user the container is started with and the permissions of the folders:
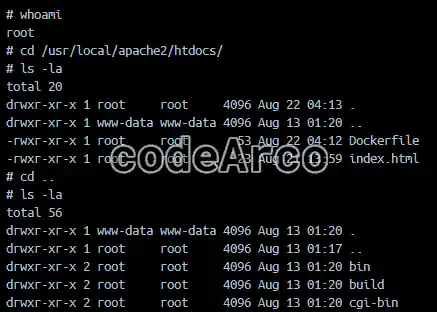
As we can see, the user with which the container is started is root and all the folders and files, including our index.html, belong to him. This is a huge security risk that we are going to solve in this section.
Let’s suppose that instead of being a folder with HTML files, we are in a container with a .NET MVC application. Let’s also suppose that a hacker manages to access our container… Well, he will log in with root and, as a consequence, he will be able to edit all the files, such as those of the operating system.
The solution consists of indicating in the Dockerfile that the user who is going to log in to the container is a specific one and that, in addition, that user is the owner only of the application files but not of the rest, such as those of the operating system.
Let’s get down to business with the Dockerfile file to improve security in Docker containers:
FROM httpd:2.4.62
RUN addgroup my-app-group && adduser my-app-user --no-create-home --disabled-password && adduser --gecos "" my-app-user my-app-group
USER my-app-user
COPY ./ /usr/local/apache2/htdocs/
As you can see, the lines to change the user of a container with Dockerfile are:
- RUN commands, creates a group and a user that will be the owners of our application folder and will be the one with which the user will log in to the container.
In addition, the user does not have a home folder or password and we have activated silent mode so that it does not ask us for data such as name, email… etc.
This command will depend on the base operating system that your container uses, which is why you can find it slightly different on other Internet sites. - USER user, is the line that actually changes the user with which the following instructions in the Dockerfile will be executed.
If we regenerate the image again (build) and create and start the container (run) in the same way as before, we can check that we are logged in with my-app-user:
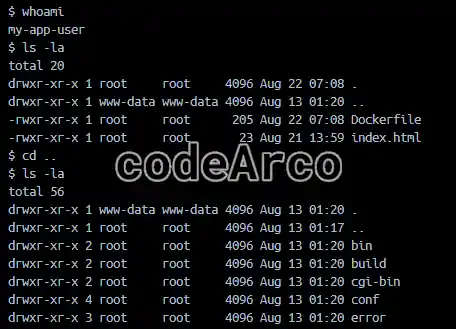
Now… Here we still have an error, the folder and files of our application (index.html and Dockerfile) belong to the root user but they should belong to the my-app-user user, why does this happen? Because the USER command applies only to all the following instructions that are RUN, CMD or ENTRYPOINT and, therefore, the COPY is being executed as root.
In order for the COPY command to run as my-user-app we must change the Dockerfile as follows:
FROM httpd:2.4.62
RUN addgroup my-app-group && adduser my-app-user --no-create-home --disabled-password && adduser --gecos "" my-app-user my-app-group
USER my-app-user
COPY --chown=my-app-user ./ /usr/local/apache2/htdocs/
And now, if we repeat the tests, the container starts with my-user-app and the files and folders of our project belong to it:
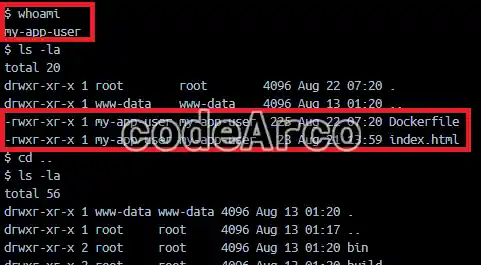
This means that if someone tries to enter our container, they can only access it with the user my-app-user and, therefore, they can only modify the files of our application but not the others, thus reducing the impact or damage they can do to us.
What is .dockerignore and what is it for?
You may have noticed that, in our example, the Dockerfile is being copied and it is not necessary for it to be in our container.
One way to optimize the size of images and containers is to use .dockerignore, it allows you to ignore files when creating the image with build and, therefore, they will also be ignored when creating the container with said image.
We can see it as something similar to Git’s .gitignore. In fact, a very good practice is to use the same thing as in .gitignore because… What is the point of copying the obj folder to our image and container in a .NET project? We will see a real .NET example later.
The steps to use .dockerignore in Docker are:
- Create a file called “.dockerignore” in the project folder along with the Dockerfile. Make sure that no extension is added by mistake.
- Enter the following code in it:
#ignore all kind of files * #except html files !*.html - Delete the container and the image that we have created previously with
docker container rm MyContaineranddocker image rm my-app-image:1.0.0. - Build the image again with the command
docker build -t my-app-image:1.0.0 .from the HTML App directory. - Build and run the container again with the command
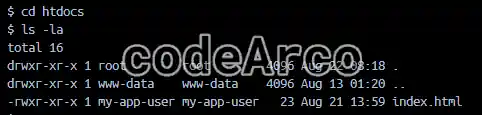
docker run --name MyContainer -p 8080:80 -it my-app-image:1.0.0 sh. - Verify that we only have the index.html in the htdocs folder of the container and that the Dockerfile file no longer appears:

What is dockerignore and what is it for
Practical and real example of Dockerfile
It is time to use Docker with a real project, in our case we are going to containerize the .NET MVC application (APP folder) that you can find on GitHub, branch “WithoutDocker”.
The first step is to ask ourselves the following questions:
- What image or base system do we need? In this case the application uses .NET 8.0, therefore any image that has that version installed will work. If we go to Microsoft’s Docker Hub we will find the image of the sdk with .NET 8.
- What do we need to turn the code into an executable package?:
- First we need the SDK to build and restore and download the dependencies, and then to publish our application.
- We also need the .NET runtime for our application to run. For now we are going to use only the SDK to keep the Dockerfile simple.
- What additional steps do we need? Simply map and expose the container port to one on our computer and start the application with the command “dotnet App.dll”.
That said, we are going to create a Dockerfile file in our project, folder “Docker\App\App”, with the following code:
FROM mcr.microsoft.com/dotnet/sdk:8.0
RUN addgroup my-app-group && adduser my-app-user --disabled-password && adduser --gecos "" my-app-user my-app-group
USER my-app-user
COPY --chown=my-app-user . /home/my-app-user/app/src
WORKDIR /home/my-app-user/app/src
RUN dotnet build "App.csproj" -c Release -o /home/my-app-user/app/build
RUN dotnet publish "App.csproj" -c Release -o /home/my-app-user/app/publish
WORKDIR /home/my-app-user/app/publish
CMD ["dotnet", "App.dll"]
And below you have the explanation of the Dockerfile commands:
- FROM. Base image from which we start, we will use the sdk to build and publish and, later, to run the application.
- RUN and USER. The RUN command creates the specific user for the application (remember, for security reasons) but this time we will not use the –no-create-home parameter, we need a user’s home folder to use it later. The USER command causes everything that comes next (remember, everything except the COPY commands) to be executed under our new user.
- COPY, we copy all the content of our machine into the current directory (.) in the “/home/my-app-user/app/src” path of the container with the user my-user-app as the owner of the new content.
- WORKDIR, we change the current directory to the folder where we copied the code.
- RUN build, we build the code so that the necessary dependencies are installed and downloaded in release mode and the generated files are stored in “/home/my-app-user/app/build”.
- RUN publish, we publish the application in the “/home/my-app-user/app/publish” directory. This command is what actually converts the application code into binary files to be executed.
- WORKDIR, we change to “/home/my-app-user/app/publish” which is where the file we must execute to start our application is located.
- CMD, we execute the command “dotnet App.dll” with the syntax of an array of elements. This command is the one that, finally, starts the application listening on port 8080.
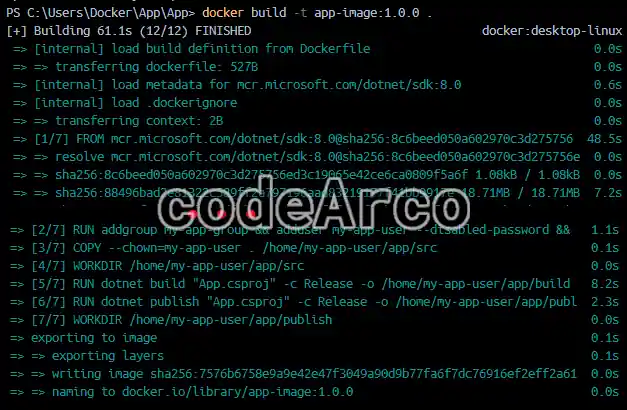
Once the Dockerfile is created, we will go to the Docker Desktop terminal and enter the following commands:
cd Docker\App\Appto change to the directory where the Dockerfile is located.docker build -t app-image:1.0.0 .to create the image of our application. Save the logs somewhere, especially the time consumed the first time the image is created, then we will analyze and optimize it.docker run --name app-container -p 8080:8080 -it app-image:1.0.0to create the container based on the previous image. We map the 8080 port of the container with the 8080 port of our machine.
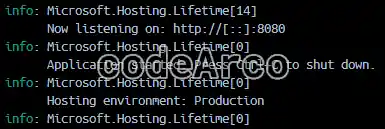
If you have doubts about which port an application starts in a container, use, in theruncommand, the-itoption to see the logs, in the case of .NET it is indicating that it starts on port 8080, which we will then map to a port on our machine.

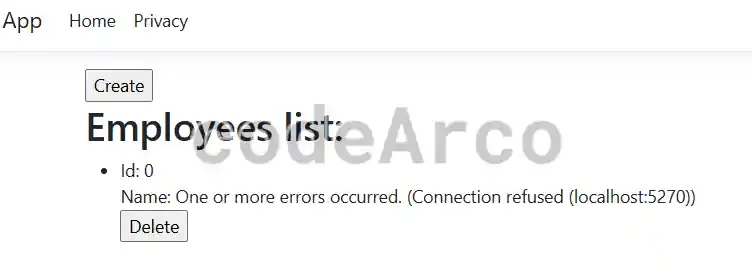
Docker logs to know the starting port - Finally, check that everything has gone well by accessing the address “http://localhost:8080/” from your browser, you should see something similar to the following image.
But, why do errors appear? Well, because we have not started the API and, when the application tries to obtain the list of employees, it does not obtain them and the “Connection refused” error occurs. Later we will put the API in another container.

Docker error API connection refused
Finally, we will leave the times and sizes noted here to later verify the optimization of containers and images in Docker:
- Image creation time, 61 seconds.

Image creation time for Docker optimization - Image size, 867 MB.

Image size for Docker optimization

How to optimize Docker images with .dockerignore?
The first step to optimize a Dockerfile image is to use .dockerignore to reduce the number of files that are copied to the image and the container from our machine.
The content of a .dockerignore is the same as you can find in any .gitignore, in our case, being a .NET application we will use the .gitignore of visual studio, you can find all the files for any language/IDE in the following repository. Remember that you must place it in the same folder as the Dockerfile with the name “.dockerignore”.
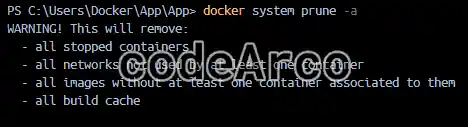
Next, we are going to delete everything with the docker system prune -a command, including the docker cache:
Then we create the image and the container exactly the same as in the previous section.
Now we will compare times and sizes generated with .dockerignore:
- Image creation time, 62.8 seconds, the same as before.

Optimize Docker with dockerignore image creation time - Image size, 865 MB, smaller than before.

Optimize Docker with dockerignore image size


Perhaps a 2 MB reduction in the image size will seem small, but keep in mind that we started from a small .NET template and only touched 2 files. A real project is much larger, it has many Nuget packages, dependencies… etc., in them the difference will be much greater.
We can see that before including the .dockerignore we had the Debug folder copied as is from our project:
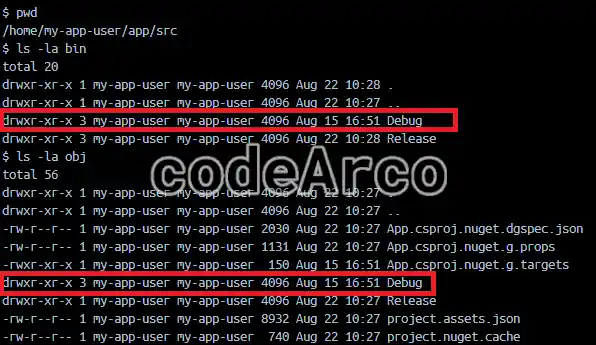
And that by including the .dockerignore we no longer have it. Release is kept because it is the one generated when doing build and publish since it is the mode selected in the Dockerfile:
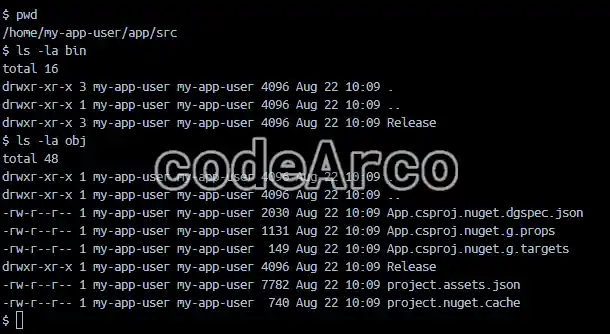
Finally, it should be noted that, generally, including a .dockerignore file does not have much impact because what usually happens is that the pipeline system downloads the code from a git repository and, therefore, the folders and files have already passed the .gitignore filter. But in our case, since we are running the Dockerfile directly from the code, it does have an impact and is a small step to optimize Docker images.
Optimize Docker images by changing the base image
Another way to reduce the size of Docker images and their creation time is to choose smaller and/or optimized base images. It is not the same to have .NET on an Ubuntu with a lot of extra features than on Alpine, a distribution made specifically for Docker that is extremely light.
Let’s see an example where we will optimize a Docker image by changing only the base image we start from.
In the previous example we are going to change the line FROM mcr.microsoft.com/dotnet/sdk:8.0 to FROM mcr.microsoft.com/dotnet/sdk:8.0-alpine.
Then we are going to delete everything with the command docker system prune -a and then we will create the image again and then the container.
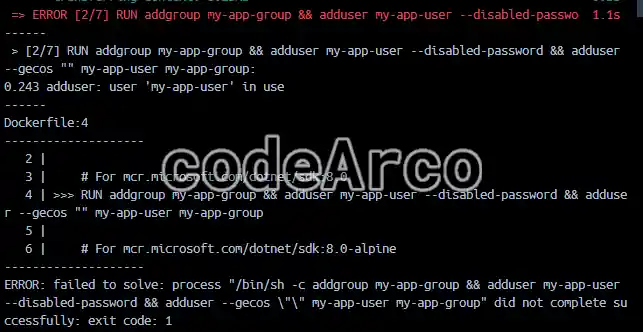
The first time we get an error when creating a user, this is because Alpine has another syntax to create them, we will change the line to create a user to addgroup my-app-group && adduser my-app-user --disabled-password --gecos "" --ingroup my-app-group.
It is true that the creation has taken a little longer (92 seconds) but we have managed to reduce the size to 718 MB from 865 MB, a saving of 147 MB by changing only the base image we used:

We are not going to analyze each of the .NET images but it is advisable that, for the type of project you have, such as node or .NET, you investigate their tags and the operating system they are based on to choose the optimal image that meets the needs of the project.
How do Docker cache and layers work?
In theory we already mentioned that an image is in fact a set of layers. Now that we have seen a Dockerfile, it is time to know that each line of it is a layer (or almost all of them). We can see this when generating the image, in our case we have 7:
=> [1/7] FROM mcr.microsoft.com/dotnet/sdk:8.0-alpine@sha256:658c93223111638f9bb54746679e554b2cf0453d8fb7b9fed32c3c0726c210fe 149.8s
=> [2/7] RUN addgroup my-app-group && adduser my-app-user --disabled-password --gecos "" --ingroup my-app-group 1.3s
=> [3/7] COPY --chown=my-app-user . /home/my-app-user/app/src 0.1s
=> [4/7] WORKDIR /home/my-app-user/app/src 0.1s
=> [5/7] RUN dotnet build "App.csproj" -c Release -o /home/my-app-user/app/build 9.6s
=> [6/7] RUN dotnet publish "App.csproj" -c Release -o /home/my-app-user/app/publish 2.1s
=> [7/7] WORKDIR /home/my-app-user/app/publish 0.0s
In theory we also said that if a layer is already in Docker (such as the download of the .NET SDK, first layer FROM) it is not necessary to run it when creating an image, the layer is cached. We can check this by deleting the image we just created and recreating it:
=> [1/7] FROM mcr.microsoft.com/dotnet/sdk:8.0-alpine@sha256:658c93223111638f9bb54746679e554b2cf0453d8fb7b9fed32c3c0726c210fe 0.0s
=> CACHED [2/7] RUN addgroup my-app-group && adduser my-app-user --disabled-password --gecos "" --ingroup my-app-group 0.0s
=> CACHED [3/7] COPY --chown=my-app-user . /home/my-app-user/app/src 0.0s
=> CACHED [4/7] WORKDIR /home/my-app-user/app/src 0.0s
=> CACHED [5/7] RUN dotnet build "App.csproj" -c Release -o /home/my-app-user/app/build 0.0s
=> CACHED [6/7] RUN dotnet publish "App.csproj" -c Release -o /home/my-app-user/app/publish 0.0s
=> CACHED [7/7] WORKDIR /home/my-app-user/app/publish 0.0s
Here we see two things:
- Downloading the base image took 0 seconds because Docker has already downloaded it.
- The rest of the layers are cached which means that it doesn’t have to run them. For example, you don’t have to run build or publish, and therefore all lines take 0 seconds.
Now we’re going to touch the app code minimally, all we’ll do is put a space in a view, and then delete the image and recreate it:
=> [1/7] FROM mcr.microsoft.com/dotnet/sdk:8.0-alpine@sha256:658c93223111638f9bb54746679e554b2cf0453d8fb7b9fed32c3c0726c210fe 0.0s
 => CACHED [2/7] RUN addgroup my-app-group && adduser my-app-user --disabled-password --gecos "" --ingroup my-app-group 0.0s
 => [3/7] COPY --chown=my-app-user . /home/my-app-user/app/src 0.1s
 => [4/7] WORKDIR /home/my-app-user/app/src 0.0s
 => [5/7] RUN dotnet build "App.csproj" -c Release -o /home/my-app-user/app/build 9.8s
 => [6/7] RUN dotnet publish "App.csproj" -c Release -o /home/my-app-user/app/publish 2.1s
 => [7/7] WORKDIR /home/my-app-user/app/publish
Now we can see that:
- Downloading the base image takes 0 seconds because it is cached.
- The RUN addgroup instruction is cached and takes 0 seconds.
- From the COPY instruction onwards the layers are not cached or, in other words, they have been removed from the cache and have to be re-executed.
The really interesting thing here is the last point… Why have the layers been removed from the cache after the COPY instruction? Because any change we make to the code, if it affects a line or layer of Docker, will cause that layer and the ones below it to be removed from the cache. In our example:
- FROM mcr.microsoft.com/dotnet/sdk:8.0-alpine. If we touch the code of our application this instruction is not affected because it consists of downloading the base image of the Alpine SDK.
- RUN addgroup my-app-group… If we touch the code this command is not affected either, it will always be the same regardless of the modifications we make.
- USER my-app-user, just like before, the current user change does not change if we touch the code.
- COPY –chown=my-app-user . /home/my-app-user/app/src, now this command is dependent on changes in the code, that is, if we touch a view or a controller the copy command has to be executed again to copy the modified file, it cannot use the cached version because it has the old code.
That is why this layer and all those below it are removed from the cache and have to be executed again.
Ok but… What does all this mean? Well, the order of the lines in Docker matters because it affects the time of image creation. If we manage to cache as many layers as possible when we touch code, the image will be generated faster.
Let’s see an example using the Docker cache. To do this, we will use the following file:
FROM mcr.microsoft.com/dotnet/sdk:8.0-alpine
RUN addgroup my-app-group && adduser my-app-user --disabled-password --gecos "" --ingroup my-app-group
#Commented for lab purposes USER my-app-user
COPY --chown=my-app-user . /home/my-app-user/app/src
# ¡¡¡ New line !!!
RUN apk add wget
WORKDIR /home/my-app-user/app/src
RUN dotnet build "App.csproj" -c Release -o /home/my-app-user/app/build
RUN dotnet publish "App.csproj" -c Release -o /home/my-app-user/app/publish
WORKDIR /home/my-app-user/app/publish
CMD ["dotnet", "App.dll"]
We have made two changes in this file:
- We have commented on the use of the my-app-user user to be able to install a package later. If we are not root we cannot install it.
- We have added “RUN apk add wget” after the copy command, this command installs the “wget” application in our container.
To understand how the layer cache works in Docker we will follow the following steps:
- Build the image 2 times so that the layers are cached, the result of the second creation is the following.
As you can see in the second creation all the layers are cached.=> [1/8] FROM mcr.microsoft.com/dotnet/sdk:8.0-alpine@sha256:658c93223111638f9bb54746679e554b2cf0453d8fb7b9fed32c3c0726c210fe 0.0s => CACHED [2/8] RUN addgroup my-app-group && adduser my-app-user --disabled-password --gecos "" --ingroup my-app-group 0.0s => CACHED [3/8] COPY --chown=my-app-user . /home/my-app-user/app/src 0.0s => CACHED [4/8] RUN apk add wget # New line 0.0s => CACHED [5/8] WORKDIR /home/my-app-user/app/src 0.0s => CACHED [6/8] RUN dotnet build "App.csproj" -c Release -o /home/my-app-user/app/build 0.0s => CACHED [7/8] RUN dotnet publish "App.csproj" -c Release -o /home/my-app-user/app/publish 0.0s => CACHED [8/8] WORKDIR /home/my-app-user/app/publish - Now modify the code of a view or controller in the project, delete the image and regenerate it, the result is the following.
What happened? As we mentioned above, all layers after COPY have been removed from the cache and have had to be re-executed. Among them is the installation of the wget package.=> [1/8] FROM mcr.microsoft.com/dotnet/sdk:8.0-alpine@sha256:658c93223111638f9bb54746679e554b2cf0453d8fb7b9fed32c3c0726c210fe 0.0s => CACHED [2/8] RUN addgroup my-app-group && adduser my-app-user --disabled-password --gecos "" --ingroup my-app-group 0.0s => [3/8] COPY --chown=my-app-user . /home/my-app-user/app/src 0.1s => [4/8] RUN apk add wget # New line 2.3s => [5/8] WORKDIR /home/my-app-user/app/src 0.0s => [6/8] RUN dotnet build "App.csproj" -c Release -o /home/my-app-user/app/build 9.3s => [7/8] RUN dotnet publish "App.csproj" -c Release -o /home/my-app-user/app/publish 2.1s => [8/8] WORKDIR /home/my-app-user/app/publish - Now we are going to change the order of the lines in our Dockerfile, we will put the wget installation line above the COPY line, that is:
RUN apk add wget # New line COPY --chown=my-app-user . /home/my-app-user/app/src - Remove everything you have in Docker with the command “docker system prune -a”.
- Recreate the image twice, the result of the second run is as follows.
As we can see and as expected all layers are cached.=> [1/8] FROM mcr.microsoft.com/dotnet/sdk:8.0-alpine@sha256:658c93223111638f9bb54746679e554b2cf0453d8fb7b9fed32c3c0726c210fe 0.0s => CACHED [2/8] RUN addgroup my-app-group && adduser my-app-user --disabled-password --gecos "" --ingroup my-app-group 0.0s => CACHED [3/8] RUN apk add wget # New line 0.0s => CACHED [4/8] COPY --chown=my-app-user . /home/my-app-user/app/src 0.0s => CACHED [5/8] WORKDIR /home/my-app-user/app/src 0.0s => CACHED [6/8] RUN dotnet build "App.csproj" -c Release -o /home/my-app-user/app/build 0.0s => CACHED [7/8] RUN dotnet publish "App.csproj" -c Release -o /home/my-app-user/app/publish 0.0s => CACHED [8/8] WORKDIR /home/my-app-user/app/publish - Modify some code in the project, such as a view or a controller.
- Delete and generate the image again, this is the result.
What happened this time? Now the RUN apk command was cached and took 0 seconds, while in the previous test it was not cached and took 2.3 seconds to install.=> [1/8] FROM mcr.microsoft.com/dotnet/sdk:8.0-alpine@sha256:658c93223111638f9bb54746679e554b2cf0453d8fb7b9fed32c3c0726c210fe 0.0s => CACHED [2/8] RUN addgroup my-app-group && adduser my-app-user --disabled-password --gecos "" --ingroup my-app-group 0.0s => CACHED [3/8] RUN apk add wget # New line 0.0s => [4/8] COPY --chown=my-app-user . /home/my-app-user/app/src 0.1s => [5/8] WORKDIR /home/my-app-user/app/src 0.0s => [6/8] RUN dotnet build "App.csproj" -c Release -o /home/my-app-user/app/build 8.4s => [7/8] RUN dotnet publish "App.csproj" -c Release -o /home/my-app-user/app/publish 2.2s => [8/8] WORKDIR /home/my-app-user/app/publish
The conclusion we can draw from this example is that by simply changing the order of the lines in the Dockerfile we can reduce the time it takes to create the image.
The goal is to identify the commands that can be affected by a code change (such as COPY) and put as many instructions as we can on top of them to take advantage of the Docker cache.
Let’s look at another example of Docker layers and cache, this time with node:
- We’ll start with the following code, the only thing you need to know is that npm-install installs the project’s packages/dependencies:
FROM node:20.5 WORKDIR /my-app/ COPY . . RUN npm install - Let’s think about it… Which lines in the Dockerfile will be removed from the cache if we change the code in our project? Only COPY and the ones below it.
What does this mean? That every time we touch code it will be necessary to reinstall the node packages. - Let’s now look at the improved version of the code:
FROM node:20.5 WORKDIR /my-app/ COPY package*.json . RUN npm install COPY . . - Let’s think again… Which lines are affected if we modify, for example, a view? Only the last COPY, the first one would not be affected because it only copies the files where the dependencies and packages are indicated.
And this… What does it mean now? Well, if we modify a view of our node project this time the dependencies do not have to be installed again because only the last COPY is deleted from the cache.
Obviously if we add a package/dependency to the project, the first COPY and the rest of the lines below it will be deleted from the cache, which means that the dependencies will be installed and downloaded, but this is obvious and necessary.
Finally let’s see an example of Docker layers and cache with our .NET project:
FROM mcr.microsoft.com/dotnet/sdk:8.0-alpine
RUN addgroup my-app-group && adduser my-app-user --disabled-password --gecos "" --ingroup my-app-group
USER my-app-user
WORKDIR /home/my-app-user/app/src/
COPY --chown=my-app-user ./App.csproj .
RUN dotnet restore "App.csproj"
COPY --chown=my-app-user . .
RUN dotnet publish "App.csproj" --no-restore -c Release -o /home/my-app-user/app/publish
WORKDIR /home/my-app-user/app/publish
CMD ["dotnet", "App.dll"]
If you notice, we have divided the COPY into two parts, one that copies only the .csproj to install dependencies and another that copies all the files. With this we ensure that “dotnet restore” is always cached (except if a new package or dependency is added to the project) and, with this, we reduce the time to create the image in most cases.
Also note that only if you are using the .NET framework, it is important to use –no-restore in the publish because otherwise this layer will do restore and we are not interested in that, it is already done:
=> [1/8] FROM mcr.microsoft.com/dotnet/sdk:8.0-alpine@sha256:658c93223111638f9bb5474 0.0s
=> CACHED [2/8] RUN addgroup my-app-group && adduser my-app-user --disabled-password 0.0s
=> CACHED [3/8] WORKDIR /home/my-app-user/app/src/ 0.0s
=> CACHED [4/8] COPY --chown=my-app-user ./App.csproj . 0.0s
=> CACHED [5/8] RUN dotnet restore "App.csproj" 0.0s
=> [6/8] COPY --chown=my-app-user . . 0.1s
=> [7/8] RUN dotnet publish "App.csproj" --no-restore -c Release -o /home/my-app-use 5.1s
=> [8/8] WORKDIR /home/my-app-user/app/publish
Have you realized how important and powerful the layer cache is in Docker? Simply by changing the order of the lines or thinking for five minutes about how to redo the file we can achieve an optimized speed of image creation.
What is multi-stage in Docker? Practical example
The first step to create a multi-stage file is to understand what a multi-stage Dockerfile is. We can see this in two ways:
- There are several Dockerfiles in one. But… Why would we need several files in one? Well, for example, because we need to use more than one base image.
The clearest example is in .NET, on the one hand we need to use thesdk (mcr.microsoft.com/dotnet/sdk:8.0-alpine)to build and publish and, on the other hand, we need to use theruntime (mcr.microsoft.com/dotnet/aspnet:8.0-alpine)to run our application. - This is when we need to use several base images but, in the end, to launch the application, we only have to use one of them.
Let’s go back to the .NET example, we need the sdk for build and publish but, in the end, to launch the application, we only need the runtime.
This means that our final image will only actually have the runtime installed and not the SDK as it has until now and, since the runtime takes up less space, our final image will take up less space and therefore we will have it optimized.
You must take into account the following important points about a multi-stage Dockerfile:
- With multi-stage, everything that is not necessary from previous stages will not be present in the final image.
For example, if our final stage is the runtime and in between we use the SDK, it will not be installed in our final image or in our container. - Each stage is a completely independent step, this means that we will have to repeat lines such as user creation or we will have to copy folders between stages.
Once we have seen the above, we can ask ourselves… What advantages does a multi-stage Dockerfile provide?:
- Smaller image size if we know how to optimize it well.
- Shorter container execution time because having fewer things installed or a smaller image will start sooner.
- We can continue using the image layer cache to reduce creation time.
Let’s start with the following example, the one we have been using until now:
FROM mcr.microsoft.com/dotnet/sdk:8.0-alpine
RUN addgroup my-app-group && adduser my-app-user --disabled-password --gecos "" --ingroup my-app-group
USER my-app-user
WORKDIR /home/my-app-user/app/src/
COPY --chown=my-app-user ./App.csproj .
RUN dotnet restore "App.csproj"
COPY --chown=my-app-user . .
RUN dotnet publish "App.csproj" --no-restore -c Release -o /home/my-app-user/app/publish
WORKDIR /home/my-app-user/app/publish
CMD ["dotnet", "App.dll"]
And we’ll note down how much the image takes up and the creation time:
- Creation time without cache, approximately 11 seconds.
- Creation time with cache, approximately 0.2 seconds.
- Image size 717 MB.
- What we have in our container, sdk and runtime check output:
~/app/publish $ dotnet --list-sdks
8.0.401 [/usr/share/dotnet/sdk]
~/app/publish $ dotnet --list-runtimes
Microsoft.AspNetCore.App 8.0.8 [/usr/share/dotnet/shared/Microsoft.AspNetCore.App]
Microsoft.NETCore.App 8.0.8 [/usr/share/dotnet/shared/Microsoft.NETCore.App]
Now we are going to modify the Dockerfile to make it multi-stage in such a way that:
- With the sdk we perform the tasks of restoration and publication (build and publish).
- With the runtime we perform the task of executing or starting our application (dotnet App.dll).
The final code of our example multi-stage Dockerfile is the following:
FROM mcr.microsoft.com/dotnet/sdk:8.0-alpine AS sdk
RUN addgroup my-app-group && adduser my-app-user --disabled-password --gecos "" --ingroup my-app-group
USER my-app-user
WORKDIR /home/my-app-user/app/src/
COPY --chown=my-app-user ./App.csproj .
RUN dotnet restore "App.csproj"
COPY --chown=my-app-user . .
RUN dotnet publish "App.csproj" --no-restore -c Release -o /home/my-app-user/app/publish
FROM mcr.microsoft.com/dotnet/aspnet:8.0-alpine AS runtime
RUN addgroup my-app-group && adduser my-app-user --disabled-password --gecos "" --ingroup my-app-group
USER my-app-user
COPY --chown=my-app-user --from=sdk /home/my-app-user/app/publish /home/my-app-user/app/publish
WORKDIR /home/my-app-user/app/publish
CMD ["dotnet","App.dll"]
Some comments about the code:
- We can use “AS” to name one stage and then reference it in another.
For example, we have called the first stage “sdk” and we use it in the “runtime” stage with the parameter--from=sdkwithin the last COPY. - Both the restoration and the publication are done with the sdk.
- The execution is done with the runtime, for which it is necessary to copy the “publish” folder between the stages since it is the one that contains the compiled application ready to be started.
- The user must be created twice because each stage is independent of the other, in fact, in the first stage we could save the issue of security and users in Docker.
And let’s compare the metrics we obtained before:
- Creation time without cache, approximately 13 seconds. It takes longer because now it is downloading two images instead of one.
- Creation time with cache, approximately 0.2 seconds. Again, although the layers are cached it can take longer because there are more steps to perform.
- Image size 117 MB, compared to the previous one that occupied 717 MB we have saved 600 MB.
- What we have installed in the container, SDK and runtime check output, as you can see now we don’t have SDK and we have the runtime:
~/app/publish $ dotnet --list-sdks
~/app/publish $ dotnet --list-runtimes
Microsoft.AspNetCore.App 8.0.8 [/usr/share/dotnet/shared/Microsoft.AspNetCore.App]
Microsoft.NETCore.App 8.0.8 [/usr/share/dotnet/shared/Microsoft.NETCore.App]