
In this post we will talk about the theory and the most important concepts of Docker. Keep in mind that understanding this basis is essential and, as a consequence, if I had to choose the most important topic of all those in this Docker course it would be this one.
I will tell you my case: I have tried to study Docker many times and none of them have been successful… Why? Basically because I studied the theory and the concepts of Docker superficially and then went straight to practice with commands and files… As you can imagine I understood very little of what I was doing and it was very difficult for me.
That is why I recommend that you make sure you understand very well all the concepts that I explain below, this way you will be halfway there and everything we do in the practical part will be tremendously simple for you.
What is Docker?
Docker is a virtualization system that allows us to build, run and deploy applications in a simple, portable, fast and reliable way:
- Portable, perhaps the most important feature since it allows an application along with its dependencies to always work well on any computer without having to configure it or follow complex guides.
- Fast, it only takes a few seconds to deploy a container and make the application it contains start working.
- Simple, it will only be necessary to create, at least, a small file in the project to indicate its dependencies and how it should start so that the application starts working within a container.
- Reliable, an application will always run correctly, without errors, anywhere, as long as we have done the corresponding initial tests.
Some examples and advantages of Docker are:
- Development teams. Let’s imagine a development team that has 5 members and all of them have their computer correctly configured and the application running on their premises, however, the project configuration or onboarding process takes at least 2 days since many things have to be installed for everything to work correctly.
With containers we can reduce the onboarding process for a new developer to 10 minutes. We would simply send them the projects with their Docker files and they would only have to run them and create containers with them to have the application running locally.
In addition, with Docker we ensure that the application will work for the new developer since, as we have said, containers are reliable since they always run in the same way. If the application works for one developer running in a container, it will also work for the rest and for the new members since it does not depend on the configuration of their machine. - Different environments. Let’s suppose that we have a development environment and a production environment with different configurations where, every time we have to upload something to production, we have to give the systems team complex instructions on how they should deploy the application and its configurations. This process, in addition to requiring time, is very prone to human errors.
With Docker and containers we can eliminate possible errors in deployments and reduce publication time because all we have to do is send the Docker configuration file to the systems team so they can run and create the container. - Different versions. If we had 3 projects running on different versions of .NET (for example .NET 5, .NET 7 and .NET Core 2) without containers it would be necessary to have all these versions installed on our computer and in the production environment. This not only consumes resources but, both in .NET and in other frameworks, this can lead to incompatibilities between them.
If we use different containers for each version we reduce disk space since it is not necessary to always have all versions of .NET installed and running on our computer. In addition we avoid possible incompatibilities due to having different versions of the same framework installed at the same time.
Images and containers in Docker
Differences between containers vs virtual machines
The best way to understand what a container is is to compare it to virtual machines.
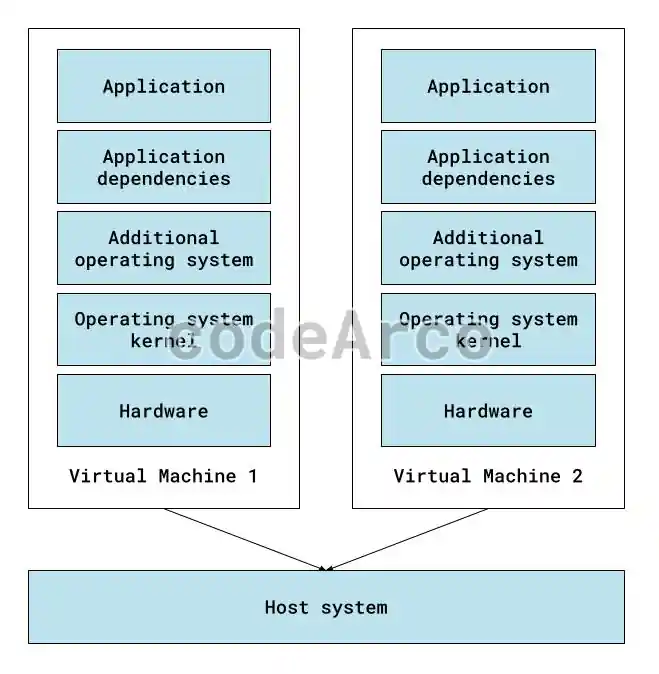
A virtual machine is a virtualized computer where applications can be run in isolation. We can define it through the following characteristics:
- Everything is virtualized, including the hardware. Examples of elements that are virtualized are the processor, RAM, the full operating system, and the application itself.
- It is necessary to install the full operating system, either manually or automatically. Do you remember those days when it was necessary to manually install Windows and fully configure it before having your virtual machine ready?
- They are slow to start since they have to simulate and start absolutely all the components of a computer.
- They take up a lot of space since they need to store information about everything they simulate, such as the paging file, RAM, the full operating system, and the application code.
- They consume a lot of resources from the computer on which they are hosted. For example, if we have a virtual machine with 4GB of RAM inside a computer with 12GB, the host computer will only be able to use a maximum of 8GB since it reserves 4GB for the virtual machine even if it does not use all that RAM.
A container is an isolated box where applications can be run. Some of its characteristics are:
- They use the hardware and kernel of the host operating system. This does not mean that containers do not have an operating system, what they do not have is the kernel of the operating system because they use the host system.
As a reminder, the operating system kernel is the part that is responsible for communicating the applications with the hardware, such as reserving and consuming RAM, using the processor to perform calculations… etc. - As a consequence of the above, only a small part of the resources are virtualized, which are the part of the operating system that is not part of the kernel, the application dependencies and the application itself.
An example of this would be a container where we install the Alpine operating system, on top of it we install .Net Core 2 and on it we run our application. - There is no need to install the entire operating system, and the part that is installed is done fully automatically.
- They are quick to start because they do not have to simulate and start many components, only those that are strictly necessary.
- They do not take up much space compared to virtual machines, while a container can take up 200 MB, a virtual machine with similar characteristics can easily reach 8 GB.
- They consume fewer resources from the host system. Following the example of virtual machines, in a container we do not indicate how much RAM it has and it is not fully blocked in the host system, simply use what you need at any given time.
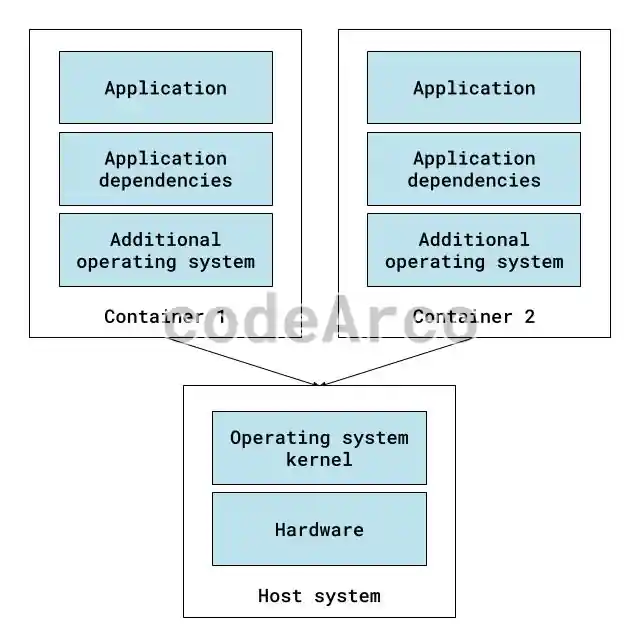
Finally, it is worth mentioning that, since containers use the kernel of the host operating system, they can be of two types: Linux containers and Windows containers. Obviously, a Linux container can only be run on Linux and a Windows container on Windows.
Image vs container Docker
Before defining an image in Docker, it is necessary to know the differences between an application and a process:
- An application is nothing more than the code of a program stored on the hard drive of our computer.
- A process is the application running on our computer. In addition, a process can be in an active state, paused, or fully stopped.
Once we know these concepts, it is easy to define what an image is in Docker, it is the code of our application together with the code of its dependencies stored somewhere. Following the previous example, the differences between an image and a container in Docker are:
- An image is the code of a program together with its dependencies stored anywhere, for example, in the cloud or on the hard drive of our computer.
- A container is the image running in an isolated environment or drawer. In the same way as a process, a container can be in an active, paused or stopped state.
What are the layers of an image?
Do you remember that we said that an image is the code of an application together with its dependencies? Well, in that definition it is explicit that an image is a set of layers, that is, it is made up of several parts.
Suppose we have an API written in .NET, we can say that an example of image layers in Docker is:
- Operating system, we need a base on which our .NET application works, for example, Ubuntu.
Remember that the core of the operating system does not belong to the image or the container, but rather the core of the host operating system is used. - .NET environment, we also need the ecosystem necessary for our application to run, in this case it could be .NET 8 for Linux because we have the API in .NET Core.
- Application dependencies, let’s suppose that our API has a method that accesses a database and generates an Excel that sends an email. Well, we will need to install the libraries to access the database (Entity Framework Core), to create the Excel (Epplus) and to send the email (System.Net.Mail).
- Application code, finally, after everything necessary, we will have the code of our program written, for example, in C#.
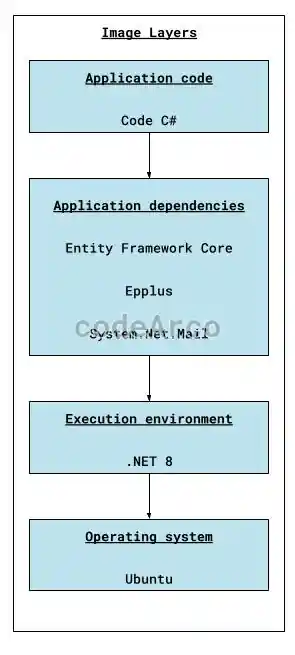
Image repositories
Just like we can store the code of an application in a repository like Github, we can also store an image in image repositories like Docker Hub. Just like in GitHub, repositories can be public or private.
Some useful examples of public repositories in Docker Hub can be the WordPress image and the SQL Server image.
Now, you might be wondering, why do I need an image repository like Docker Hub? Well, let’s suppose that you want to install WordPress locally, you have two options:
- Manual installation. This requires, among other things, installing PHP on your computer, installing and configuring a web server like Apache, hosting the WordPress code in Apache, making the thousand configurations necessary for it to work and finally running it.
Some problems you may encounter are that the PHP version on your computer is not the correct one for the version of WordPress you want or that, after configuring many things on your computer, you cannot get your WordPress installation to work. - Installation through a Docker container. All you will need are a couple of commands to download the WordPress image and run it in a container, all the dependencies such as Apache or PHP will already be included and you will not have conflicts between versions.
Containers and volumes in Docker
One of the characteristics that define containers is that they do not have persistent storage, that is, when a container is deleted and created again, all the information that has been generated in the old one disappears.
Suppose we have a container where we have an API that stores data in a local database, well, the moment we delete and create the API container again, the database will be deleted and, with it, all the data that we have stored.
This is why volumes in Docker exist, a concept that allows one or more containers to share the storage of the host system to make data persistent between them.
Following the previous example, if we store the API database in a volume we will not have the problem of data being deleted when we recreate the container, thus having it available for any container in our system.
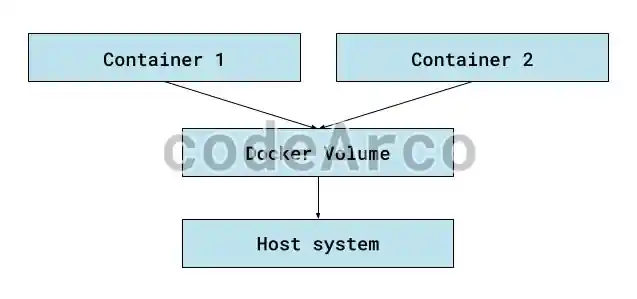
An important point to keep in mind is that the storage of a container is not deleted when it is restarted, only when we delete it and create a new one exactly the same. We will check this point in practice so that you can see the differences.
Containers and configuration variables
It is important to be clear that an image is executed in a container and, to do so, it is necessary to provide it, in most cases, with configuration variables.
We will follow the previous example where we have an image of an API in .NET that connects to a database, but this time it is not local but external. In addition, we want to run it in two different containers, one for development and one for production. Obviously, the database connection string will be different for both environments.
Well, the configuration variables are used for the previous scenario, that is, they allow the same image to have different behaviors when executed in different containers.
In the previous example, when executing each container, through the configuration variables, we will pass different connection strings so that each API points to a different database.
Container sets or packages in Docker
What is a container set or package?
A container set or package in Docker is nothing more than a group of containers that have something in common with each other, that in one way or another are related to each other.
Keep in mind that this concept does not really exist in Docker but I think it is necessary to understand other more advanced concepts.
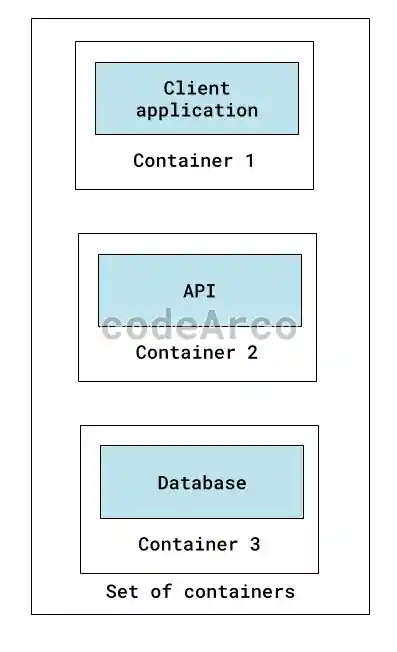
Following the previous example where we had an API in .NET, we can expand it in such a way that we now have three containers:
- Client application with MVC .NET that accesses the API.
- API in .NET Core 3.
- SQL Server database that the API accesses to query and modify data.
We can see the above as a container package because it meets the following characteristics:
- They are part of the same project or solution.
- They are dependent on each other since, if one of them were missing, the others would not work or would not make much sense.
- They need to communicate with each other, at least the application must communicate with the API and, in turn, the API with the database.
- They are deployed in a specific order, first we should deploy the database, then the API and finally the client application.
If we alter this order, it is possible that, for example, the application calls the API without it being up and running and, as a consequence, an error is thrown to the user.
Networks and ports in Docker
One of the characteristics of container packages is that containers need to communicate with each other, but… How do they do it? Well, the answer is simple, through Docker networks and ports.
By default, a container is an isolated space where an image can be run, this means that, by default, a container is not accessible or can communicate with anyone.
On the one hand, we have Docker networks, which are simply a group of containers that, internally, can communicate with each other.
This means that a Docker network does not allow access from outside, it simply allows internal communication of the containers that are within it.
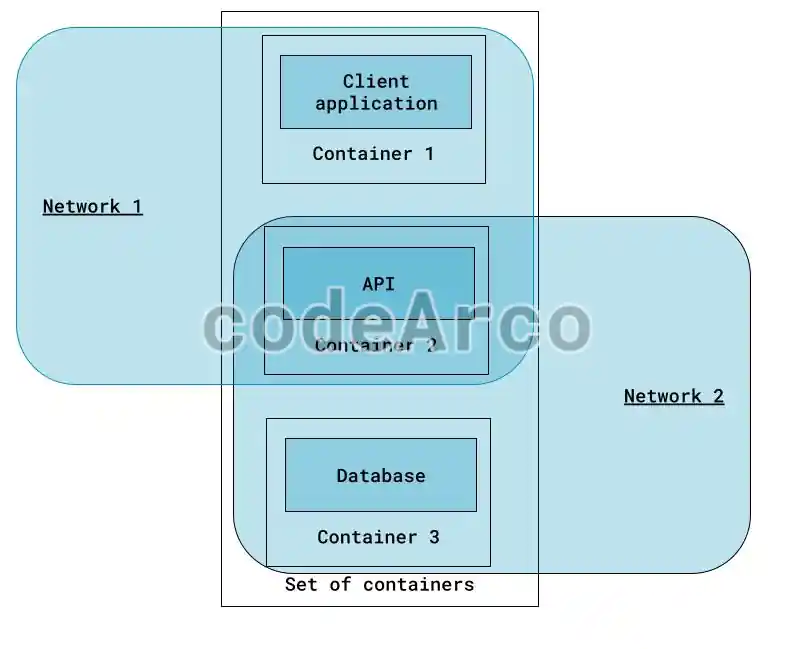
Following the previous example, we have the following requirements:
- The client application must be able to communicate with the API.
- The API must be able to communicate with the database.
- No other communication is allowed, for example, the client application cannot communicate with the database directly.
The way to satisfy these requirements is by creating two Docker networks:
- Network 1, where the client application and the API will be.
- Network 2, where the API and database will be.
At this point you might be wondering… If containers are not accessible by default from outside… How can the user access the client application? Well, that’s what Docker ports are for, to allow communication from both inside and outside:
- Private ports allow communication between containers.
- Public ports allow communication between a container and the outside.
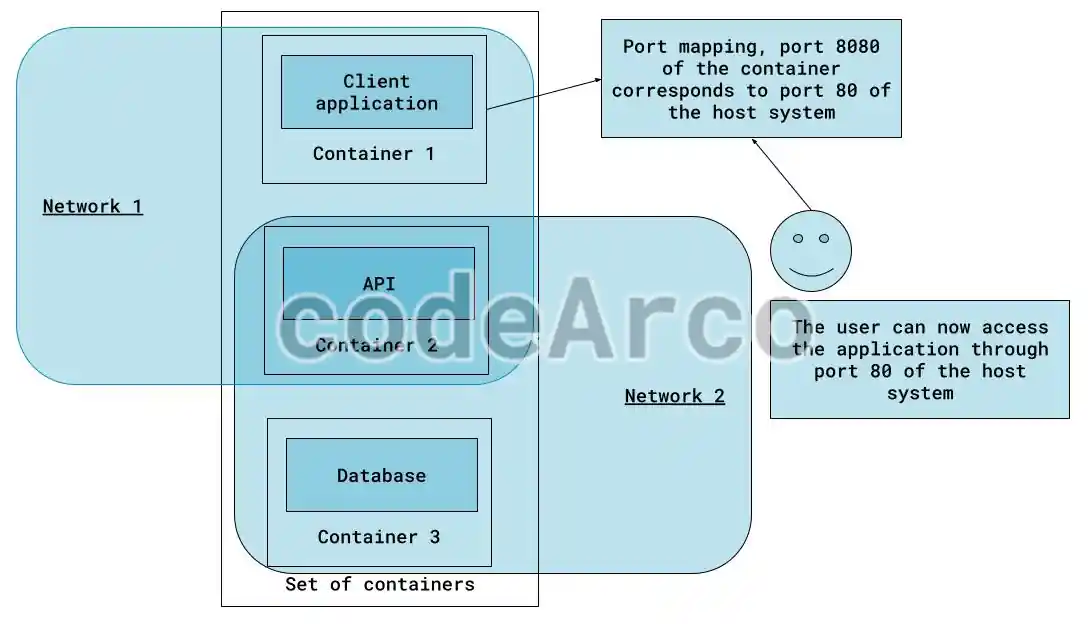
As we can see, following the previous example, if we wanted to allow access to the application container we should use ports and, more specifically, map them, in such a way that we tell Docker “Port 8080 of the application container corresponds to port 80 of the host system”.
This will allow us, if the host system is a server accessible from the Internet, that any user can connect to the application through port 80 which, in turn, points to the container that is running our client application.
Dependencies between containers
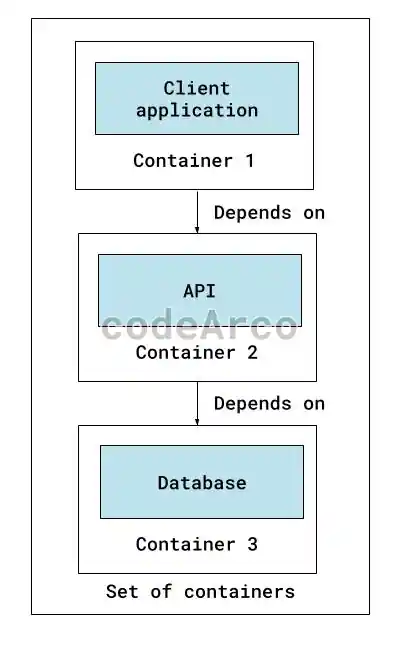
Dependencies between containers allow us to satisfy the point mentioned above, that is, that when they are executed within a group, they must follow a certain order.
Following the previous example we can see that:
- The client application container depends only on the API container.
- The API container depends only on the database container.
- The database container does not depend on anyone.
- The application container does not depend on the database container directly and vice versa.
Dockerfile and docker-compose.yml
What are Dockerfile and docker-compose.yml used for?
In Docker there are two ways to create images and run them in containers:
- Through commands, for which we need to install a program on our computer and, through its terminal, run the necessary commands.
- Through files that contain the instructions necessary to create the images and run them inside containers.
Well, Dockerfile and docker-compose.yml are used to generate images and run them in containers through files, that is, the second option.
Without these files we would be forced to store all the commands somewhere so that, every time we create or run an image in a container, we write them by hand through the terminal.
We can see it as a .bat file in Windows or a .sh in Linux, that is, they are files that store a set of commands and that we can execute at once with a single instruction.
Finally, it is worth noting that these files are usually found in the root of the corresponding project in order to create its images and containers.
Differences Dockerfile vs docker-compose.yml
You may be wondering, what is the difference between Dockerfile and docker-compose.yml?:
- Dockerfile allows you to define the instructions necessary to create an image.
An example of a Dockerfile would be to indicate that we want our API to run on Ubuntu, use the .NET Core 3 version, which has X dependencies and the instructions necessary to compile and publish. - docker-compose.yml allows you to define the instructions necessary to create a set of containers with everything we have seen previously, such as networks, dependencies, ports and configuration variables.
An example of docker-compose.yml would be to indicate that we have three containers where the client application depends on the API and the API depends on database. We could also indicate the database user and password.
How to install and test Docker locally
In the following tutorials of this Docker course we are going to move on to practice and, to do so, we need a program that allows us to create Docker images and containers.
Well, the program that allows us to install and test Docker locally is Docker desktop, which you can download from the link above.
Keep in mind the following two points:
- You must select the version corresponding to your operating system.
- Please read the requirements and instructions for the operating system in question, because if you don’t meet any of them, strange things may start to happen when you’re running commands.
Once you have Docker desktop downloaded and installed on your computer, open the terminal through the icon that appears at the bottom right and, in it, enter the command docker version:
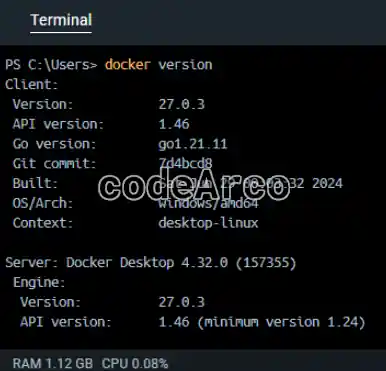
If everything has gone well during the installation process, you will see the full information of the version of Docker installed on your computer as shown in the image.
What is Kubernetes?
You may have heard this concept every time Docker is mentioned… Well, I can tell you in advance that this is not part of this Docker course and that we will see it later in the blog. However, I think it is necessary to see it and understand it superficially to have a basic notion about it and avoid confusion.
Kubernetes is a system that allows you to run, distribute and replicate containers on different servers known as “Pods”.
Some of the advantages offered by Kubernetes are:
- High availability since a container can be replicated on N servers.
- Scalability, if a container receives many requests we can scale it and replicate it on different servers to reduce the load on each of them.
- Load balancing, derived from the previous point, by having the same container on multiple servers the load between each of these copies is balanced.
- Optimization of resources, costs and infrastructure, similar to Azure, Kubernetes allows to dynamically expand or reduce the resources (servers) assigned to each container, this technique is better known as horizontal automatic scaling.
Practical Docker example and general scheme
The following practical Docker tutorials are based on a repository made up of three .NET projects:
- .NET MVC application that accesses an API to query and insert employees.
- .NET API that performs its operations on a SQL Server database.
- SQL Server database on which the API performs the operations.
In this repository there are two branches, “WithoutDocker” that contains the three projects without Docker and “WithDocker” that contains the final result of implementing Docker in practice.
The general Docker scheme that we are going to implement is made up of the following points:
- Three images, one for each project. In turn, each image will have N layers.
- Three containers, one for each of the images created previously.
- A volume to allow persistent storage of the database on our host computer.
- The necessary configuration variables such as, for example, the database user and password.
- A set of containers or package where we will introduce our three containers.
- Two networks that will allow communication, on the one hand, between the MVC application and the API and, on the other hand, between the API and the database.
- A port mapping that will allow us to access the .NET MVC client application from the outside.
- Dependencies that will allow us to define the order of execution of the containers, that is, the API depends on the database and the client application depends on API.
- Dockerfile file in each project to create the images for each of them.
- Docker-compose.yml file to configure all of the above and create our container group.
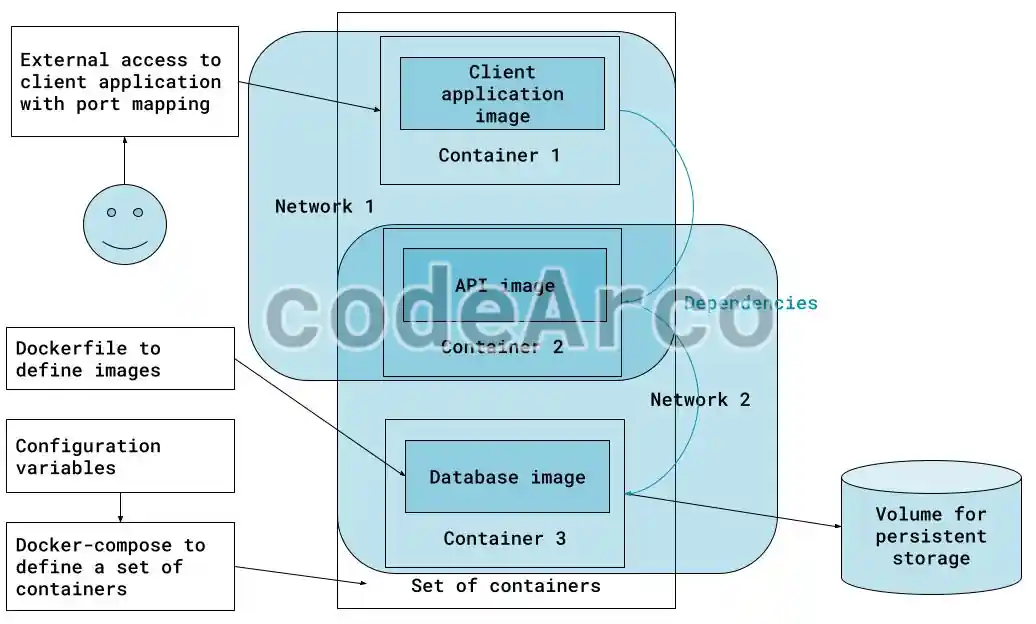
Maybe something is not entirely clear to you. Although my recommendation is that you try to understand everything in this tutorial, keep in mind that later in the Docker course we will see all these concepts in practice.