In this article we will learn how to install WordPress locally, that is, on our computer, without having to hire or pay for a hosting service. To do this, you first need to know a series of important WordPress concepts:
- What is WordPress?. WordPress is a CMS or content manager that allows us to create web pages without the need for code or programming knowledge. For this to work, a database is necessary to store the data (MySQL) and a web server to send the web pages to users (Apache). Additionally, all of the above is possible thanks to the PHP programming language.
- What is XAMPP?. XAMPP is a package of software tools or programs that includes everything necessary so that we can install WordPress locally. Among other tools we find the Apache web server, the MySQL database system and the PHP programming language interpreter.
- What is MySQL?. MySQL is the database system that will allow us to store all the necessary WordPress information such as, for example, posts, pages, users, permissions and plugins installed in our website.
- What is Apache?. Apache is a web server that will allow us to send web pages to users when they enter a web address or url in the browser.
- What is PHP?. PHP is the programming language that acts as a union or link between the different systems and that allows you to write instructions or orders that will be interpreted by the Apache web server, which will consult MySQL and will deliver the result to the users. An example of PHP would be to consult the title and description of all our posts and list them in the Home page of our WordPress.
Why should I install WordPress locally?

You may be wondering what is the positive part of having WordPress locally… well, below we are going to list some advantages of install WordPress locally:
- Backups. The first reason that comes to mind is the possibility of making a backup or a copy on your computer of all the content of your website, including the posts, plugins, configurations and customizations that it has taken you so much effort to make.
- Safe modifications. Have you ever thought about modifying something in WordPress but in the end you have ruled it out for fear of breaking something on your website? Well, with this method you can forget about the fear, you can make any modification first locally and, if everything turns out as you expected and you haven’t broken anything, you can replicate the change on the real production web page.
- Secure updates. Updates, both to WordPress and to the plugins you have installed on your website, can sometimes be disastrous and incompatible with each other, causing certain functionalities of your website to stop working. Well, as before, you can first perform the update locally and, if everything goes well, replicate said update on your real website.
- Research plugins and features. Have you ever wondered how the Gutenberg block editor works or what functionalities the Yoast plugin brings to your blog but you don’t want to implement it until you have all the information available? Well, the best way to know these things without having to modify your website is to install and test locally first.
- Testing or tests. Perhaps you want to test what speed and performance improvements for SEO a WordPress plugin offers you by automatically optimizing and compressing images or what information is sent to Google Tag Manager when the user rejects cookies in your banner with consent mode v2. The best way to know all this information is to carry out all these tests locally and leave the production environment aside as much as possible, until all possible tests have been carried out.
- Reduce hosting costs. Some hosting providers offer a testing or staging environment for a certain price. With this solution we can avoid these costs and even completely control and configure the testing environment without the limitations of our provider.
Once we have understood all the previous information, it is time to follow the steps to install WordPress locally:
- Install XAMPP locally. We will download XAMPP from the official website and follow the steps of the installation wizard.
- Test installation of XAMPP, for which we will check, in turn, the correct functioning of MySQL and the Apache web server.
- Create a MySQL database locally for WordPress, for which we will follow a few simple steps and, later, we will verify that it has been created correctly.
- Install WordPress on XAMPP and localhost. We will follow the steps of the program to install WordPress where we will have to, among other things, enter the name of the database that we created previously and its user.
- Check the correct installation of WordPress for which we will access the administration interface and create a test post that we will later view through the browser.
How to install XAMPP locally
The first step is to download XAMPP from its official website and for the corresponding operating system. After that, we will follow the steps to install XAMPP:
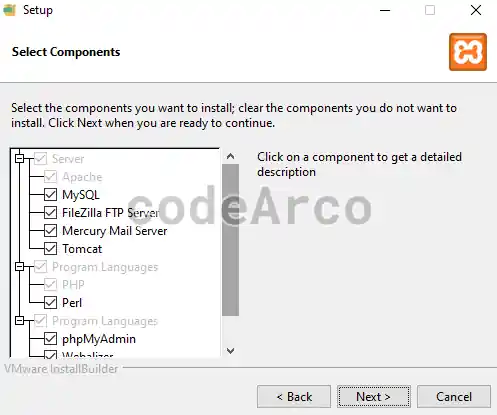
- Choose the components to install, in our case only Apache, MySQL and phpMyAdmin will be necessary, although you can leave them all selected in case you need them in the future.

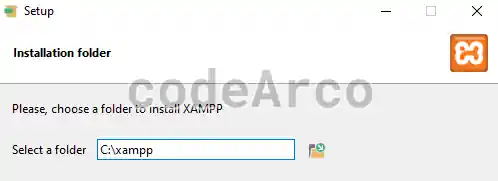
Choose components install XAMPP - After that we select the path where XAMPP will be installed, write it down because later it will be necessary to access it.

Select XAMPP installation path - Select the XAMPP language, you can only choose between English and German.
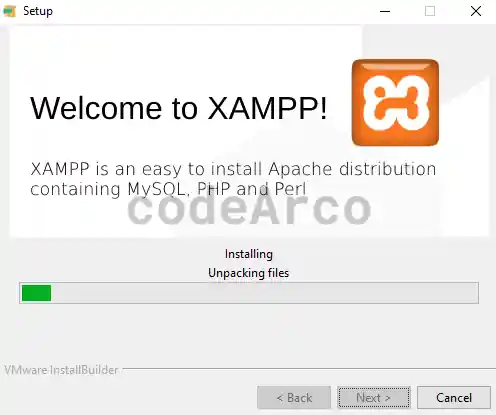
- Finally we wait for the installation wizard to finish.

XAMPP installation process
Test XAMPP installation
The next step is to verify that the XAMPP installation is correct, for which we will check both the Apache web server and the MySQL database:
- Open the XAMPP control panel, which you can find in the menu of your operating system as “XAMPP Control Panel”.
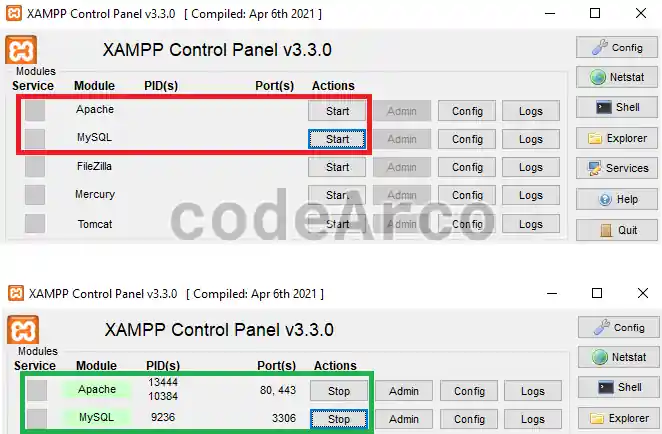
- Start Apache and MySQL by clicking on the “Start” buttons that appear to the right. After a few seconds we will see that the name of both services appears in green.

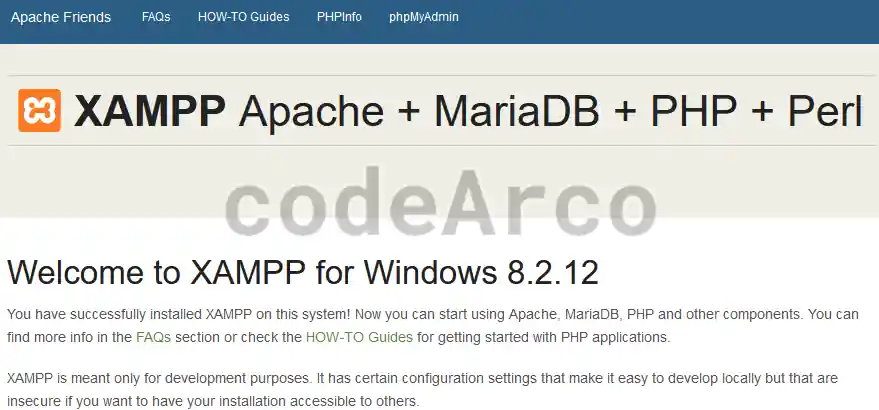
Start Apache and MySQL in XAMPP - Open the Apache admin, either through the “Admin” button on the previous screen, or by accessing the path “http://localhost/dashboard/” from the browser. We will check that a welcome screen similar to the following appears:

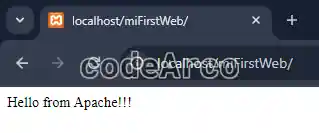
Test Apache installation in XAMPP - Additionally, we are going to create a test website. To do this you must create, in the path where we installed XAMPP, folder “htdocs”, a new folder called “miFirstWeb” with an index.html file and with the content “Hello from Apache!!!”. If you have not touched the default path of XAMPP, the index.html file should be found in the path “C:\xampp\htdocs\miFirstWeb\index.html”.
Finally, we test from the browser that our website appears by accessing the address “http://localhost/miFirstWeb/”.
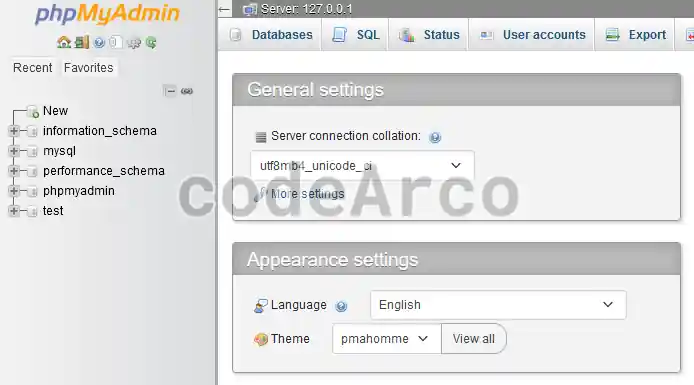
Apache in XAMPP create test website - Open the MySQL admin, again, we can do it from the XAMPP control panel or through the path “http://localhost/phpmyadmin/index.php”. The page should look similar to the following:

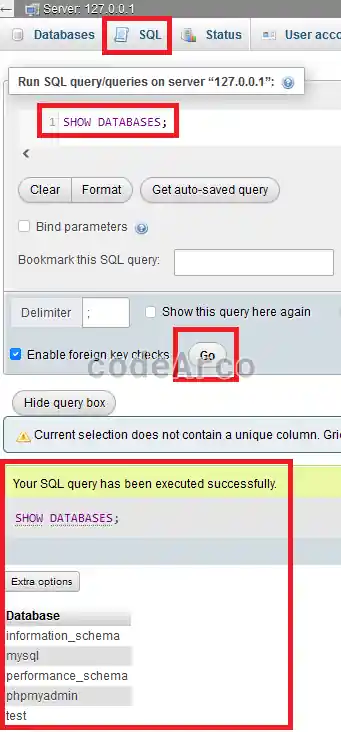
Test installation of MySQL in XAMPP - Check that we can execute queries, for which we will go to the SQL section of the top menu, within the text box we will enter the query “SHOW DATABASES;”, we select the “Go” button and, at the bottom, the message “Your SQL query has been executed successfully” along with the result of the query, that is, the list of databases that come by default in MySQL and XAMPP:

MySQL in XAMPP run test query
Create MySQL database for WordPress locally
Next we will follow the steps to create the MySQL database for WordPress that will later be requested when install WordPress:
- Open the MySQL administrator through the address “http://localhost/phpmyadmin/index.php”.
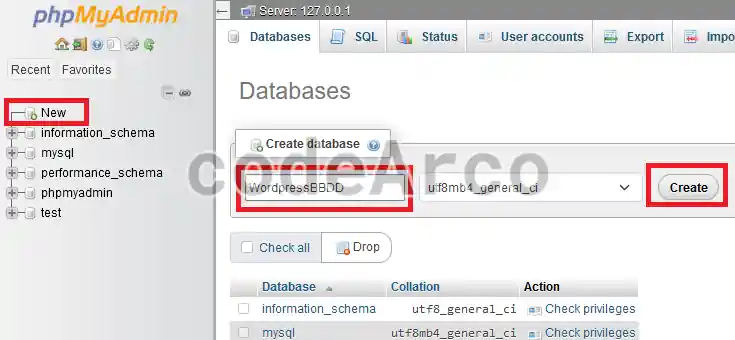
- Create the database through the “New” button, we give it a name that we will write down because later they will request it from us and we click on the “Create” button.

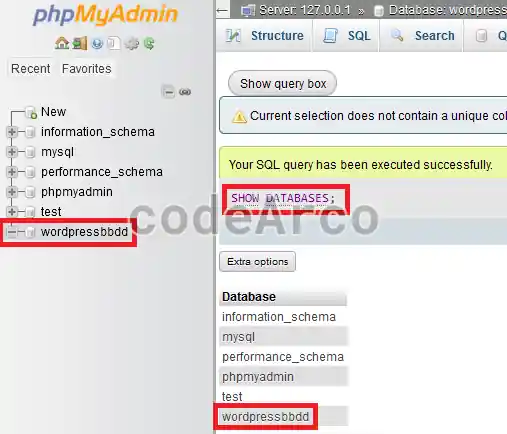
Create a MySQL database to install WordPress - Check that the database has been created both in the side menu and by executing the query “SHOW DATABASES;”, within the “SQL” section:

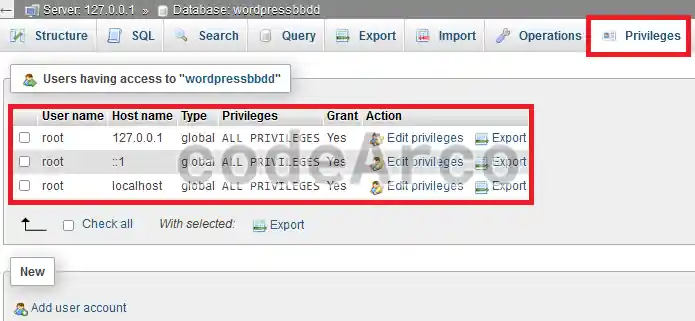
Test MySQL database for WordPress - Finally we will go to the “Privileges” section accessible from the top menu and we will write down the name of the administrator user who is the one who has, within the “Privileges” column, the value “All privileges”. Generally the default name is “root”.

MySQL and WordPress administrator user
How to install WordPress locally with XAMPP
Finally, the time has come to follow the steps to download and install WordPress locally with XAMPP:
- Download the latest version of WordPress from its official website. Do not confuse “.com” with “.org”, the official page is the one that ends in “.org”.
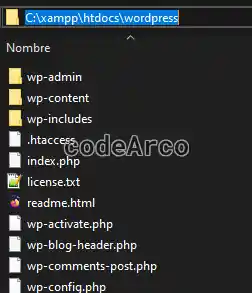
- Unzip the zip into the path where we installed XAMPP, “htdocs” folder. For example, we could unzip it, if we have not changed the default path of XAMPP, to the path “C:\xampp\htdocs\wordpress”.

Install WordPress zip in htdocs - Open the WordPress installer through the address “http://localhost/wordpress” or the name you have given to the folder within htdocs.
- Choose the installation language after waiting a few seconds for the previous address to load.
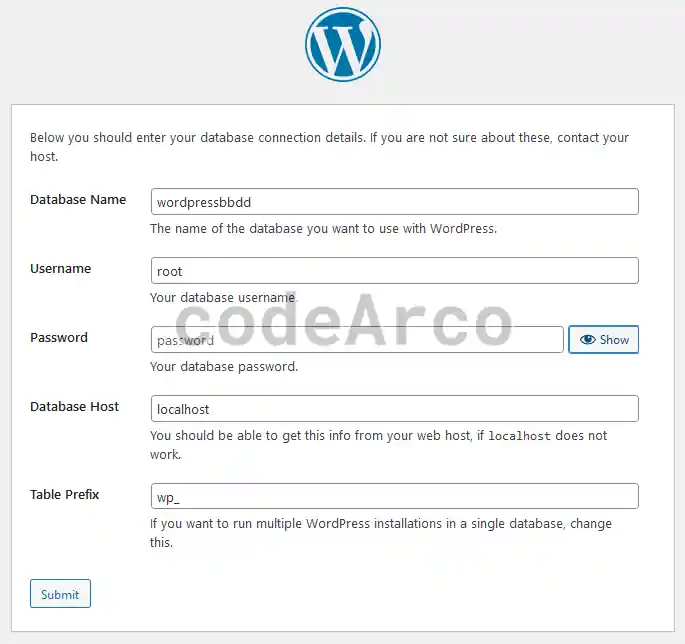
- Establish the database configuration that we created earlier. The name we used was “wordpressbbdd”, the user was “root” and, by default, MySQL in XAMPP does not have a password. We leave the rest of the fields by default.

Local WordPress database configuration - If all the previous information is correct, a screen will appear where we will select the “Run the installation” button.
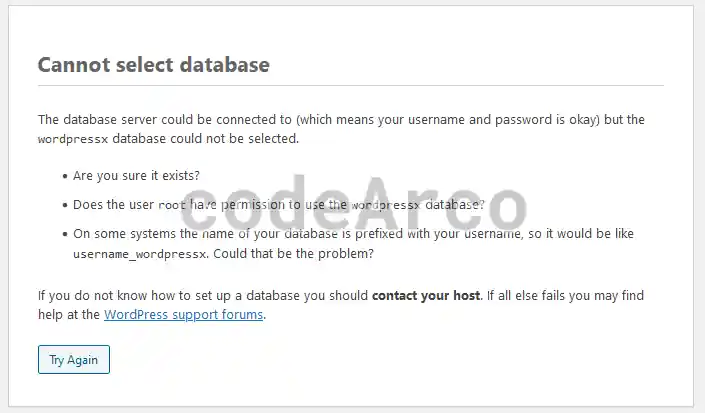
If, on the other hand, we get the message “Cannot select database” it means that some of the previous data is incorrect, such as the name of the database, the name of the administrator user or the password of said user.
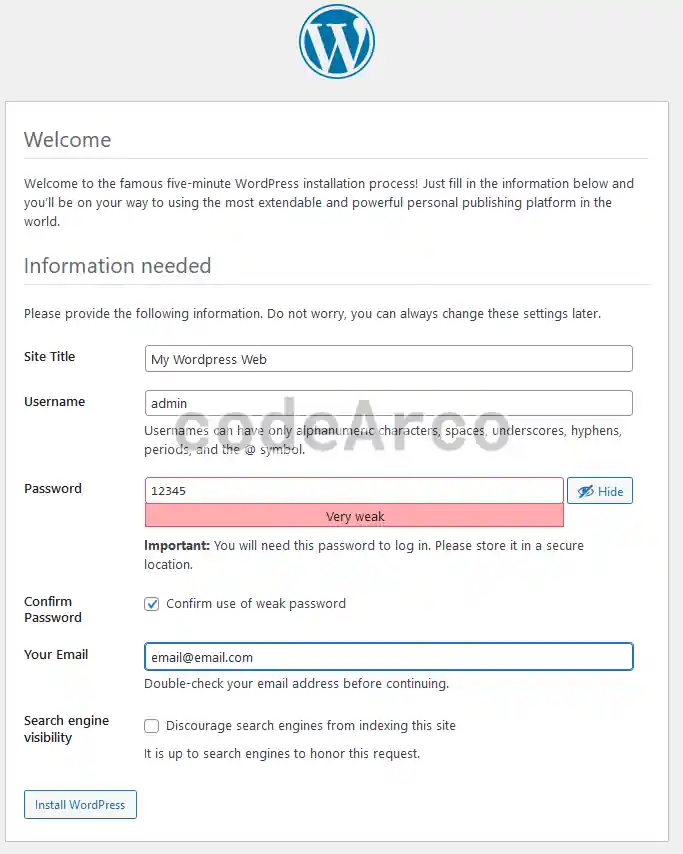
WordPress cannot select database - Fill in the data from the WordPress website, such as the name of the website, the name of the administrator user, their password and an email.

WordPress web data locally - Finally we have finished installing WordPress locally and we can access the login through the url “http://localhost/wordpress/wp-login.php”.
Test WordPress installation
As a last step we are going to check the local installation of WordPress, for which we will follow the following steps:
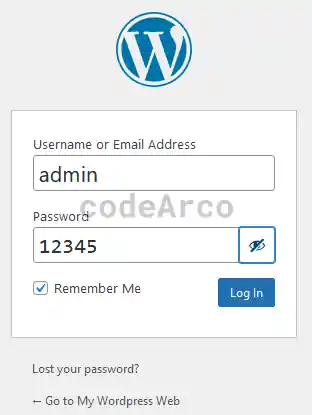
- Access the WordPress login “http://localhost/wordpress/wp-login.php” and enter the data that we entered in the installation process:

WordPress login on localhost - Create a test post, to do this we will select “Posts”, “Add new post” through the side panel.
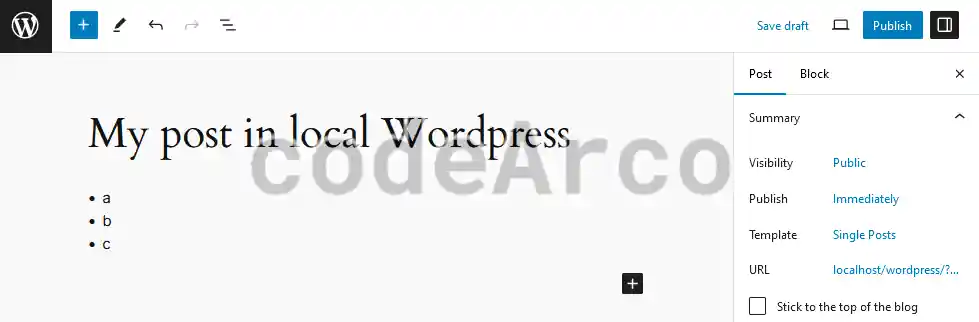
- Add some content to the post and click on “Publish”. Once published, we will go to it through the “View post” button.

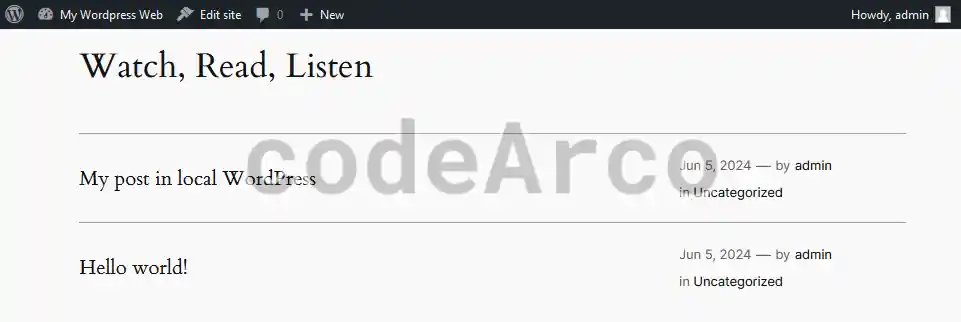
WordPress create post locally - Finally we check that our WordPress site correctly loads the content of the theme that we have activated by default through the url “http://localhost/wordpress/” and that, in the list of posts, we can see the post that we have created in the previous step.

Test WordPress installation locally