
In this tutorial we will learn how to configure and install consent mode V2 for WordPress using a free plugin.
We will assume that we have a website with Google Tag Manager to manage the different Google tags such as, for example, Google Analytics 4, Google Search Console or Google Ads.
What is Google consent mode V2?
Consent mode V2 in Google is a new implementation by Google that allows users, for products and tags of Google, to tell what information it may or may not receive, store and process about them.
An example of consent mode V2 would be, for a user who visits our website who has Google Ads installed, to indicate to Google that they allow it to use their information for analytical purposes but not for advertising purposes.
This consent is done by sending signals, better known as consent parameters, among which we find the following:
- Ad_storage. Allows you to store content related to advertising.
- Ad_user_data. Allows you to send information about the user for advertising purposes.
- Ad_personalization. Give consent about personalized advertising.
- Analytics_storage. Allows user information to be processed for analytical and statistical purposes.
- Functionality_storage. Grants consent to store information related to the correct functioning of the website.
- Personalization_storage. Allows you to store information about customization topics.
- Security_storage. Grants consent to store information related to website security.
Additionally, it is worth knowing that consent mode V2 has two operating modes, basic mode vs advanced mode:
- Basic mode, consists of blocking tags, scripts and cookies that belong to a category until the user gives consent. No data is sent to Google until the user allows it.
For example, if the user consents to “Analytics_storage” the tags in this section will be triggered, such as Google Analytics 4, and they will work as usual, collecting analytics data.
On the other hand, if the user does not consent to “Analytics_storage”, the tags, cookies and scripts in this section will not be activated and, as a consequence, no analytics data will be collected for Google Analytics 4. - Advanced mode, where the tags, scripts and cookies are executed before the banner appears on our website. Once the user establishes their consent, they communicate to Google Tag Manager and the tags adjust their behaviors by collecting and processing only the data that they have been allowed. Data is sent even if the user does not consent.
This mode is completely optional and is what we will implement in the following sections.
Difference cookies vs consent parameters
Up to this point we have understood that Google has implemented a system so that the user can decide what information can be sent and processed to Google through the consent parameters but… What does this have to do with cookies?.
Well, before starting this consent mode V2 and WordPress tutorial, you need to understand the difference between cookies and Google consent parameters:
- A cookie is nothing more than a file that is stored in your browser and sent to servers and services such as Google so that they remember and know certain aspects such as, for example, whether you are logged in or not, whether you have activated the dark theme or not or what are the last searches you have performed in the search engine in order to personalize the ads. For each service, whether Google or not, there are one or more cookies.
- Google consent parameters are nothing more than values or signals that we send to Google to give or withdraw consent to receive, process and analyze certain information about us through cookies. The consent parameters are also common to all cookies.
An example of cookies and consent parameters (very superficial and unrealistic) would be the Google Ads cookie. We allow Google to store this cookie on our computer but, through the consent parameters, we can tell it to only process this data for analytical purposes (for example to know from which device we click on the ad) but not for ads personalization purposes or advertisement purposes.
What happens if I don’t have consent mode V2 on my website?
Quick response, nothing serious, you can continue with your old cookie banner, however I recommend that you continue reading…
We could summarize what happens if we do not have consent mode V2 configured on our website in two points:
- At a legal level nothing happens, you will not be financially sanctioned. However, remember that the consent parameters are not the same as cookies and, therefore, this is not the same as the cookie banner and the privacy policy and so on, the latter are mandatory and, if you do not have them, you can be penalized financially.
- At the level of Google products we may have restrictions. If you have ads on your website, it is possible that they will no longer be personalized and may even stop appearing. If you only have Google Analytics 4, Search Console or Tag Manager there is nothing to worry about (for now) although, personally, I recommend configuring it anyway and being ready for future changes.
How to check if I already have Google consent configured?
First of all, we are going to make sure and follow the steps to check if we already have consent mode V2 configured on our website, perhaps some plugin or technology that we have installed has already activated it automatically (although it is not the most common). We will start from the scenario, as I have already said, of a website that manages all its tags with Tag Manager:
- Access our Tag Manager account, select the account and the appropriate container and click on the “Preview” button:

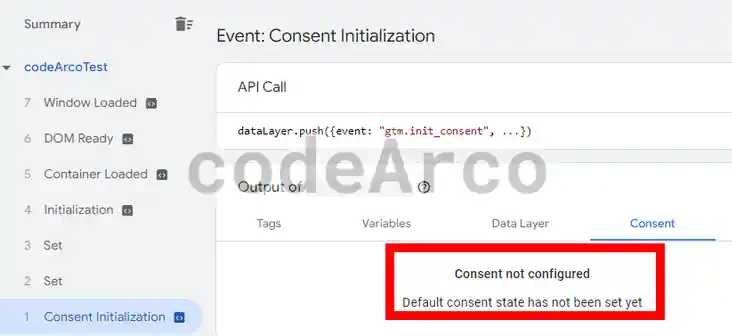
Google Tag Manager preview - For all the events in the list we check that, in the “Consent” section, “Consent not configured” appears.

Consent mode v2 not configured in Tag Manager

Free plugin for WordPress and consent mode V2
Let’s stop with so much theory and get to work. We are going to follow the steps to install and configure the free plugin for WordPress and consent mode V2:
- Download and install the Pressidium Cookie Consent plugin.
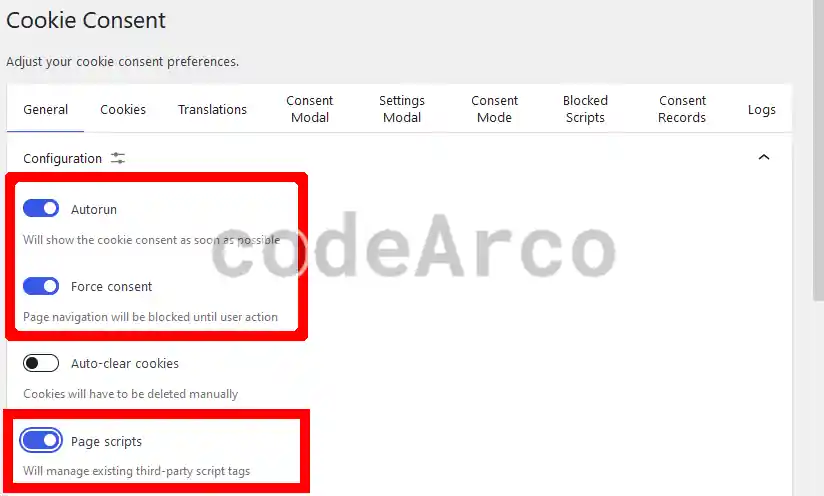
If you don’t have WordPress, any plugin that meets the requirements for consent mode V2 will be sufficient. Be careful with this, not everything is prepared for it or it is capable of managing it automatically. - General section. We will leave all the default options and verify that we have the “Autorun” option activated so that it starts first on our website and, optionally, “Force consent” to block the page until an option is selected. We can also configure the appearance and theme of the banner at the bottom.

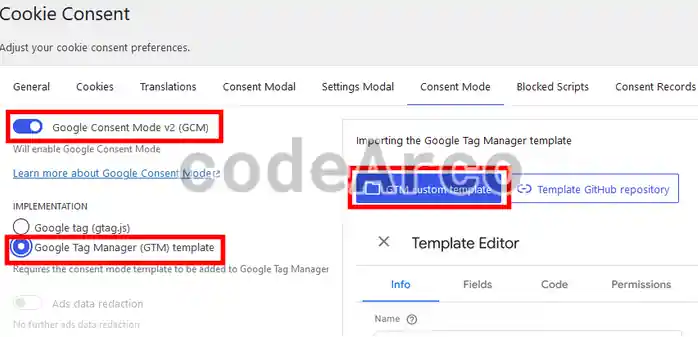
WordPress plugin consent mode V2 general section - Consent mode section. We select the option “Google Consent Mode V2 (GCM)” and “Google Tag Manager (GTM) template”. We select the “GTM custom template” button and download the file, later we will see that we will use it in Google Tag Manager.

WordPress plugin consent mode V2 section consent mode - We will leave the rest of the sections by default, although you can visit them to see what they do since some allow you to modify the appearance of the cookie banner or see the consent logs that some countries require you to maintain and save.
Configure Google Tag Manager and consent mode V2
Now we will proceed to follow the steps to configure Google Tag Manager and consent mode V2:
- Verify that we have the appropriate account and container selected.
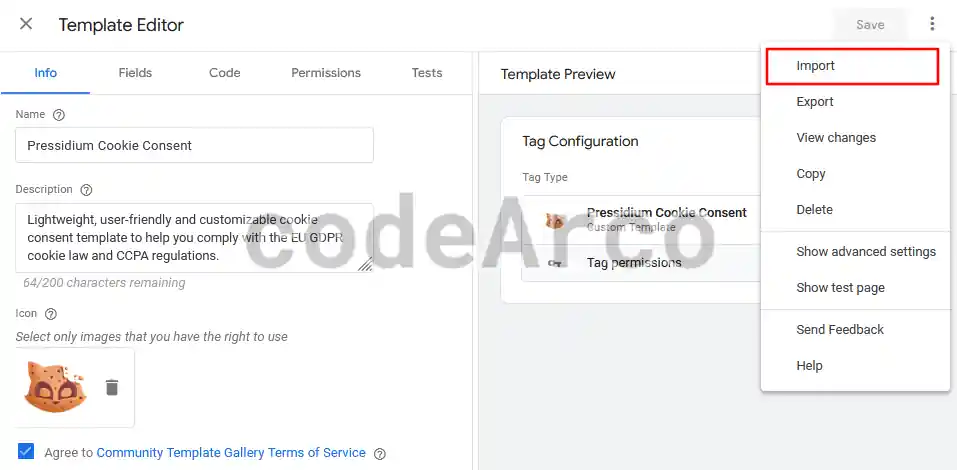
- Create a template through the “Templates” section.
In the three points at the top right, we click on “Import” and select the file that we downloaded in the section where we configure the plugin for WordPress. We click on the “Save” button.

Google Tag Manager template consent mode V2 - Create a tag of the type “Pressidium Cookie Consent” through the “Tags” section.
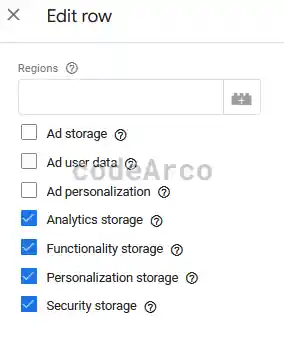
We establish the default consents that will be used before the user selects an option in the banner, to do this we press the “Add row” button and mark only the boxes that appear in the image below.
It must be taken into account that these options depend on the location of our audience and, therefore, it is advisable that you investigate and consult, if necessary, with someone who knows the laws of each country.

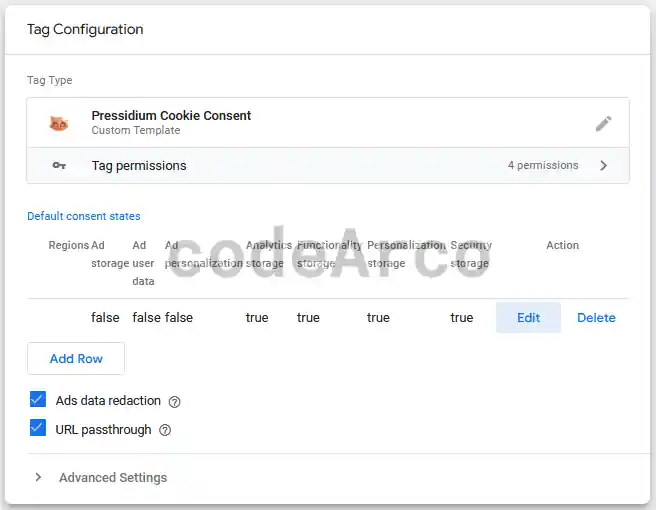
Google Tag Manager default consent parameters - Then we select the “Ads data redaction” and “URL passthrough” options and click on “Save” to create our new tag with the name “Consent mode”:

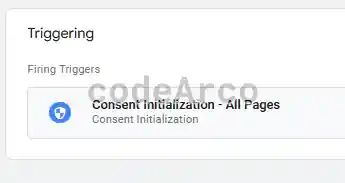
Google Tag Manager tag consent mode V2 - As a final step for the tag and, no less important, in the “Triggering” section, we select “Consent Initialization All Pages” as the trigger and save the changes.

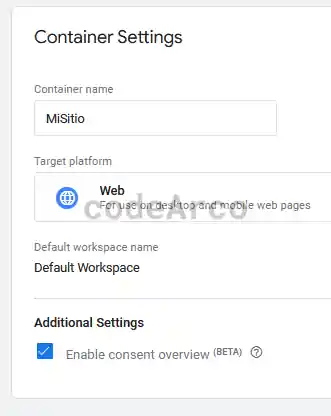
Google Tag Manager trigger consent mode V2 - Finally we will go to “Administrator” of Google Tags Manager and, within the appropriate container, we select “Container Settings”. Within this section we check the “Enable consent overview” box:

Google Tag Manager container configuration consent mode V2
Apply consent to Google tags
Once we have everything configured, it is necessary to apply said configuration to Google tags, such as Google Analytics 4. The steps to apply consent mode V2 to Google tags are:
- Verify which tags are not configured with consent mode V2, to do this, within “Tags” we will go to the “Consent Overview” icon.

Google Tag Manager consent overview - And we verify that the Google tags are in the “Consent not configured” section:

Google Tag Manager consent not configured - For each of them we will click on the tag name and within the “Advanced settings” section, “Summary of consent”, we will check the “No additional consent required” box:

Google Tag Manager consent settings - In the “Triggering” section we will verify that we have the “Initialization All Pages” value.

Trigger tag with Initialization All Pages - As an additional step we will verify that all Google tags are within “Consent configured”:

Google Tag Manager consent configured
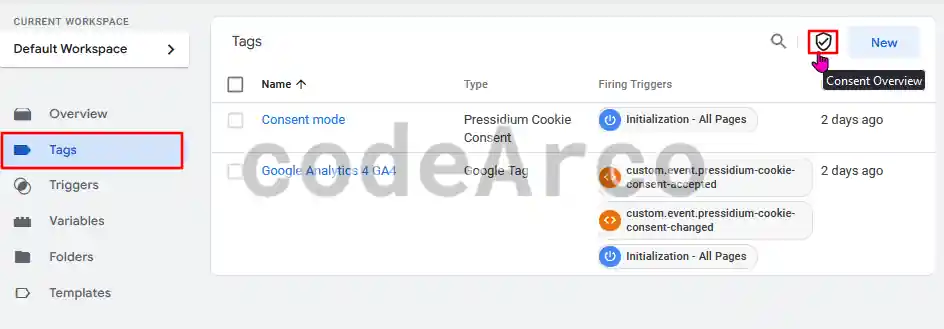
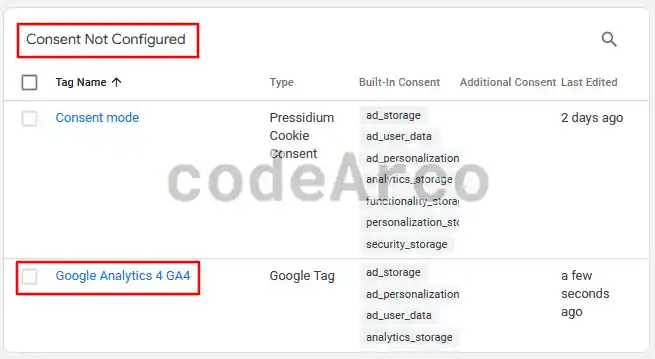
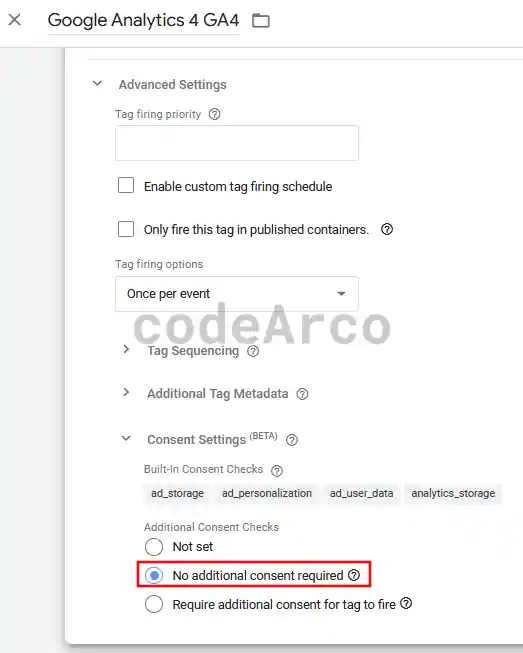
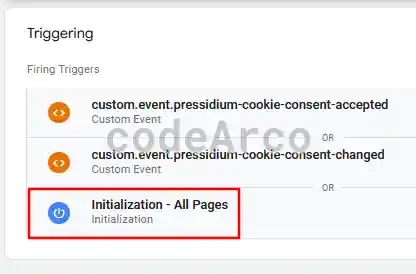
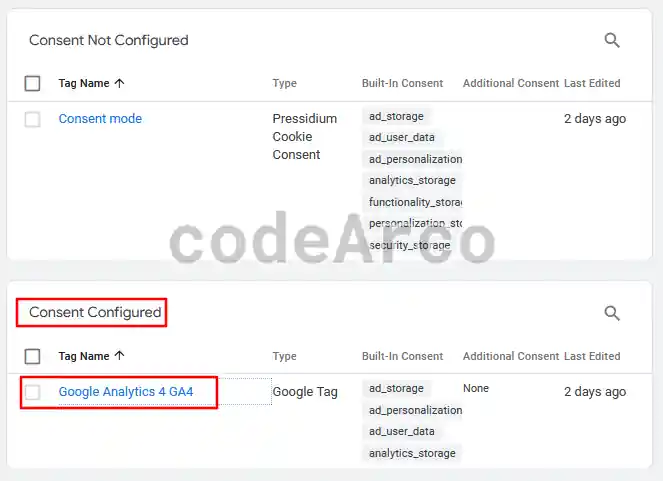
Finally, don’t forget that you must send the changes to Google Tag Manager for them to take effect on your website.
How to verify consent mode V2 installed on my web?
Once we have everything ready and configured, we will follow the following steps to verify that the installation of consent mode V2 on your website is correct:
- We will open Google Tag Manager and select “Preview”.
If the cookie banner does not appear when you open your website, it is because you have already accepted it previously and, as a consequence, you will have to delete the cookies and refresh the page. - Without clicking on any button on the banner we go to Google Tag Manager.
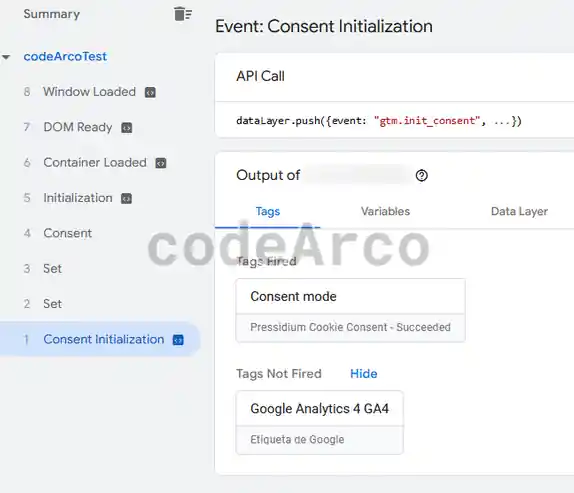
The first event, “Consent Initialization” must have the “Consent mode” tag launched and the ones you have from Google as unlaunched, such as “Google Analytics 4 GA4”:

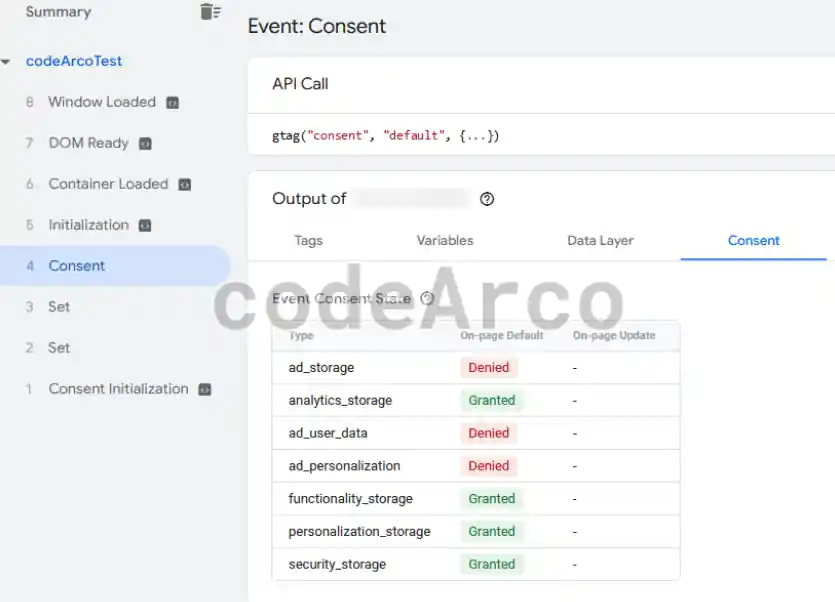
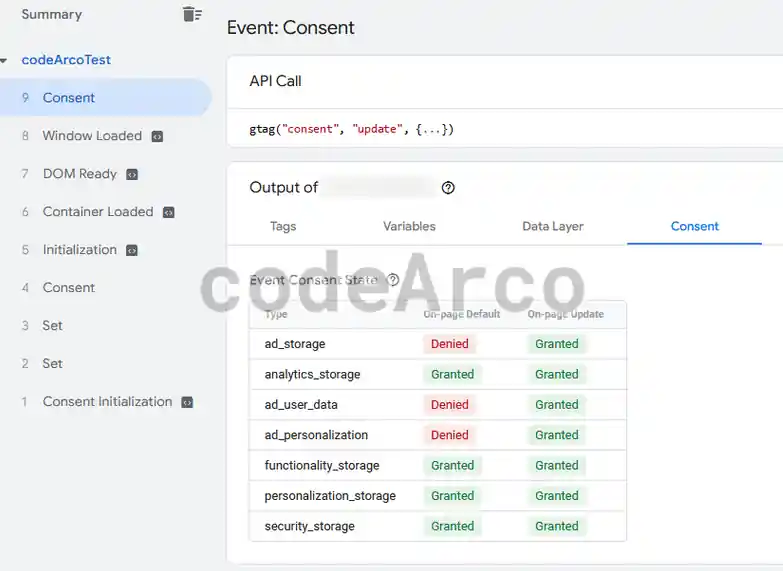
Consent Initialization Google Tag Manager - There must be a “Consent” event and the values that appear within the “Consent” section in the “On Page Default” column must be those that we set by default in the previous sections:

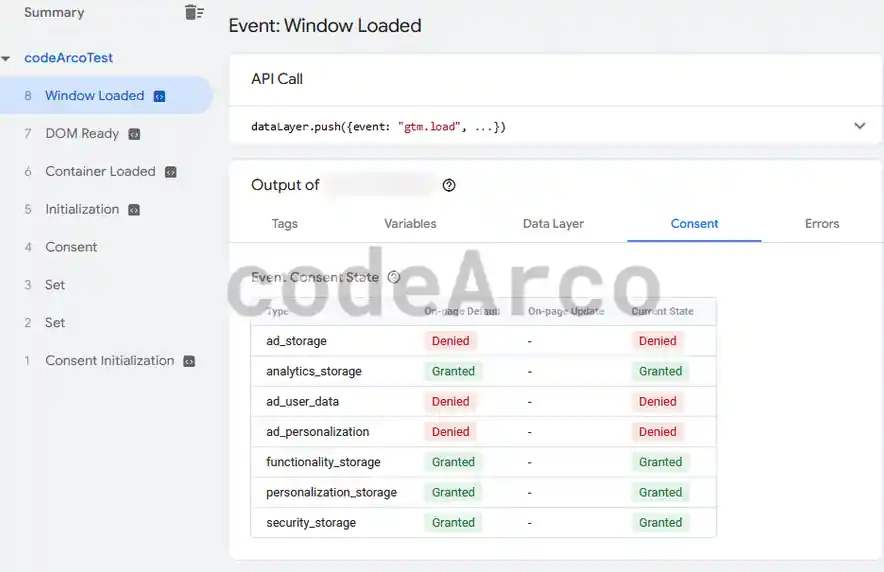
Consent on page default Google Tag Manager - In the rest of the tags that are above the previous one, within the “Consent” section, the “Current State” column, the same default values must appear as in “On Page Default”:

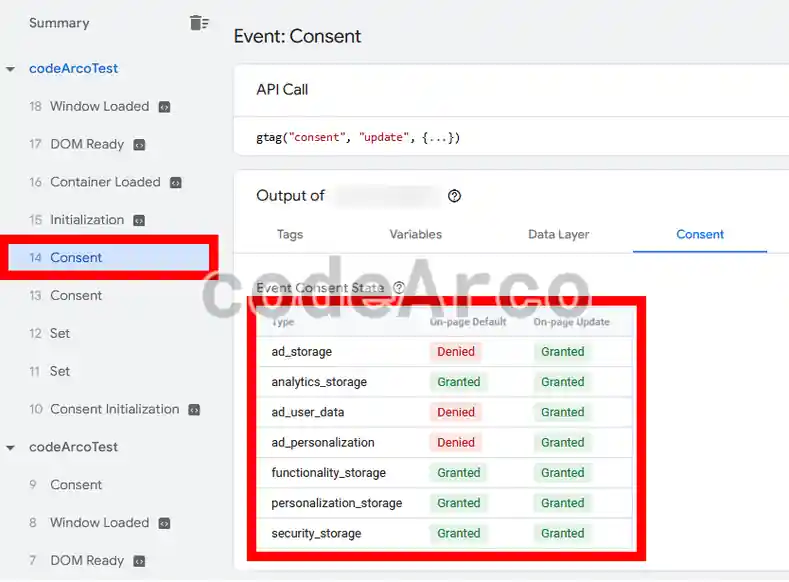
Default consents consent mode V2 - Accept all cookies in the debugger of our website and verify that a new “Consent” event has appeared with all the “Granted” values:

Updated consents with cookie banner - Refresh the page or go to a different one and verify that we have two Consent events, the first with the default values in the “On page Default” column and the second with the default values in the “On page Default” column and with the Granted values in the “On page update” column:

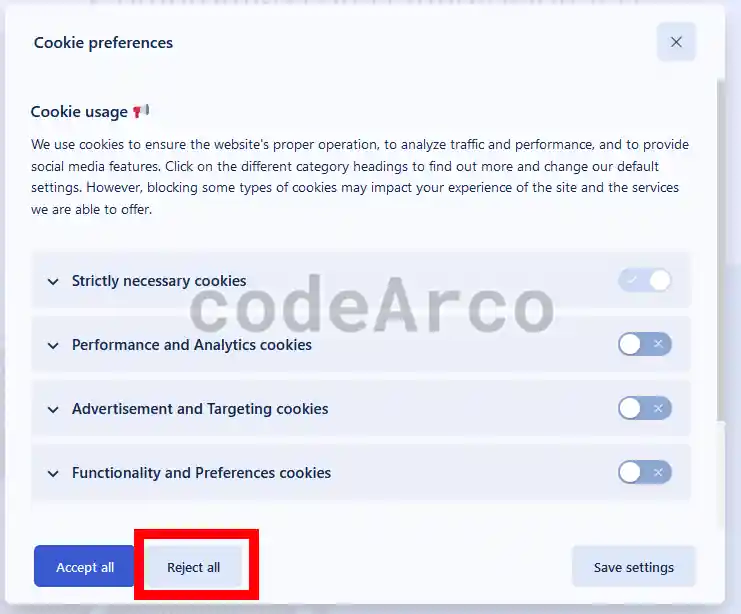
Consents when updating page Google Tag Manager - Finally we repeat the process but, this time, rejecting all cookies in the WordPress plugin banner:

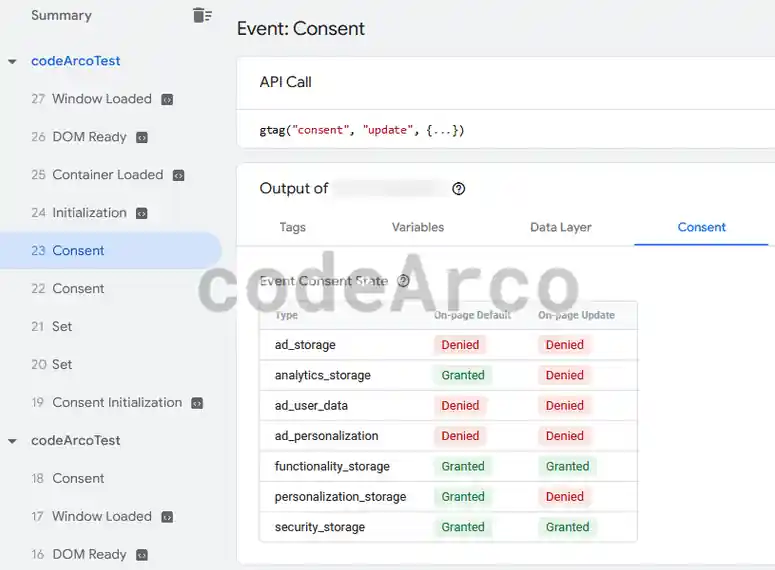
Cookie banner consent mode V2 reject all - And we verify within Tag manager that, within “On page Update” all appear as “Denied” except “functionality_storage” and “security_storage”:

Consents denied in consent mode V2
Resend tags when user consents, is it necessary?
If you have debugged with the Google Tag Manager preview you will have noticed that the sequence of events when the user accepts the consents for the first time is:
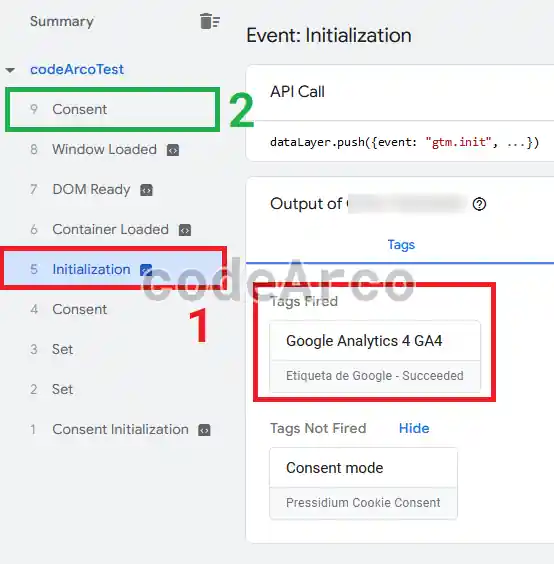
- The consents are initialized with the default values.
- The tags that we have configured with “Initialization All Pages” are triggered, such as, for example, Google Analytics 4.
- The user gives their consent with the banner by accepting cookies or configuring them to their liking.
- The “Consent” event is triggered with the updated values.
- The tags configured with “Initialization All Pages” (Google Analytics 4) are not triggered again with the new consents until the user navigates to another page on the website.
This may lead us to think that what we have done is wrong since, in the user’s first interaction with the website (which in fact is one of the most important) the default consents are being sent and, given that they are quite restrictive, Google is receiving less or lower quality data than it should.
Well, don’t worry, it is not necessary to resend the Google tags when the user gives their consent, it is able to realize the situation and “fix the data” once the user has clicked “Accept all cookies”.
This section is only necessary if you have other non Google tags, such as “Meta Ads Pixel” or the Facebook pixel, and you need to receive consent data in them.
Investigate events of cookie banner plugin
The first step is to investigate the free WordPress plugin and consent mode V2 (or whatever platform you have). Said plugin must be able to trigger events when the user has accepted or rejected the cookies (all or just some sections) and when the user modifies these preferences.
In the case of Pressidium we can read in its FAQ that two types of events are triggered:
- Consent accepted, pressidium-cookie-consent-accepted. This event is triggered the first time the user accepts the cookie banner (whether all or just some) and each time a page on our website is loaded only if the banner has previously been accepted.
- Modified consent, pressidium-cookie-consent-changed. This event is triggered only when the user modifies their cookie preferences and as long as consent has been previously given.
We will save the name of the events because we will use them in the next section.
Insert JavaScript code in WordPress head
This step consists of creating Javascript code and inserting it into the WordPress head to perform the following tasks:
- Capture plugin events when the user accepts or modifies consent or when they navigate to a new page.
- Write to the dataLayer so that the events are received by Google Tag Manager.
Javascript code is the following:
(function () {
    var eventChanged = 'pressidium-cookie-consent-changed';
    var eventAccepted = 'pressidium-cookie-consent-accepted';
    console.log("Execute function");
    window.addEventListener(eventChanged, function (event) {
        console.log("eventChanged");
        window.dataLayer.push({
            event: 'custom.event.' + event.type
        });
    });
    window.addEventListener(eventAccepted, function (event) {
        console.log("eventAccepted");
        window.dataLayer.push({
            event: 'custom.event.' + event.type
        });
    });
})();
It is very important that you enter this code directly in the WordPress head and not through Google Tag Manager, for this you can use a WordPress plugin to modify the head like the one I linked to you.
If you insert the code through Google Tag Manager and use the Pressidium plugin, it is the case that the user can accept the banner without the Javascript code being loaded and, as a consequence, we lose the capture of the event and do not write to the dataLayer for Tag Manager to capture.
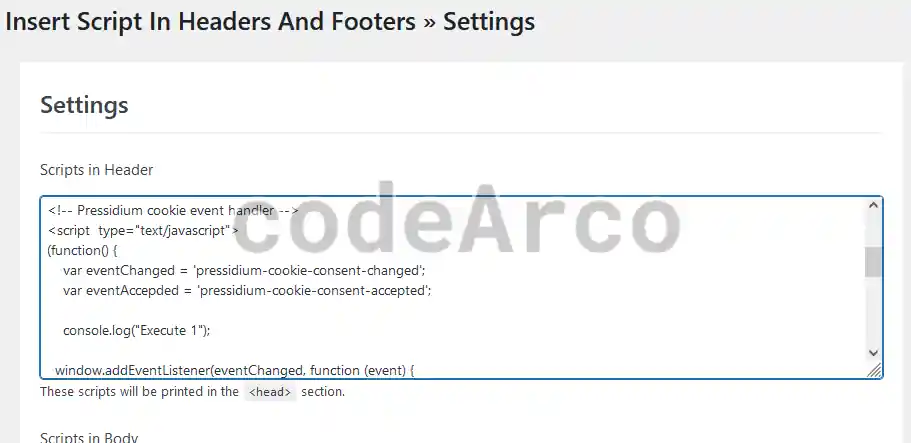
Now we are going to test that it works both when we accept cookies and when we navigate to another page using the browser debugger:
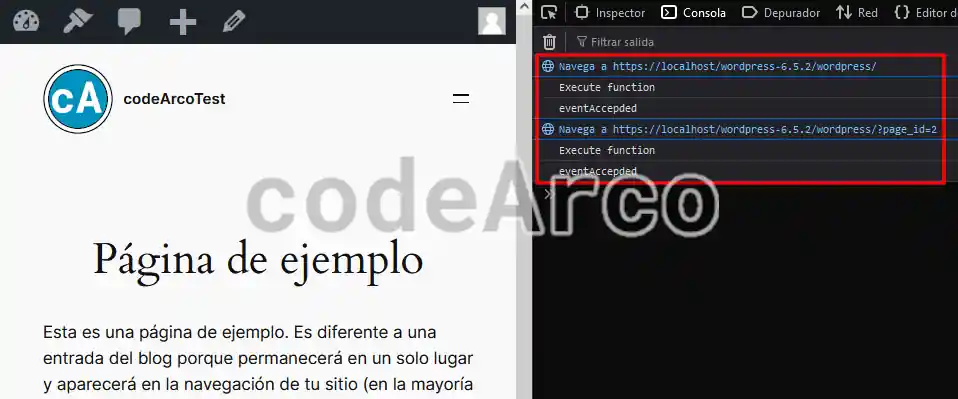
Finally, remember to delete the “console.log” since we have only included them as a verification measure.
Configure Google Tag Manager to resend tags
In this section we are going to configure Google Tag Manager so that, when the previous events occur, the tags that we want are triggered. You should keep in mind that we will do the example with Google Analytics 4 but, as I said before, this is not necessary for Google tags:
- Create two triggers with the following configuration called “custom.event.pressidium-cookie-consent-accepted” and “custom.event.pressidium-cookie-consent-changed”:

Create triggers to resend Tag Manager tags - Then we add the activators to the tags we want without removing the “Initialization – All Pages” one:

Create triggers for resending Tag Manager tags
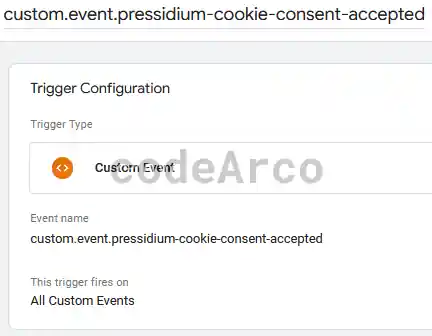
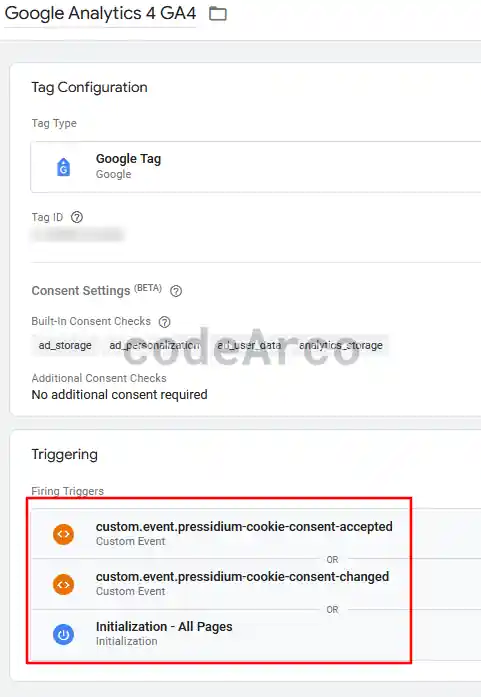
Finally, remember to save and submit the changes so that they take effect.
Test consent mode V2 and tags resend
We come to the final step of this section, testing that resending tags when the user consents works:
- Activate the preview of our site in Google Tag Manager.
- Within the window we will delete the cookies so that the banner appears again.
- Reload the page and do nothing else for now.
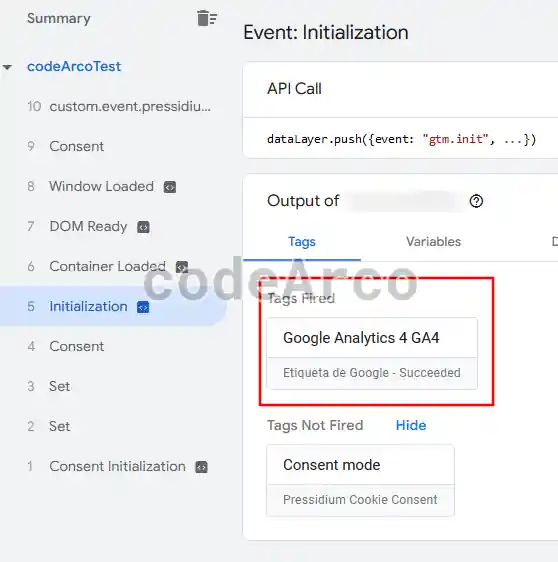
- Verify that in “Initialization” the “Google Analytics 4 GA4” tag has been triggered.

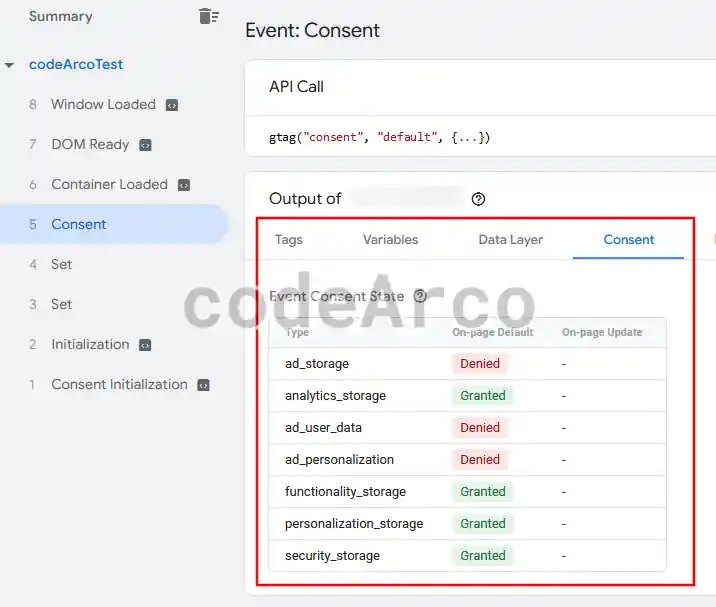
Consent mode V2 resend tags Initialization - Verify that from the “Consent” event, within the “Consent” tab, the consents are those that we established by default in previous sections.

Consent mode V2 resend consent tags by default - Accept the cookie banner with consent mode V2.
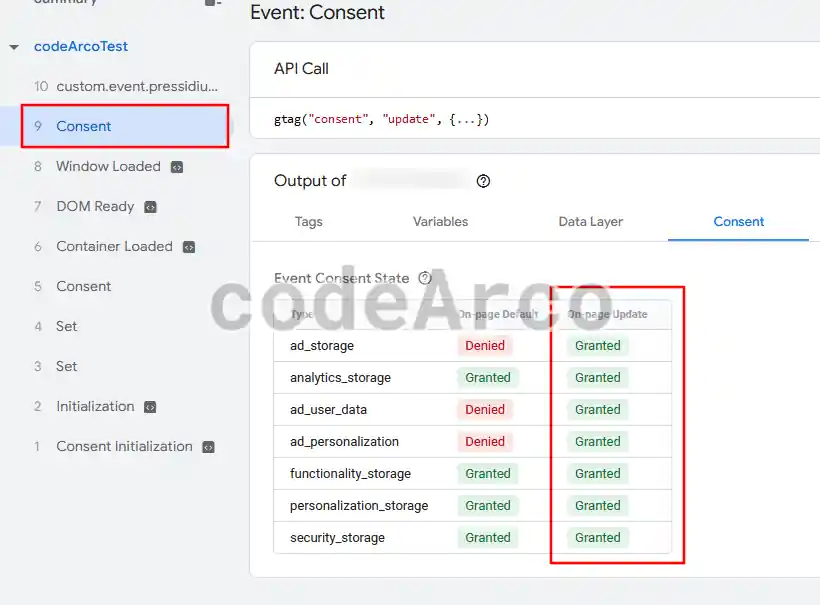
- Verify that we have a new “Consent” event with the updated consents within the “Consent” tab.

Consent mode V2 resend updated consent tags - Enter the “custom.event.pressidium-cookie-consent-accepted” event and we can see that our Google Analytics 4 GA4 tag has been triggered.

Consent mode V2 resend tags when user consents - Finally we click on another page on the website and verify that the second “Consent” event acquires the values that we entered in the banner and that the “custom.event.pressidium-cookie-consent-accepted” event has been triggered together with Google Analytics 4.

Consent mode V2 page reload and event resending
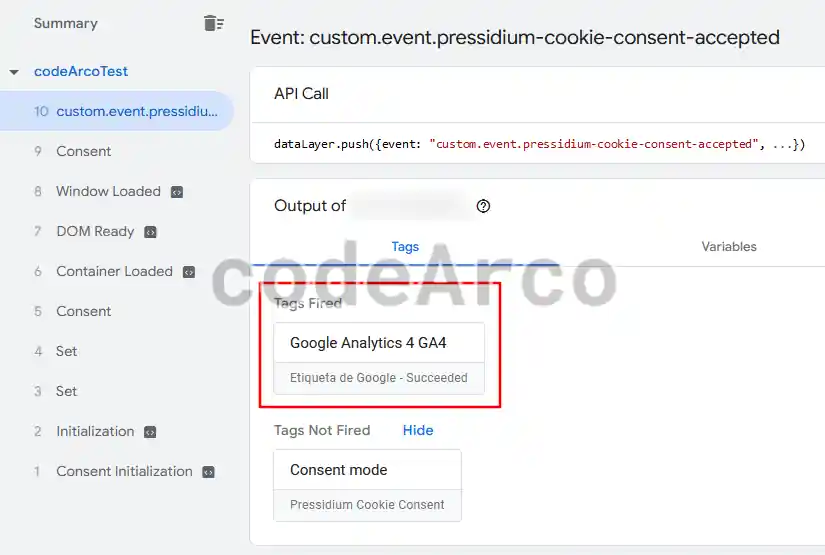
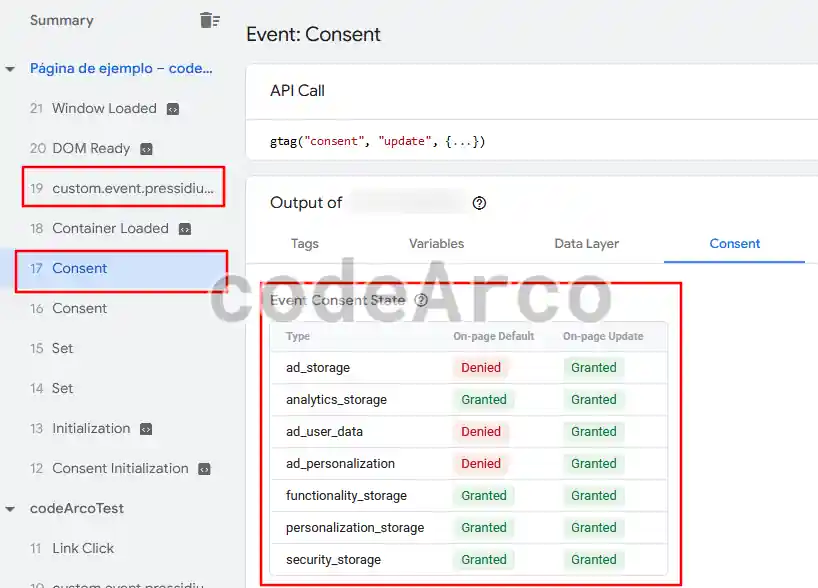
Again, remember that Google tags do not need to be resend or retriggered when the user accepts the cookie banner, this is only for non-Google tags that require consent information.
Categories, parameters and cookies in the plugin
All of the above is very good, we have followed the steps of the consent mode V2 tutorial for WordPress free and it works correctly but, you may wonder, where have I established, for each category of the cookie banner, what consent parameters and cookies are accepted and sent? The answer is simple, nowhere, for now we have the default values, so pay attention because we are going to learn it.
Before continuing reading make sure you understand the difference between cookies and Google consent parameters.
Categories and consent parameters
In this section we will learn where the consent parameters are set in the WordPress plugin for each cookie banner category. My recommendation is that you leave the default values if you do not have great knowledge.
If you remember, in Google Tag Manager, we import a template to then create a tag. It is in this template where the default values are found and where we can modify them. To do this we will go to “Templates”, “Pressidium Cookie Consent”, “Code” section:
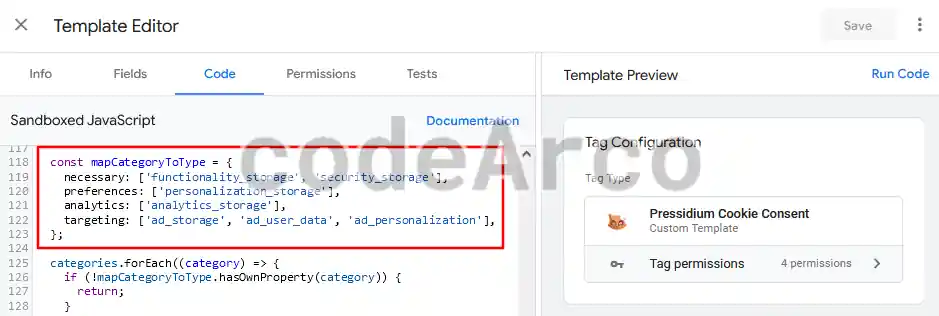
As we can see, by default, the values of each category for each consent parameter are:
- Necessary cookies, we allow functionality_storage and security_storage.
- Preference cookies, we allow personalization_storage.
- Analytics cookies, we allow analytics_storage.
- Advertising or targeting cookies, we allow ad_storage, ad_user_data and ad_personalization.
If we want to modify what parameters are allowed when the user clicks on one of the cookie banner categories, it will only be necessary to modify the template code before creating the tag based on said template.
Additionally, it is worth remembering that, when creating the tag, we established the default values of the consent parameters for when the user has not selected any option in the cookie banner:
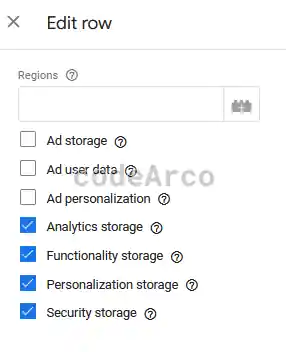
Again, this is modifiable and we can set the values we want to have as default when the user has not yet accepted or rejected cookies.
My recommendation regarding this section is that you leave the default values unless you have legal knowledge or consult with someone who knows the laws on the matter.
Categories and consent cookies
In this section we will learn where to establish which cookies are stored through the WordPress plugin for each banner category.
To do this we will go to the plugin configuration in WordPress, “Blocked Scripts” section:
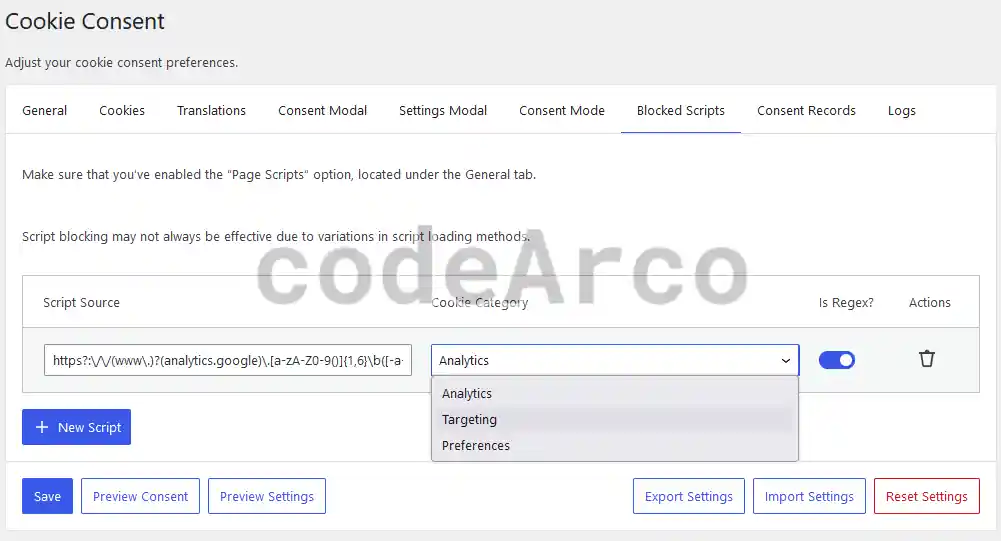
What this section allows is to block the loading of scripts and, as a consequence, their respective cookies, until the user gives their consent through the cookie banner.
In the previous example we can see that any script whose origin is “analytics.google” is being blocked until the user accepts the “Analytics” category.
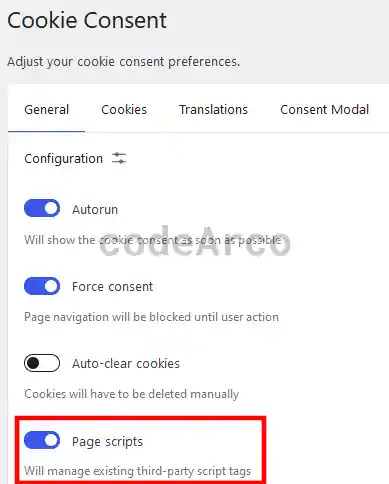
For this section to work correctly, it is necessary to enable the “Page Scripts” option within the general section:
My recommendation regarding blocking scripts and cookies is that you do not do it if you only use Google services, for that we are using the consent parameters and the advanced mode. If you use other scripts with third-party cookies and need to block them, this is the place to configure it.
List of cookies, privacy policy and terms of Google
Finally we have reached the last section where we will close some topics that, although they do not have to do directly with consent mode V2, it is advisable to dedicate some attention to it and follow the steps that we will see below.
How to get a list of cookies for my website?
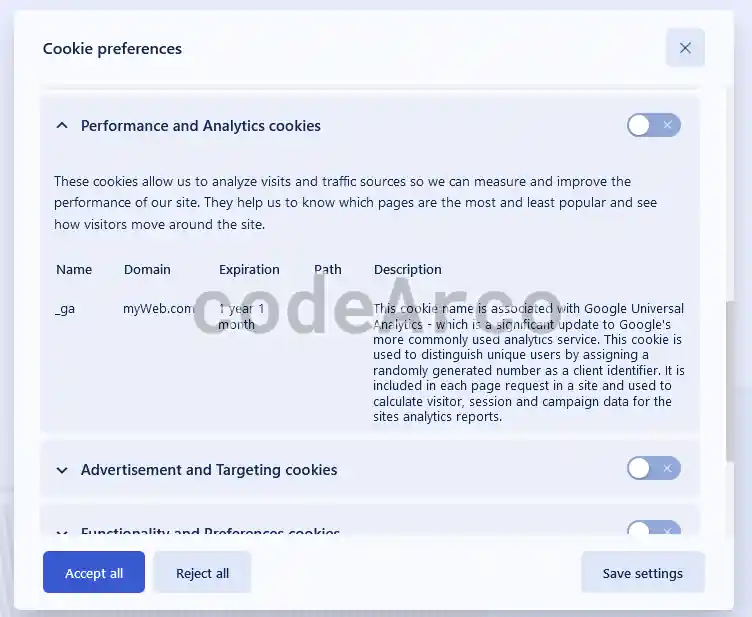
You will surely have noticed that the list of cookies on the banner is empty, which means that we are not informing users what cookies our site uses.
The quickest way to get a list of cookies for your website is to use the cookie scanner of cookie script tool:
- Make sure that in the WordPress plugin settings, you have the “Hide from bots” option activated.
- Access the link for the cookie scanner tool.
- Enter our main page in the search engine and click on “Scan cookies”.
- After a few seconds, the full list of cookies will appear along with all their information, such as category, type and description.
- Repeat the process with other pages that are not the main one and that have different functionalities such as, for example, a page with a video, a page with a link to Amazon… etc. We do this to prevent us from missing any cookies from the list.

Scanner for listing web cookies
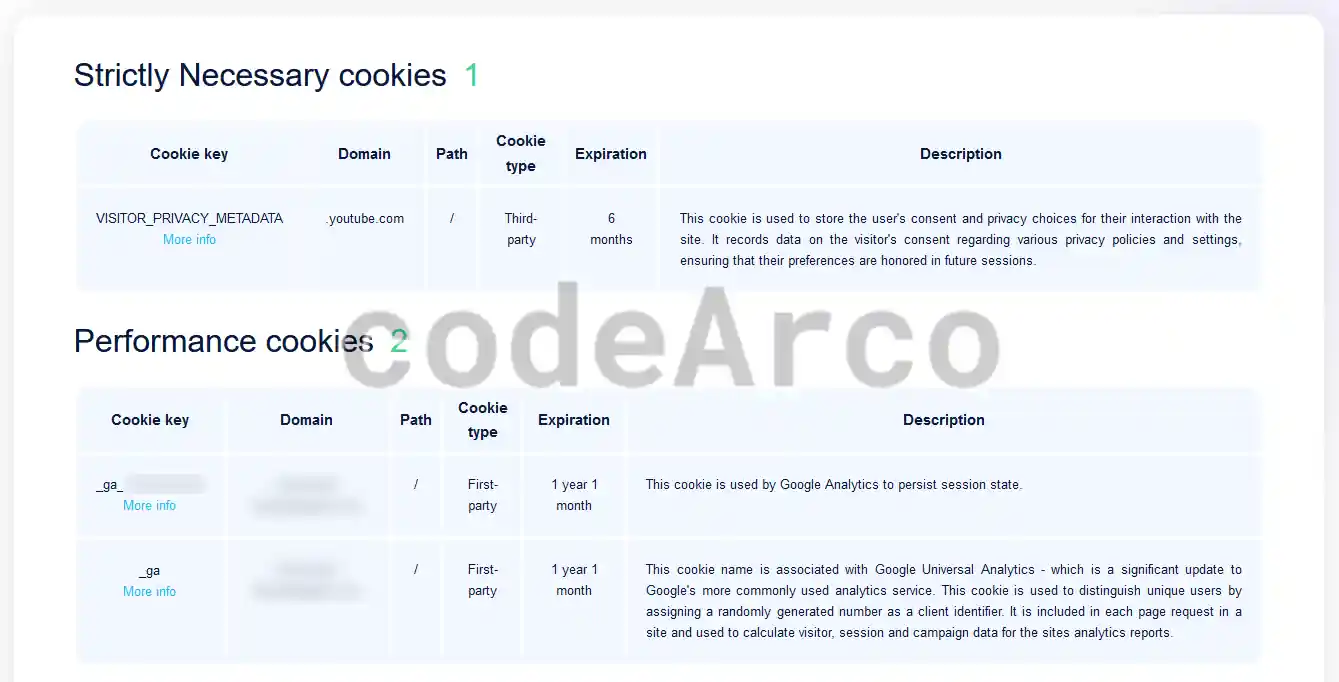
However, keep in mind that this is an automatic tool and we should not trust it completely, you should do at least a manual review of the cookies through the browser debugger and verify that they are all there.
Once we have this list, it is necessary to include the cookies in the WordPress plugin banner through the “Cookies” section, each of them in the section indicated by the cookie scanner:
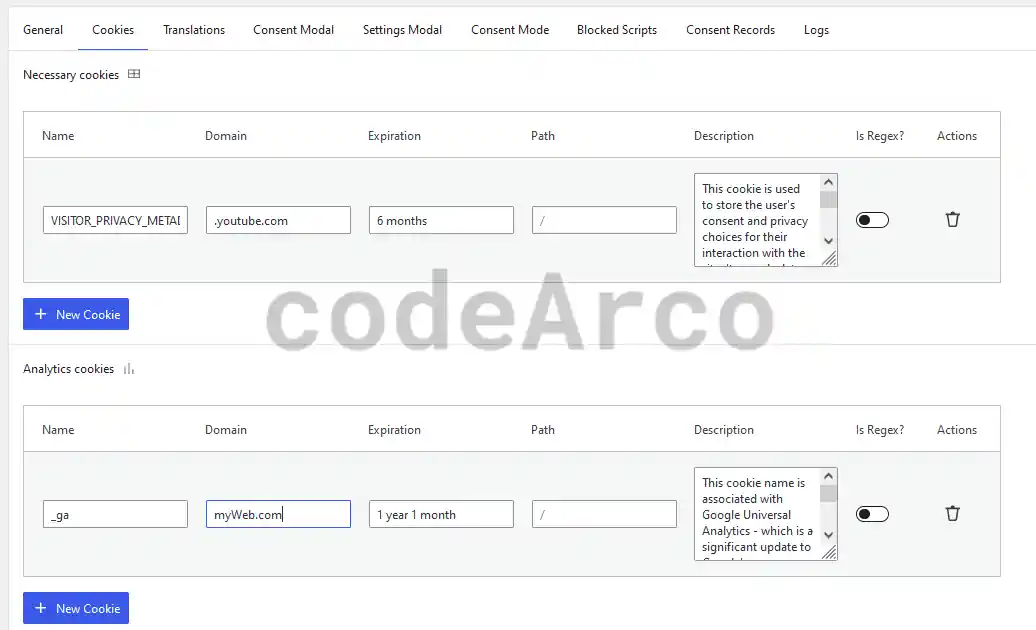
And finally we check that the list of cookies appears in the banner:
Accept Google terms
Now we will proceed to configure consents and accept Google’s terms in its different services so that all of them work correctly with consent mode V2:
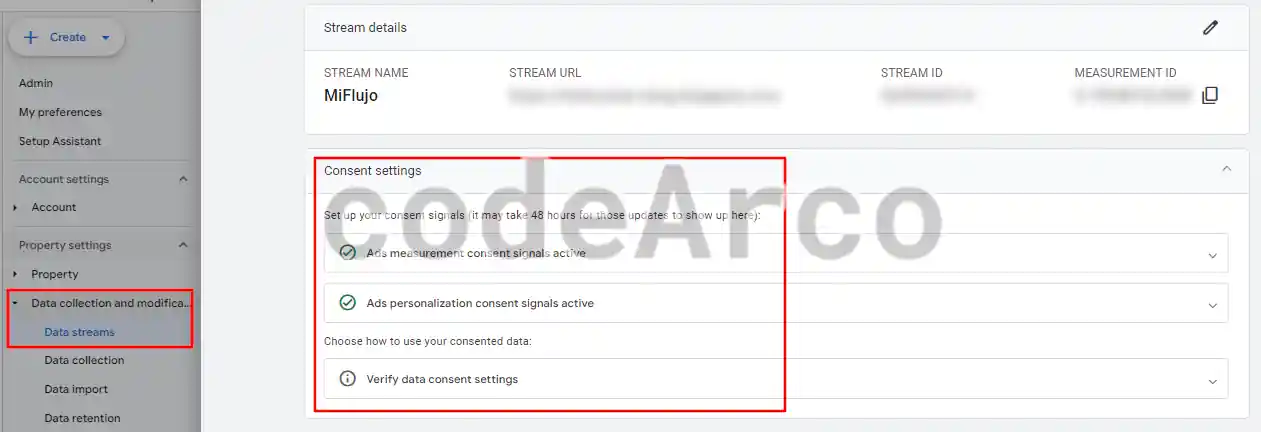
- Configuring consent in Google Analytics 4 GA4. Within the “Admin”, “Data collection and modification”, “Data streams” section, we select our stream and go to the “Consent setting” section.
We must have the first two options checked and in the options of the third, “Manage data use across Google services”, we select the option “All Google services (recommended)”.

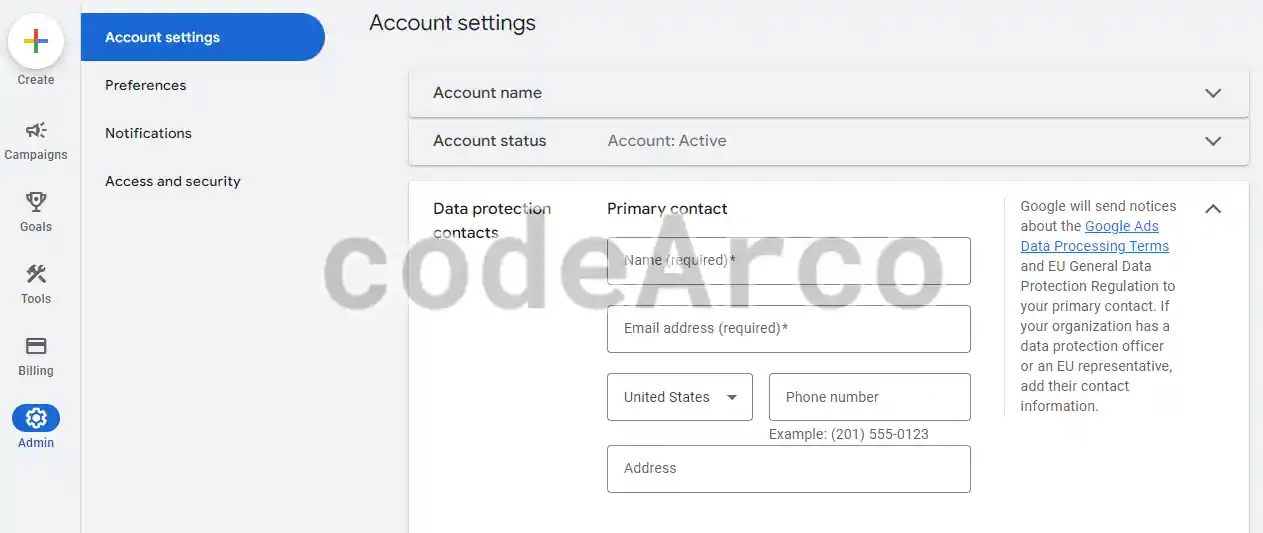
Configure of consent in Google Analytics 4 GA4 - Contact information in Google Ads. We will go to “Administrator”, “Account settings” and, within the “Data protection contacts” section, we fill in all the fields with our personal data.

Contact information in Google Ads
Legal notice, privacy and cookies
Finally we come to the last point, the writing of the legal notice, privacy and cookies on our website.
Since it is a complex, extensive topic and I am not an expert on the subject, I leave you a link to a WordPress plugin to generate the legal notice, privacy and cookies.
As before, do not blindly trust a tool that does all the work automatically, inform yourself through Google and check the terms of other websites to see if, in the document generated by the plugin, any sections are missing.