
As we discussed in the Docker theory we have two ways to create images and containers:
- Through commands and the terminal. The disadvantage of this method is that we would have to store the commands somewhere and run them every time we have to create the images and containers.
- Through files, “Dockerfile” and “docker-compose.yml”.
In this section we will focus on the first point and we will see Docker in practice with commands to create images and run containers.
Before you start, you need to install Docker Desktop and then run the docker version command either through the Docker Desktop terminal or the terminal of the operating system you use:
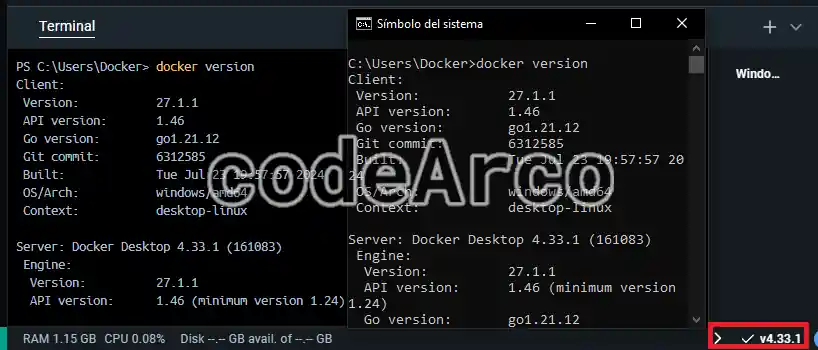
If the installation was correct, you will be able to see the information regarding the version of Docker installed on your computer.
You also need to have some knowledge of Linux commands. As we mentioned in the theory, a container can be Linux or Windows and, in our case, we will work with Linux containers and, to do so, we will need to use some other commands.
Image commands in practice
Commands to download and list images
We will start by checking that we do not have any images downloaded on our computer, for this we will use the docker images command:
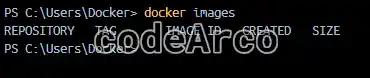
Next we will proceed to download an image from Docker Hub, to do this visit the official page and choose the image you want, in our case we will use the SQL Server image:
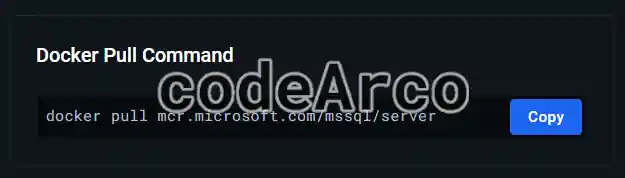
- The first step is to locate the name of the image, we can see it on the right side, where “Docker Pull Command” appears.

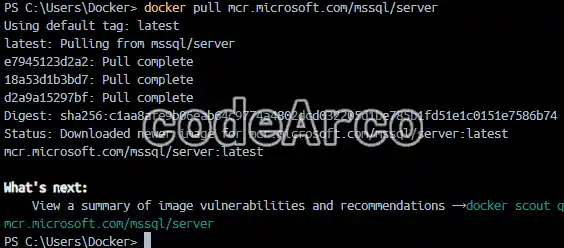
Command to download Docker Hub image - The second step is to run the command in the terminal, you will have to wait a few seconds. Congratulations, you have now run your first command,
docker pull, which allows you to download an image.
As you can see, in our case, three lines have been downloaded (where it says “Pull complete”), why? Because they are the dependencies or images layers of the SQL Server as we will see later.
Docker pull command to download image - Finally, run the
docker imagescommand again to list all the images and check that you now have the SQL Server image with a unique identifier:

List images in Docker

What are image tags?
Tags in Docker are used to version images, that is, to indicate the version to download. If you notice, we have not indicated any version before, in fact we do not even know which version has been downloaded.
Well, to indicate the version when downloading an image we will use the command docker pull image:tag and, to know the version, we will go to Docker Hub and there we will look for the list of versions of the corresponding image.
In our case we are going to install the 2019 and 2022 versions with the commands docker pull mcr.microsoft.com/mssql/server:2019-latest and docker pull mcr.microsoft.com/mssql/server:2022-latest respectively:
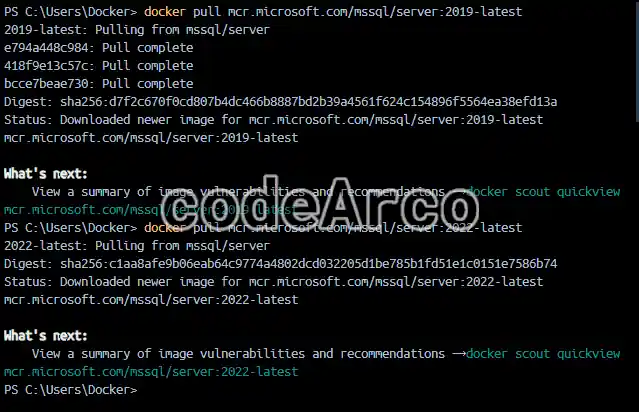
And finally we verify that we have the 3 images downloaded on our computer:

In this process we have several important points regarding the tags in Docker:
- The first time we downloaded the image we did not indicate any tag and, as a consequence, it used the “latest” tag by default and downloaded the latest version. This means that if we do not indicate tags it will use “latest” by default.
It is not good practice to download images without indicating the tag, either through commands or through the Dockerfile.
Let’s say that instead of downloading SQL Server we are downloading the .NET version for our API… If you don’t indicate the version, it will download the latest one at that moment and, as a consequence, it is very possible that your project will not work because the version of .NET it needs is not the same as the one it is downloading. - When we downloaded the 2022-latest version it took two seconds but… Why? Well, because one of the advantages of Docker is that it reuses layers of images already downloaded.
For example, imagine that we download the .NET 6 and 7 image, they will most likely share the operating system layer and some of its dependencies.
As a consequence, when we go to download .NET 7 it will not be necessary to download as many layers since it has already done so when downloading .NET 6. - If you look, you will notice that the id of “latest” is exactly the same as “2022-latest”. This means that today the “latest” image is the same as the “2022-latest” image, or in other words, “latest” is pointing to “2022-latest”.
For this reason, it is dangerous not to specify a tag when downloading an image, because in five years “latest” will be pointing to another version (for example 2029) and all of this is done transparently and without us realizing it. This can result in a currently working container becoming inoperable after a period of time.
How to delete an image in Docker?
The command to delete images in Docker is docker image rm image[:tag].
Let’s see an example of deleting images in Docker:
- First we will delete SQL Server 2019, for this we will use the command
docker image rm mcr.microsoft.com/mssql/server:2019-latest.

How to remove images in Docker - Next, we will remove version 2022 with the command
docker image rm mcr.microsoft.com/mssql/server:2022-latest.

Example of removing image in Docker with commands
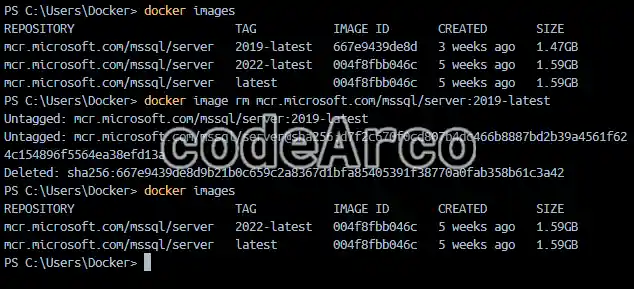

As you can see, the removal of version 2022 has not taken long. Why? For the same reason as before, image 2022 is a copy of the latest and as a consequence, below, it has not removed anything, only the link.
Container commands with Docker
How to create and delete containers with commands?
The command to create containers is docker create image[:tag]. The tag is optional and, obviously, you must have the image previously downloaded to your computer.
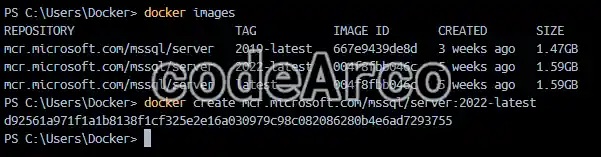
As you can see, the only thing that the creation of the container returns is an id that, as you can imagine, is the identifier of the created container. Write it down because we will need it later.
To delete a container, it is exactly the same, but instead of using docker create, we will use docker rm containerId.
Run, stop, and list containers
Once created, we can run the container using the docker start id command and, later, we proceed to list the containers we have with the docker ps command:
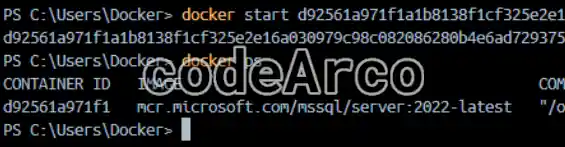
The information in the list of containers that we can see in the previous image is:
- Container id, although much shorter than the one returned by
docker create. - Name of the image with which the container has been created.
- Command that the container will use to start.
- Creation date.
- Status.
- Container ports, in this case it only has private ports and, therefore, it will only be accessible from the internal network or from other containers, but not from outside.
- Container name, since we have not given it any, Docker has assigned it a random one.
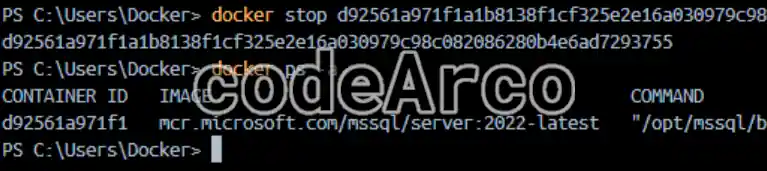
Next we are going to stop the container with the docker stop id command.
If you now run docker ps to access the list of containers you will see that there is nothing, this is because the docker ps command by default only shows the started containers, if you want to see all of them you will have to use the docker ps -a command:
How to name a container in Docker with commands?
During the previous sections we have interacted with the containers through their id and this is a bit tedious. Well, we can use all the above commands with the container name, the only thing you have to do is assign a custom name to the container when you create it, this is achieved by adding --name CustomName at the beginning of the create command:
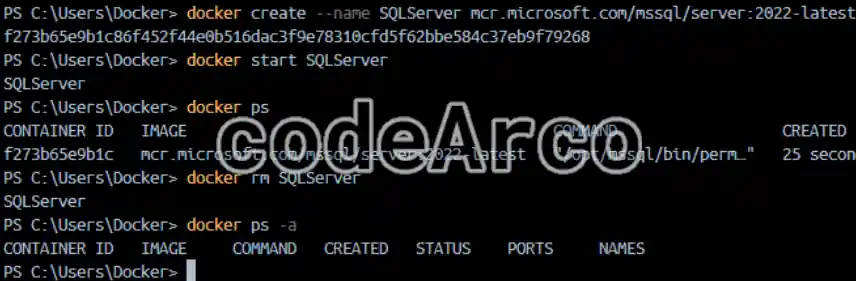
Afterwards you can use the name instead of the id in the commands we have seen, such as docker rm SQLServer.
Interactive mode and logs in Docker
If you have noticed, when we start the SQL Server container, it stops after five seconds. Docker has the -i or --interactive option to see the logs when we create and start containers, it will be of great help to detect the problem.
We can also use the docker logs SQLServer command to see the logs after they have been generated, that is, after the container has started.
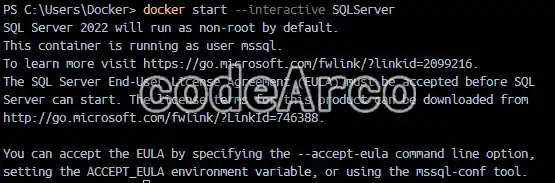
As you can see, it is telling us that we are missing configuration variables for it to run correctly. In this specific case, it is the variable that indicates whether or not we accept the terms and conditions of SQL Server.
Configuration variables when creating a container
As we have seen before, our container was missing at least one configuration variable. Well, to set configuration variables in containers, two steps are necessary:
- Read the documentation for the image you want to instantiate in a container to know all its parameters. For example, in the case at hand, if we read the documentation for the SQL Server image we will see that we are missing the parameters “ACCEPT_EULA=Y”, “MSSQL_SA_PASSWORD=<your_strong_password>” and “MSSQL_PID=’Developer’”.
- Run the command to create the container with the
-e parameter=’value’option as many times as parameters you want to add.

Docker create with configuration variables
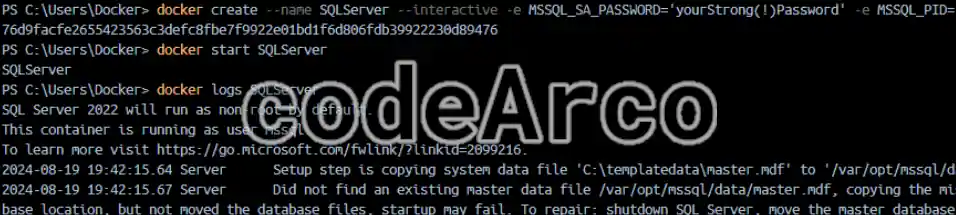
As you can see in the image, the container does not stop automatically now because it no longer gives an error when running it.
A very interesting question to see if you have understood the theory is… Why are the configuration parameters passed to the create command and not to the start command? Well, because we can instantiate the same image in different containers to, for example, have different environments.
With configuration variables we can create different environments with different configurations such as, for example, different users and passwords. This is achieved by creating several containers that have different configurations.
Communication with containers, internal and external ports
Once we have managed to configure and start our container, you may be wondering… How do I connect to the Docker container from localhost? Even though it is running, as we have it configured now, we cannot because we have not mapped any port and, since containers by default are not accessible from outside, we do not have access.
The only thing we can see from docker ps is that we have a container running with port 1433, but that port is internal, it is only used for communication between containers, not to allow external communication.

All this is solved through port mapping where we will tell Docker that the private port XX of the container corresponds to port YY of the host computer.
To do this we will use the command docker create -p XX:YY where the first number corresponds to the port of the host computer and the second to the internal port of the container. For convenience, we will use 1433 in both cases, since it is the port through which SQL Server starts:
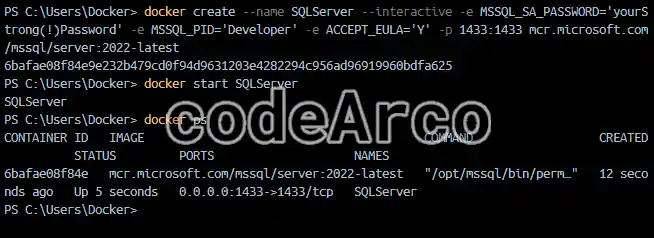
Once this is done, you can connect from SQL Server Management Studio (SSMS) or the program of your choice. In the case of a container with a web application, you could access it from the browser through the corresponding path, such as “http://localhost:8080/index”.
Error connecting SQL Server and Docker from localhost
I will be honest, despite correctly entering the previous parameters, I have had many problems when connecting to the SQL Server database in a container from SSMS. I will tell you some steps and fixes to connect to a Docker container from localhost:
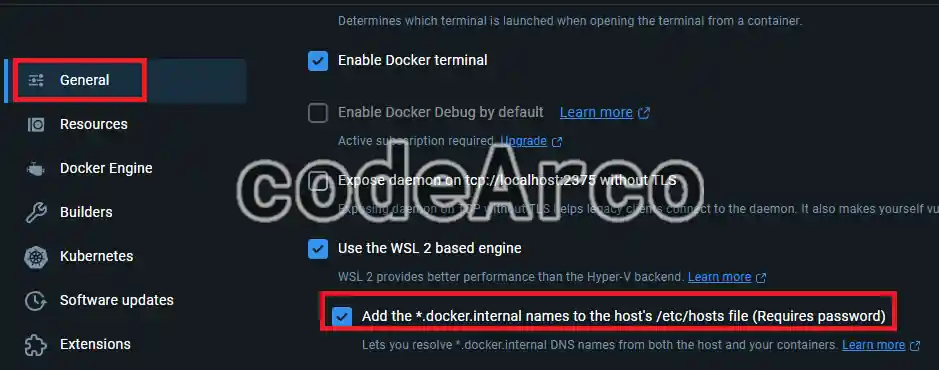
- Activate the option “Add the *.docker.internal names to the host’s /etc/hosts file (Requires password)” in the Docker configuration within the general section.

Allow access to container on localhost - Restart the computer so that the changes in the host file are applied.
- Access the Windows hosts file (C:\Windows\System32\drivers\etc) and look for the line “# Added by Docker Desktop”, write down the IP.
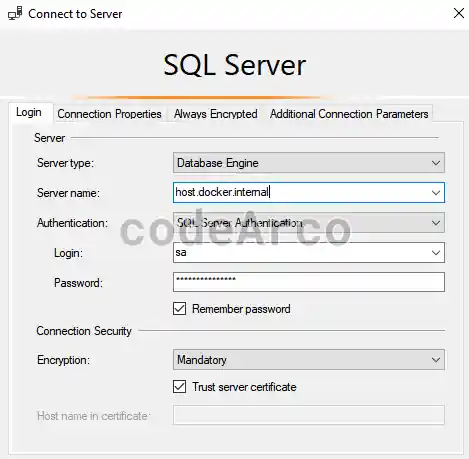
- Try with different IPs, personally “localhost”, “host.docker.internal” and the IP that we copied in the previous point have worked for me.
Additionally, the fixes to the errors when connecting from localhost to SQL Server within a container are:
- Connect through SQL Server Management Studio (SSMS) and not through Visual Studio, I don’t know why but I couldn’t connect through the IDE.
- Verify that the user is “sa” (default SQL Server user) and, as password, the one you set in the create command.
- Verify that you are using SQL Server authentication and that you have the option to trust the certificate checked.
However, if you continue to have problems, there is a lot of documentation on the Internet about how to configure Docker and Windows to access a container from localhost. These errors are not due to incorrectly entering the commands, they are due to the configuration of Docker Desktop and Windows.
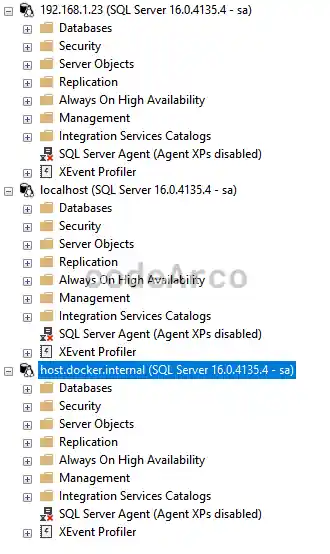
Finally, as you can see, we have access to the SQL Server container through different IPs and names:
How to create volumes and persistent storage?
If you remember, in theory we said that the data of a container is not deleted when it is restarted, but when it is recreated, let’s see an example of volume commands in Docker:
- The first thing we will do is start the container of our SQL Server database.
- Next we will create a test database.
- We stop the container with the
docker stop SQLServercommand. - We start it again with the
docker start SQLServercommand.
As you can see, the database does persist, which means that the storage in the containers is persistent between restarts.
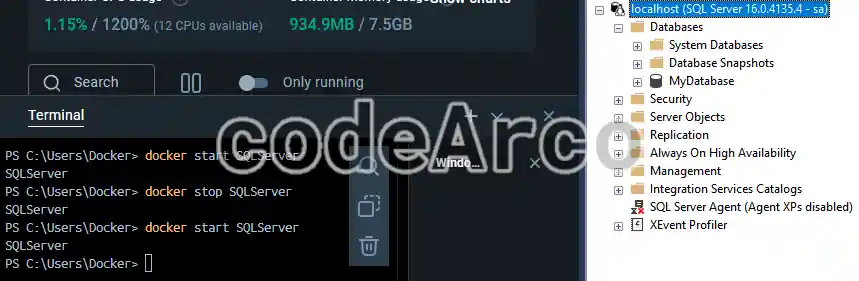
Now we are going to follow the same steps but, instead of restarting it, we are going to delete it and recreate it:
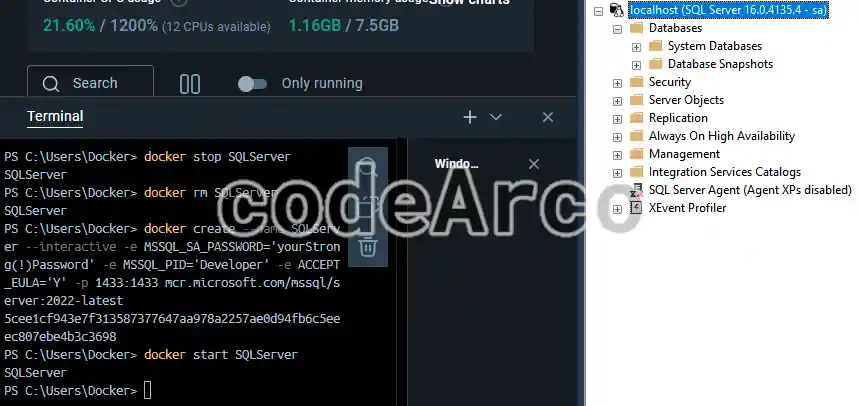
In this case the database does not exist, this means that the storage is not persistent between different containers and, since we have created a new container, the database is no longer available.
Volumes are useful for this case where we recreate a container or for the case where we have several containers and we want to share the information between them.
The commands to create a volume and assign it to a container are:
- Create volume,
docker volume create MyVolume, creates the volume by assigning it a name. - Assign or map volume,
docker create -v MyVolume:/home… etc, assigns the volume “MyVolume” to the “home” folder of the container when creating it. Everything we store in that folder will be available to other containers and even on our host system.
As you can imagine, the first step to using a volume in our SQL Server database is to know where it stores the information within a Linux system, in our case it is stored in “/var/opt/mssql/data/”.
Then we will simply create the volume and add the -v argument to our create command:
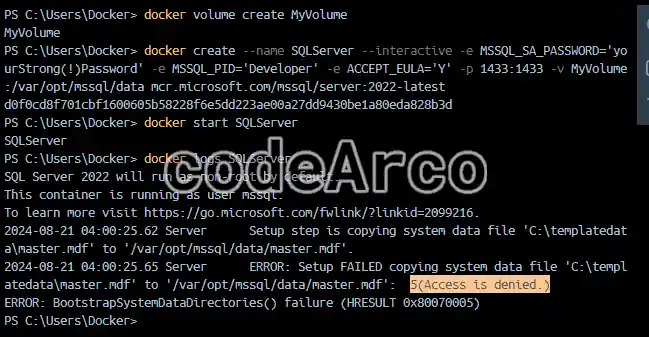
Once this is done, the storage will become persistent and our database will not disappear even if we delete and create the container again.
Volume access denied error with SQL Server in Docker
After much research I got to the root of the problem and that is that the SQL Server images went from using the root user to not using it.
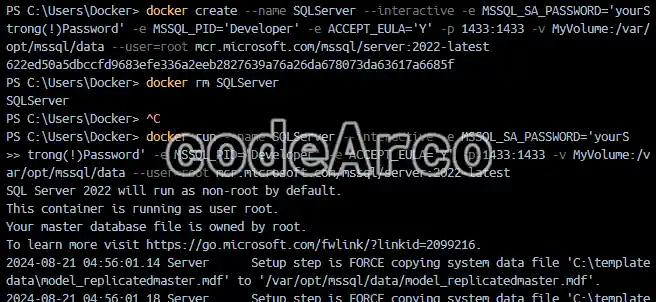
In summary, we will use the --user=root parameter when creating the container but, in production or more serious environments, I recommend that you follow the second solution where it is recommended that you analyze which user SQL Server uses internally and that you give permission to the volume folder to that user.
Once the error is resolved, we will enter the following commands:

And we will follow the following steps to verify that now, with volumes, the storage is persistent in all cases:
- Create a database.
- Investigate where Docker Desktop stores the volumes for our specific operating system, in our case it is in “\\wsl$ \docker-desktop\mnt\docker-desktop-disk\data\docker\volumes”.
- Verify that the database files have been created in the previous folder.
- Restart the container and verify that the database exists.
- Delete the container, recreate and start it and verify, as before, that the database has not disappeared.
What is the docker run command for?
Now we will use one of the most useful and popular commands, the docker run command that allows us to run three steps in one and save time:
docker pull image:tag, first checks if the image exists and, if so, downloads it.docker create image:tag, then creates a container with the parameters that we pass to it. The parameters of the run command are exactly the same as those used in the create command.docker start containerName, finally tries to start the container in the same way as the start command does.
To test this command we will run the following:
- Create the container with create in the same way as before.
- Delete the container with
docker rm SQLServer. - Copy the create command and replace the word “create” with “run”.
As you can see, the syntax and the result are exactly the same as create with the only difference that this command automatically starts the container and, if the image did not previously exist, it would download it:
How to access the terminal of a Docker container?
In a previous section we saw how to connect to the container from a program like SSMS or the browser to whatever the container is running, such as a database or a .NET application. However, it is also possible to access the server and the terminal inside the container to enter commands, perform tests or debug.
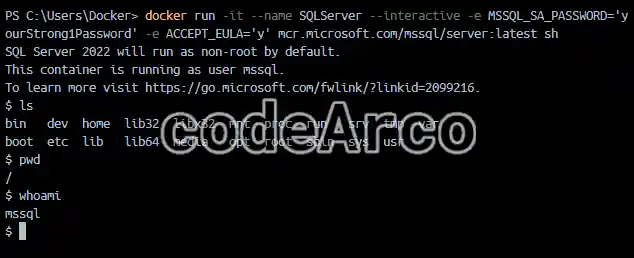
Well, we will simply have to enter the -it option inside the run command and, at the end, indicate the terminal to use, in this case sh:
Another alternative is to use the exec command after starting the container with the same options, that is, -it and sh at the end:
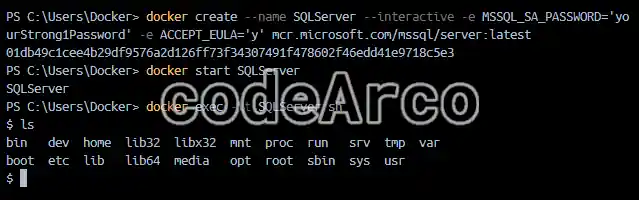
This will allow us to see what is happening inside the container, debug errors, review logs… etc.
Finally, it is worth mentioning that we could see many more commands such as, for example, how to create networks in Docker through commands, but I do not see it as useful since in Docker you do not work with commands but with the Dockerfile and docker-compose.yml configuration files.
However, as you have seen, it is interesting to practice a little with the terminal and learn what is underneath, since this reinforces the theory we saw in the previous chapter and provides us with a much more solid knowledge base to then move on to work with Dockerfile and docker-compose.yml.