
Before proceeding with this post, it is necessary to review what we have seen so far in the previous tutorials of this Docker course:
- Docker theory with the most important concepts of this. Necessary to establish a good base and then move on to practice with everything clear and without doubts.
- Docker commands in practice with real examples. Although the commands are not used much, we have seen them to understand and know how the system really works.
- Real examples of creating images with Dockerfile. The first necessary step before moving on to using the docker-compose.yml file is to create optimized, correct and secure images with Dockerfile.
The docker-compose.yml file can be seen as an orchestrator or organizer of all the previous points, something similar to the run command that we saw in past episodes but much more complete and centralized.
What is the docker-compose.yml file and what is it for?
As we have said, docker-compose.yml is an orchestrator to create images and start containers. It allows you to define a set of containers, how they will be started and what image or Dockerfile they will use.
The way we worked until now consisted of creating a Dockerfile file in our project, with the build command we created the image and with the run we mounted the image in the container and started it by mapping ports but…
What happens when we have an application made up of several projects and, therefore, several images and containers? It is unviable and quite boring to launch one by one manually.
Given the above we can say that a docker-compose.yml file is used to orchestrate several images and containers, allowing, through a single file and a command, the following points:
- Creation of several images through their respective Dockerfile files or the url where it is published.
- Creation and start of several containers, each with their respective images.
- Creating, if necessary, persistent storage so that containers can access and share data.
- Communication between containers (internal) and to the outside (external) through networks and ports.
- Synchronizing the start of containers, since some must be launched before others.
- Establishing start conditions or health checks for each of the containers so that, if one of them is not in a correct state, the rest that depend on it will not be started.
Real Docker example and docker-compose.yml
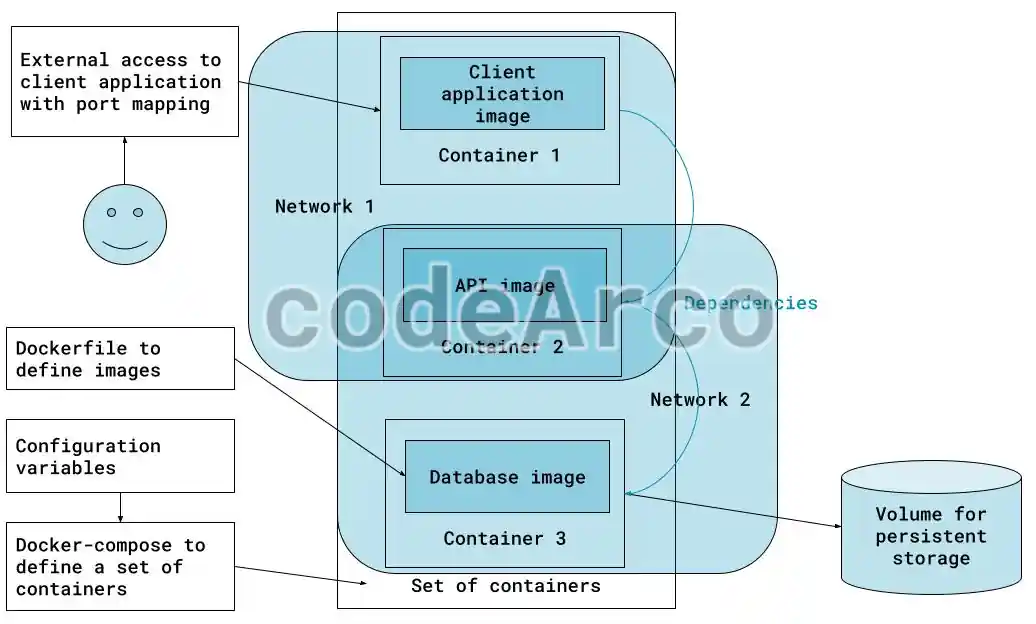
Before starting to create our docker-compose.yml file, it is necessary to have a clear idea of the architecture of the real Docker example to be implemented:
- .NET MVC application that contains the front end and the API calls, which will be the only one accessible from outside.
- .NET API that makes database calls. Only the MVC application can access the API, for which we will create Network 1.
- SQL Server database only accessible from the API, for which we will create Network 2.
- Persistent storage for our SQL Server database, for which we will create a volume.
- Execution order, SQL Server must be executed first, then the API, and finally, when it is ready, the client application.
- Configuration variables to modify the behavior of the containers once they are running.
- Dockerfile files that define how the images of each of the containers will be created.
In addition to the above, I leave you with the task of creating the Dockerfile and .dockerignore files for the API. To do this, you can use the files of the MVC application. The only thing you need to keep in mind is that if you want to test it through Swagger, you will have to comment the following lines in the “Program.cs”:
//if (app.Environment.IsDevelopment())
//{
    app.UseSwagger();
    app.UseSwaggerUI();
//}
First steps and simple example of docker-compose.yml
In this section, we will create a docker-compose.yml file to automate the following steps through a single command and a file:
- Run the Dockerfile files of the API project and the .NET MVC APP.
- Generate the image for each of them. This will help us avoid using the docker
build -t api-image:1.0.0 .command several times. - Create and start a container for each one of them, mapping the corresponding ports so that they are accessible from the outside and we can test them. This will help us avoid using the
docker run --name api-container -p 8080:8080 -it api-image:1.0.0command several times.
We will leave the database for the next section, as it is a somewhat special case.
We will start from the following Dockerfile for the APP:
FROM mcr.microsoft.com/dotnet/sdk:8.0-alpine AS sdk
RUN addgroup my-app-group \
&& adduser my-app-user --disabled-password --gecos "" --ingroup my-app-group
USER my-app-user
WORKDIR /home/my-app-user/app/src/
COPY --chown=my-app-user ./App.csproj .
RUN dotnet restore "App.csproj"
COPY --chown=my-app-user . .
RUN dotnet publish "App.csproj" --no-restore -c Release -o /home/my-app-user/app/publish
FROM mcr.microsoft.com/dotnet/aspnet:8.0-alpine AS runtime
RUN addgroup my-app-group \
&& adduser my-app-user --disabled-password --gecos "" --ingroup my-app-group
USER my-app-user
COPY --chown=my-app-user --from=sdk /home/my-app-user/app/publish /home/my-app-user/app/publish
WORKDIR /home/my-app-user/app/publish
EXPOSE 8080
CMD ["dotnet","App.dll"]
And the following Dockerfile for the API:
FROM mcr.microsoft.com/dotnet/sdk:8.0-alpine AS sdk
RUN addgroup my-app-group \
&& adduser my-app-user --disabled-password --gecos "" --ingroup my-app-group
USER my-app-user
WORKDIR /home/my-app-user/app/src/
COPY --chown=my-app-user ./Api.csproj .
RUN dotnet restore "Api.csproj"
COPY --chown=my-app-user . .
RUN dotnet publish "Api.csproj" --no-restore -c Release -o /home/my-app-user/app/publish
FROM mcr.microsoft.com/dotnet/aspnet:8.0-alpine AS runtime
RUN addgroup my-app-group \
&& adduser my-app-user --disabled-password --gecos "" --ingroup my-app-group
USER my-app-user
COPY --chown=my-app-user --from=sdk /home/my-app-user/app/publish /home/my-app-user/app/publish
WORKDIR /home/my-app-user/app/publish
CMD ["dotnet","Api.dll"]
The first step is to create a docker-compose.yml file in the root of the folder containing the projects, that is, in the “Docker” folder. The code is as follows:
services:
    app:
        build: ./App/App
        ports:
            - 8080:8080
    api:
        build: ./Api/Api
        ports:
            - 50000:8080
The commands used within docker-compose.yml are:
- services, indicates the projects we have, in our case there are only two, APP and API, we leave the database for later.
- build, indicates the path where the corresponding Dockerfile files are located, the path must be relative to the place where the docker-compose.yml file is located.
- ports, like the
docker create -pcommand, is used to indicate the port mapping between the host machine and the container.
Now we will use the docker compose up -d command to run the docker-compose.yml file. We must run it within the path where the file is located. The -d parameter reduces logs and returns control of the terminal.
Once executed we can also use the commands we have seen so far, such as docker images to see the generated images and docker compose ps to see the list of containers and their status.

Next you can test that both the APP and the API are working by accessing “http://localhost:8080/” and “http://localhost:50000/swagger/index.html” respectively.
Once the tests are done, remember to remove the ports section of the API since it should not be accessible from outside, we have simply put it there to be able to check that it really works.
Finally, if you wish, you can use the docker compose down command to stop and delete the created containers, although the images will still exist so you can also use docker image prune -a to delete them.
SQL Server database container configuration
I have left this part of the application for another section since it is a bit peculiar. What differentiates it from the other two projects is that in this case we do not have a Dockerfile or a project for it.
This is why we will use image vs build in docker-compose.yml:
- services build creates an image from a Dockerfile. In our example we use it for the API and the APP.
- services image uses an image given a url, but does not create it, only downloads it. In our example we will use it to download the corresponding version of SQL Server.
If you remember, in previous articles we used the image “mcr.microsoft.com/mssql/server:2022-latest”, this time we will also use it but we will indicate a specific version to follow good practices and avoid “latest”.
The docker-compose.yml example code that we will use to create the SQL Server container is as follows:
services:
    app:
        build: ./App/App
        ports:
            - 8080:8080
    api:
        build: ./Api/Api
        # ports:
        #     - 50000:8080
    db:
        environment:
          ACCEPT_EULA: "Y"
          SA_PASSWORD: myStrongP@ssword
        image: mcr.microsoft.com/mssql/server:2022-CU14-ubuntu-22.04
        ports:
            - 1433:1433
Some notes on the above code:
- Although we will see it later,
environmentis used to set container configuration variables in the same way as we did with theruncommand. - As you can see in this service or project we don’t have a
buildbutimageto indicate where to download the image, it will not be built. - Remember to comment out the
portssection of the database once you have tested that it is accessible and works correctly because it will not be accessible from the outside either.
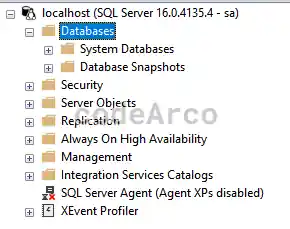
Optionally we can check that we access it correctly through Microsoft SQL Server Management Studio:
How to create volumes for persistent storage?
Now we have the same problem as when we saw the volumes with commands, if the database container is deleted and recreated, its data will disappear because we do not have persistent storage.
Well, this is solved by adding, at the same level as services, the volumes line with the list of volumes to create (in our case it will be just one). Remember that SQL Server stores the information in “/var/opt/mssql/data/” within Linux.
The docker-compose.yml code with volumes is as follows:
services:
    app:
        build: ./App/App
        ports:
            - 8080:8080
    api:
        build: ./Api/Api
        # ports:
        #     - 50000:8080
    db:
        environment:
          ACCEPT_EULA: "Y"
          SA_PASSWORD: myStrongP@ssword
        image: mcr.microsoft.com/mssql/server:2022-CU14-ubuntu-22.04
        ports:
            - 1433:1433
        volumes:
            - db-volume:/var/opt/mssql/data/
        user: "root"
volumes:
    db-volume:
As you can see, we have added two sections:
- One at the end of the file with the tag
volumesthat simply indicates the volumes available for the container group we are creating. In this example we will only have one called db-volume. - One inside the “db” service where we assign the “db-volume” volume to the “/var/opt/mssql/data/” path of the container through the line
db-volume:/var/opt/mssql/data/.
Also, just like when we created the database with commands, we must indicate that the default user of the SQL Server container is root, otherwise we will have problems with the permissions. This is something specific to SQL Server, you will probably not find it with other databases such as MySQL.
The above is because SQL Server uses the mssql user by default when starting the container and it does not have access to the created volume because it belongs to root.
Starting a container in root mode is not a good solution, the best would be:
- When mounting the volume we can indicate that the owner is mssql instead of root, this option is not viable because the owner cannot be indicated when creating a volume with docker-compose.yml.
- On the host system we can change and give permissions to users. If, for example, our host system was Linux, we would create a folder for the volumes and give permission to mssql. Since we are in Windows simulating Linux we cannot do this either.
Finally we will check the persistence of data in the volume by following these steps:
- Delete the containers created with the
docker compose downcommand. - Recreate them with
docker compose up -d. - Create the database through SSMS.
- Delete the containers again with
docker compose down. - Recreate them a second time with
docker compose up -d. - Refresh the “Databases” folder in SSMS and verify that what we created before still exists.

Configuration variables in docker-compose.yml
Although we have already seen the configuration variables section in docker-compose.yml, we are going to see another way of creating them when we have slightly more complex configurations.
In the case of our example .NET project, the configurations are stored in a file called “appsettings.json”. In the case of the APP we have the following configuration:
{
  "Logging": {
    "LogLevel": {
      "Default": "Information",
      "Microsoft.AspNetCore": "Warning"
    }
  },
  "AllowedHosts": "*",
  "Api": "http://localhost:5270/"
}
In order to establish these configuration variables through the docker-compose.yml file we will go to the APP service and create the following subsection:
environment:
    - Api=http://api:8080/
As you can see, it is a different syntax to establish the value of the configuration variables with respect to what we have in the service db, simply instead of using the format “Variable: Value” we use “- variable=value”.
You may wonder how we know which port the API starts on? Simple, run docker compose up without -d and in the logs you will find the line “api-1 | Now listening on: http://[::]:8080”.
A very important point to keep in mind, we have changed “localhost” to “api”. Within the configuration variables we can use the name of a service to refer to the IP of another container, in this way we can generalize the code even more and not be dependent on IPs that may change in the future.
Now it is the turn of the API, we must configure the database connection, the appsettings are the following:
{
  "ConnectionStrings": {
    "DefaultConnection": "Server=(localdb)\\mssqllocaldb;Database=Emplyees;Trusted_Connection=True;"
  },
  … etc
}
If you notice now it is necessary to set the value of a variable with childrens in docker-compose.yml, we achieve this with two “_”, that is, inside the API service we will add the following line:
environment:
    - ConnectionStrings__DefaultConnection=Server=db;Database=Employees;Trusted_Connection=false;User Id=sa;Password=myStrongP@ssword;TrustServerCertificate=true;
Again, remember to replace “localdb” or the corresponding IP with the name of the “db” service.
Finally, before testing the application, make sure to remove the containers with the docker compose down command and recreate the images avoiding the cache with the docker compose build --no-cache command, as we can see the application works correctly:
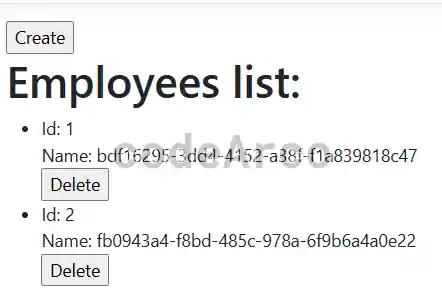
You can also check that if you remove the containers and recreate them, the data persists and does not disappear.
Finally, specifically for our project, I would like to comment on some errors that we can find in .NET with SQLServer and Alpine:
- When reading from the appconfig we must use the AddEnvironmentVariables method so that it is replaced by the one from docker-compose.yml. This is not really an error but expected behavior.
- If you get the error “System.Globalization.CultureNotFoundException” you should change the Api.csproj and insert the following line inside “PropertyGroup”:
<InvariantGlobalization>false</InvariantGlobalization> - And then modify the API Dockerfile to install the icu-libs and icu-data-full packages only if you use the Alpine runtime.
This error is only encountered with certain versions of .NET Core with SQL Server and Alpine, it may not appear for you.FROM mcr.microsoft.com/dotnet/aspnet:8.0-alpine AS runtime RUN apk add icu-libs icu-data-full
Networking, ports and communication in containers
Before starting with this section, it is necessary to remember two important points about networking in Docker:
- The
EXPOSEline within a Dockerfile does not expose the container to the outside, it is merely informative. - What really exposes and maps ports of a container to the outside is the
run -p XX:YYcommand or theports: - XX:YYsection of docker-compose.yml.
In addition, the above refers to external communication, that is, the ability to access a container from the outside so that, for example, a user can use our application.
What we are going to talk about in this section is internal communication, that is, the ability of containers to communicate with each other.
If we run the following docker-compose.yml with docker compose up -d we can check that the application works:
services:
    app:
        build: ./App/App
        ports:
            - 8080:8080
        environment:
            - Api=http://api:8080/
            - ASPNETCORE_ENVIRONMENT=Production
    api:
        build: ./Api/Api
        # ports:
        #     - 50000:8080
        environment:
            - ConnectionStrings__DefaultConnection=Server=db;Database=Employees;Trusted_Connection=false;User Id=sa;Password=myStrongP@ssword;TrustServerCertificate=true;
            - ASPNETCORE_ENVIRONMENT=Production
    db:
        environment:
          ACCEPT_EULA: "Y"
          SA_PASSWORD: myStrongP@ssword
        image: mcr.microsoft.com/mssql/server:2022-CU14-ubuntu-22.04
        #ports:
        #     - 1433:1433
        volumes:
            - db-volume:/var/opt/mssql/data/
        user: "root"
volumes:
    db-volume:
But… Why does the application work if we haven’t created any network for the containers to communicate internally with each other? Well, because, if we don’t specify anything about networks in the file, by default the containers can communicate with each other because a network is created that contains all of them, we can see it with the docker network ls command:
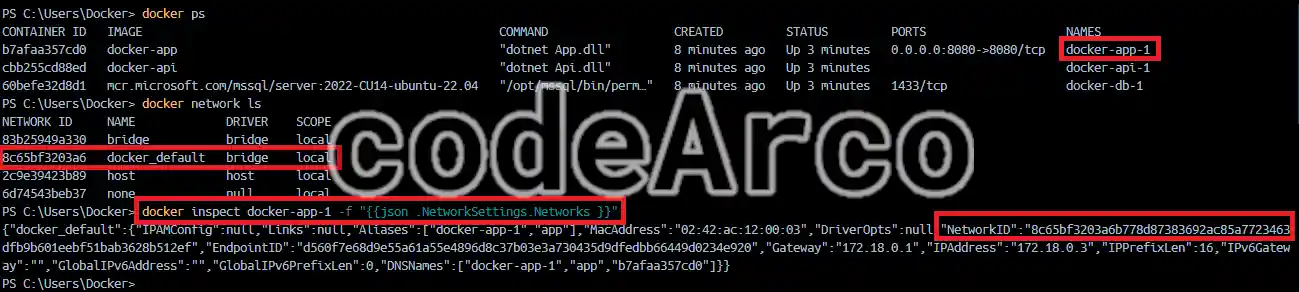
Also, before proceeding with the practice you will have seen the driver column and you may wonder what the types of Docker networks are. Well, here is a summary of the types of networks in Docker:
- Bridge, the default network type if we don’t specify anything, is used to communicate containers of an application or group between them, as in our case. These are isolated in their own network and are not accessible from the host or from another group of containers.
- Host, containers use the network of the host they are on instead of the Docker virtual network. Being on the network of the host that contains them, they are accessible both from the host itself (host machine) and from another group of containers with some extra configuration.
- Overlay, similar to host with the difference that it does not use the network of the host that contains them, but a virtual network that allows communication between containers that are on different hosts and different groups of containers. Widely used in Kubernetes.
- None, the container is fully isolated.
Now, let’s get down to business and check how to create networks in docker-compose.yml:
- The first thing we will do is create two networks, Network 1 and Network 2 with the “Bridge” driver. To do this, we will go to the end of our file and create the networks section:
networks: network-1: driver: bridge network-2: driver: bridge - Assign the networks to the containers. Specifically, we assign APP network 1 and API network 2 with the
networksinstruction in each of the services:app: networks: - network-1 - Launch the application and, as expected, we get an error because the APP cannot communicate with the API since they are on different networks:

Connection error between containers with networks
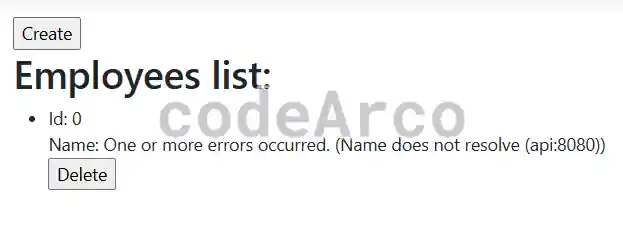
Now we are going to implement the architecture that we thought of at the beginning where APP and API will be on network 1 and API and database will be on network 2. We check that the application works correctly. Optionally we can check that the APP can ping the API but not the database:

The final code of the docker-compose.yml file for this section would be the following:
services:
    app:
        build: ./App/App
        ports:
            - 8080:8080
        environment:
            - Api=http://api:8080/
            - ASPNETCORE_ENVIRONMENT=Production
        networks:
            - network-1
    api:
        build: ./Api/Api
        # ports:
        #     - 50000:8080
        environment:
            - ConnectionStrings__DefaultConnection=Server=db;Database=Employees;Trusted_Connection=false;User Id=sa;Password=myStrongP@ssword;TrustServerCertificate=true;
            - ASPNETCORE_ENVIRONMENT=Production
        networks:
            - network-1
            - network-2
    db:
        environment:
          ACCEPT_EULA: "Y"
          SA_PASSWORD: myStrongP@ssword
        image: mcr.microsoft.com/mssql/server:2022-CU14-ubuntu-22.04
        #ports:
        #     - 1433:1433
        volumes:
            - db-volume:/var/opt/mssql/data/
        user: "root"
        networks:
            - network-2
volumes:
    db-volume:
networks:
  network-1:
    driver: bridge
  network-2:
    driver: bridge
What are dependencies and healthchecks in Docker?
Dependencies in Docker allow us to run a container when another one has been run. In our case we have the following scenario:
- The APP depends on the API.
- The API depends on the database.
- The database does not depend on anyone.
Now, how do we indicate the dependencies in docker-compose.yml? Simple, through the depends_on line, within each service we will indicate the list of services on which it depends:
services:
    app:
        …
        depends_on:
            - api
    api:
        …
        depends_on:
            - db
    db:
        …
Now, keep in mind that depends_on is an incomplete command because the only thing it checks, for a container, is that the container it depends on has started, nothing more. It does not check if that start is correct or not. This, in turn, means:
- It does not check for errors, for example, it is possible that the database container starts but, due to some configuration error, it does not start or does not allow queries. If we had only depends_on the API would start and, when calling the database, it would give an error.
Another example would be that the API did not have access to the database due to a bad network configuration, with depends_on, since the SQL Server has started correctly, the API will start and give an error. - It only runs once, which means that, if for some reason, one of the containers stops working after a while, the rest will remain active and throw errors.
An example of this would be that the API went down due to traffic overload, the APP would call it and, obviously, it would give an error.
What Docker covers is the first point, but not the second, this corresponds to Kubernetes and is not part of the course.
The first point, that is, error checking or checking the health status of another container, is achieved with the healthcheck instruction. This command allows us to define whether a container has started correctly or not, in Docker terminology, when it is “healthy”. This, together with depends_on, allows us to establish an order of execution by checking for errors.
Let’s see, in our own project, a full and practical example of depends_on and healthcheck.
We will start with the database, the question we must ask ourselves is, when is it ready? When we can make queries on it. Well, we must add the following lines to the db service:
healthcheck:
    test: ["CMD-SHELL",
    "/opt/mssql-tools18/bin/sqlcmd -S localhost -U sa -P myStrongP@ssword -C -b
    -Q \"SELECT * FROM INFORMATION_SCHEMA.TABLES WHERE TABLE_TYPE='BASE TABLE'\""]
    interval: 10s
    retries: 10
    start_period: 10s
    timeout: 3s
Then we must make sure that in the API we have the depends_on section to indicate that it depends on the healthcheck of the db service with the condition service_healthy:
depends_on:
    db:
        condition: service_healthy
In the case of SQLServer and, more specifically, sqlcmd utility, the -b parameter in the query is the most important because it returns an error if the query is wrong or cannot be executed.
The rest of the parameters are easily understandable, interval indicates how often the check is performed, retries the number of times it is repeated in case of an error, start_period when the checks should start and timeout the maximum time of each of the executions.
Once we have this in our docker-compose.yml we can see that, if we do a docker compose up, the other containers do not start until after a while:
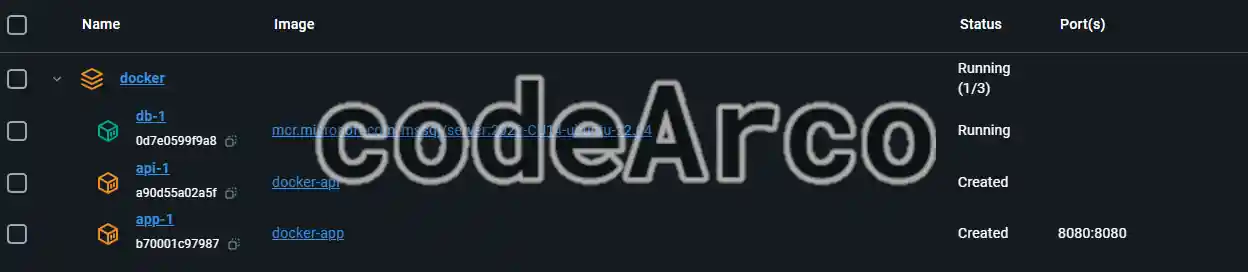
Another check you can do if you use SQL Server is to remove the FROM from the query in the test section and you will see that, after a period of time, Docker notifies us that the database container is not “healthy” and, as a consequence, it has stopped all the containers in the group and returns the error “dependency failed to start: container docker-db-1 is unhealthy”.
Now we are going to move on to the API, we must ask ourselves the same question, when will it be ready? Well, when it is accessible and can be called. We can implement this through a ping or, better yet, through the health checks of the APIs which are nothing more than a method or endpoint that, when called, tells us whether our API is healthy or not.
Here are the instructions to implement health checks in .NET, if you use another language or framework you will have to investigate, but almost all of them have this functionality.
Once we have implemented the health checks in the API we must add the following to our docker-compose.yml:
- Inside the API service we will indicate that it is healthy when the CURL command can be executed against the health check endpoint:
api: … healthcheck: test: ["CMD", "curl", "-f", "http://api:8080/healthcheck"] interval: 10s retries: 10 start_period: 10s timeout: 3s - Note that since we are using an Alpine image, you may have to install curl in the API Dockerfile with the following instruction before changing the container user:
RUN apk add curl - Within the APP service we indicate that it depends on the API being in a healthy state in the same way as before:
depends_on:
    api:
        condition: service_healthy
Once all the above is done it is time to stop and delete the containers with the command docker compose down, rebuild the images with docker compose build --no-cache and finally start them with docker compose up.
As you can see now all the containers are started in order and it takes a little while since they have to wait for the containers they depend on to be ready.
The final code of our docker-compose.yml file can be found in the repository of our linked Docker example.
Finally I would like to talk about unit and integration tests in Docker, there are advocates of running them in Docker and advocates of running them outside of it. I personally prefer to run them outside, in a previous step to creating the image and running the containers. In any case, since it will not help us much when learning Docker, we will leave this topic aside.