
In this article we are going to see how to reduce the weight or size of an image and how to create a thumbnail of it.
For this we will use Gimp, a professional, powerful, free and very versatile image and photo editing software. You can not only use it for this purpose, it is used for many very useful things such as, for example, creating icons, retouching the brightness or contrast of an image, introducing watermarks… etc. You can download Gimp for free from the official website.
Additionally, we will also learn how to compress several images at the same time and how to create thumbnails in bulk with Gimp using a plugin called Bimp.
How to reduce the weight of an image
Reducing the weight of an image consists of compressing it so that the space it occupies on the hard drive is less. Obviously, the less weight the image has, the lower its quality. In most cases it will compensate us for losing a little quality to reduce the disk size of the image.
The first thing we must do is open the image with Gimp. Then we select “File”, “Export as”.
At the bottom, click on “Select file type” and a window will appear where we will choose “JPEG image” or the desired format. We click on “Export”.
If in this step a popup appears saying that the file already exists, change the name at the top so that the original is not modified.
The window to configure the export options will then appear. We have to check the “Show preview in image window” option to be able to see how the image changes as we modify its quality and uncheck all the “Save” options so that it does not save additional data that increases the file size:
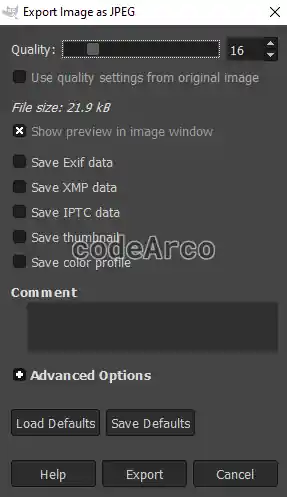
We will lower the quality of the image step by step until we obtain the desired weight but always looking at the subsequent image, which is the one that shows us the result that we will have once exported, that is, the result with the reduced size.
Finally, click on “Export”, the compressed image will be stored in the chosen directory. In our case we have managed to reduce the weight of the image from 3.1 MB to 114.1 KB without sacrificing too much quality.
However, one of the formats to compress images recommended for your website is WebP as it allows you to obtain smaller images without sacrificing quality. Maybe in the future I will be encouraged to do a JPEG vs WebP comparison.
How to create an image thumbnail
Creating a thumbnail of an image consists of reducing its size and, in turn, the space it occupies on disk.
To create the thumbnail of an image we go to “Image”, “Scale image”.
A window will open where the current dimensions of the image as well as the resolution appear. It is important that the icon that I marked appears this way and not open, this allows that when we reduce the size of the image the proportion of the image is maintained and it does not go out of square:
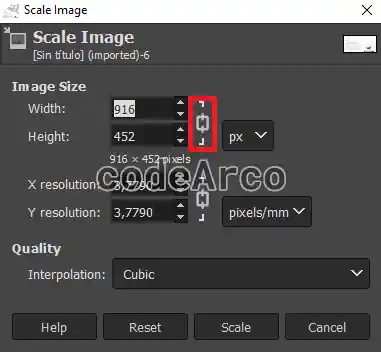
We set the desired value for the width or height and click on the number of the other. For example, we modify the width to 100 px and click on the height value so that it is auto-calculated. This happens because we have checked the option to maintain aspect ratio.
We click on “Scale”. This will allow us to see the result of reducing the image size.
To save the thumbnail we go to “File”, “Export as”, we give it the name we want and click on “Export”.
Next, the screen that we used before to reduce the weight of the image will open. In this case we will not lower the quality so we will select the option “Use the quality settings of the original image” by unchecking it and, as before, we uncheck all the “Save” options to avoid storing additional data. We are not interested in reducing the quality of the image since it is a miniature and already takes up enough little space that for us to reduce it even more, it does not make much sense.
As before, if we click on “Export” the thumbnail will be stored in the chosen directory. In our case, we have managed to reduce the weight of the image from 3.1 MB to 3.6 KB and reduce the size to 5.20% of the original.
Reduce the size of multiple images at once
To compress images in bulk or reduce the size of several images at the same time we have to use the Gimp Bimp plugin for bulk actions.
It’s important to know that Bimp doesn’t work with GIMP version 3 and, if this is the case, you should refer to the linked tutorial.
Once installed we will go to “File”, “Batch Image Manipulation”. At the top, where it says “Manipulation set”, click on “Add” and select the “Change format and compression” option.
Once inside we will open the advanced options. My recommendation is to uncheck the “Save baseline” option and use “Float” as the DCT algorithm since the compression will be greater. Regarding quality, you can play with it until you achieve the desired quality/compression ratio.
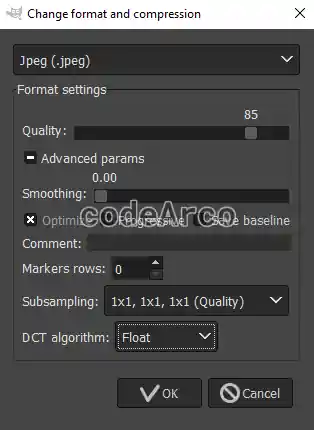
After that we click on OK. On the previous screen we will click on “Add images” and select the option to add from a folder or individually. We must also select the output folder on the right side, that is, the folder where the compressed images will be exported.
Once this is done, click on “Apply” and the reduced images will be stored in the selected folder. In our case we have managed to reduce the weight of the images by 70% although this depends on the parameters we use in the export and the images chosen.
Create thumbnails in bulk with Gimp
The process to create image thumbnails in bulk or at once is similar to the previous one. As before, you should keep in mind that the Bimp plugin is not compatible with Gimp 3, so you’ll need to read the guide linked in the previous section.
The only thing that changes is the manipulation set, in this case we will use the resize option. On the screen that appears below we can select various resizing options, such as whether we want to reduce them using percentages or pixels, whether we want the aspect ratio to be maintained or not, and the type of interpolation.
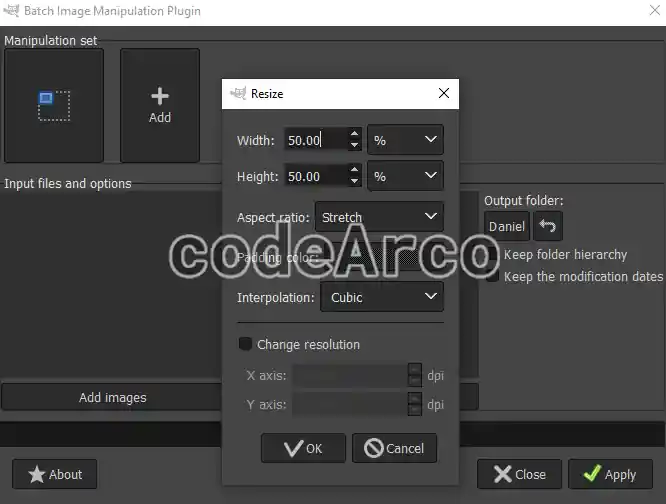
Once the process is finished we will have the thumbnails saved in the selected destination folder.