A few days ago I upgraded Gimp from version 2 to 3 and to my surprise, when I tried to bulk edit images with Bimp, the “Batch Image Manipulation” option wasn’t present in the menu.
After some research on the Internet, I realized that Bimp is not compatible with Gimp version 3 and higher and, furthermore, it doesn’t seem like there will be an update to make it compatible since it seems that the project has been abandoned by its author and hasn’t been updated since August 2021.
Keep in mind that you can continue using Bimp and Gimp 2 on your computer; you simply have the option to uninstall version 3 and reinstall version 2.
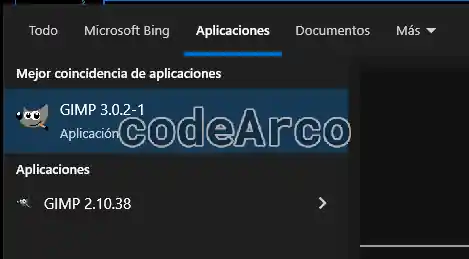
In my case, when I installed the update, I could access both versions through Windows Explorer and, therefore, every time I wanted to bulk edit images with Gimp, I chose version 2:
After a while, I got curious and started investigating, after which I found what for me is the best alternative to Bimp for Gimp, a plugin called Batcher that is fully compatible with Gimp version 3.
Bimp vs Batcher: Advantages and Differences
You may be wondering what are the differences and advantages of Batcher vs Bimp and whether this new Gimp plugin can meet your needs. Well, below we’ll look at some points that I find interesting:
- Both are very similar plugins, which means that Batcher will allow you to do exactly the same things you did with Bimp and even more.
- Batcher is compatible with Gimp version 3, which will allow you to use the updated version of Gimp at all times without having to have two different versions installed on your computer.
- Batcher is up-to-date and appears to be constantly developed and maintained by its author. This, for me, is a clear advantage over Bimp.
- Batcher is more complete than Bimp and has more customization options. As I mentioned before, you’ll be able to make any bulk edit with this plugin, no matter how difficult it may be, and you can rest assured that any task you previously performed with Bimp, you’ll be able to do with Batcher.
- Bimp was easier to use than Batcher. Since Batcher is more complete, it’s also a bit more complicated to configure. For me, this is the only drawback I see with the new plugin for bulk image editing in Gimp: it’s a bit more complex and, as a result, it will take you a bit longer to learn.
Don’t worry, though; below we’ll cover several Batcher tutorials that will give you a solid foundation of knowledge so you can later perform any bulk edit without the need for additional tutorials.
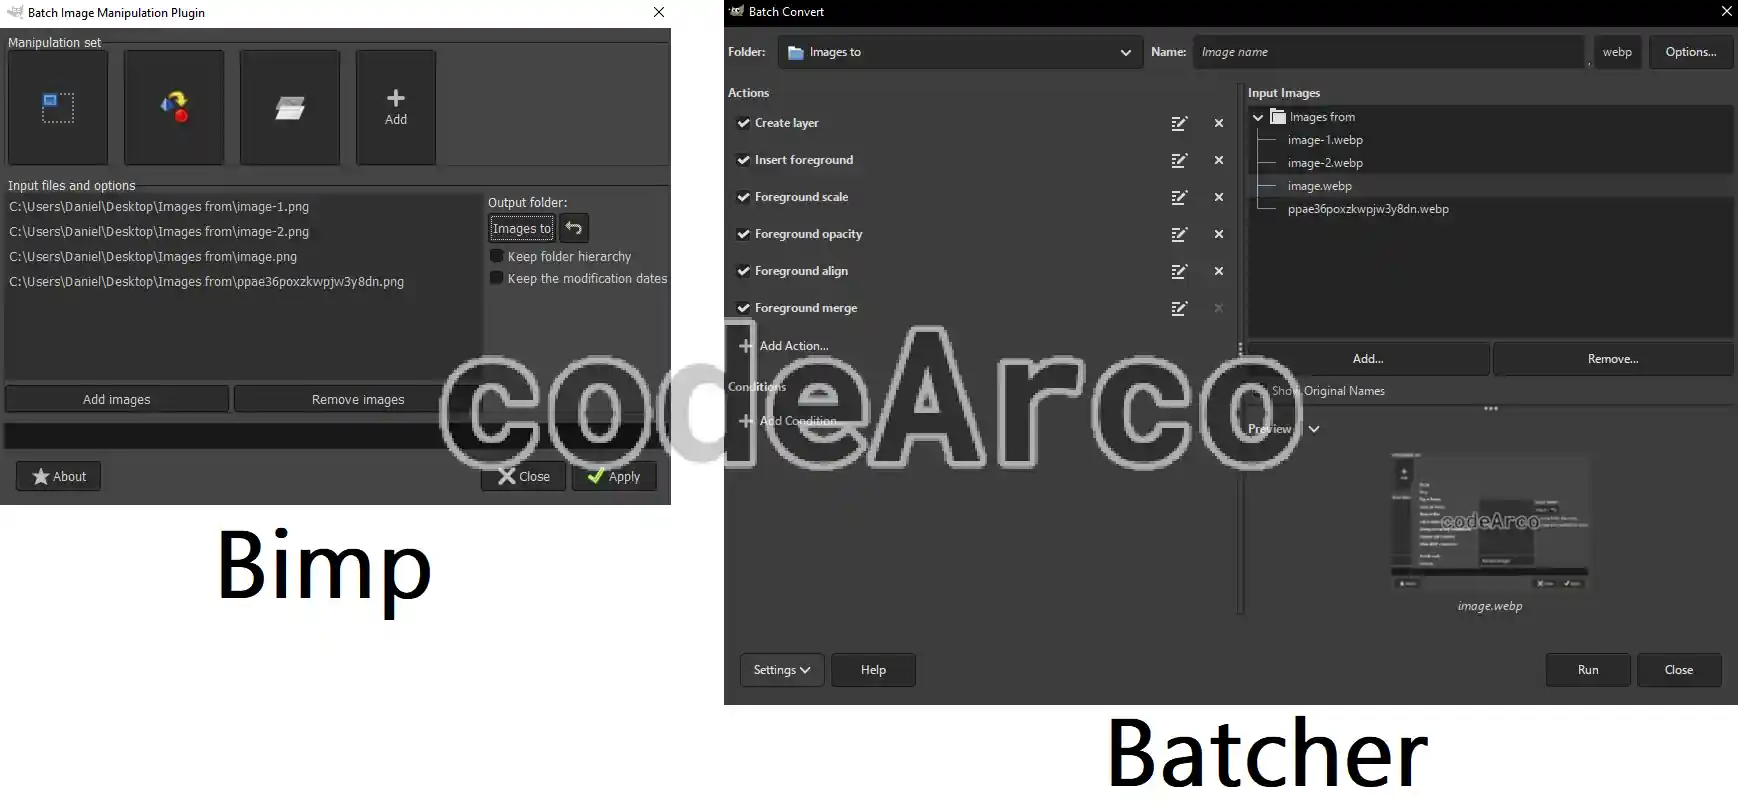
Finally, as a comparison between the two plugins, I’ve attached two examples showing the differences between them and their interfaces for the same tasks:
How to install Batcher in Gimp 3
To install Batcher in Gimp 3 follow these steps:
- Download the plugin from the official Github repository, make sure you download the latest version or release, and download the
.zipfile. - Locate the Gimp plugins folder through the “Edit” menu, “Preferences”, “Folders”, “Plug-ins” and access the path using your operating system’s file explorer.
- Copy the “batcher” folder inside the zip file to one of the paths you noted in the previous step. The folder structure should look similar to
C:\Users\your-user\AppData\Roaming\GIMP\3.0\plug-ins\batcherwhere “batcher” is the folder you found inside the compressed zip. - Close and reopen Gimp so it detects that you have a new plugin.
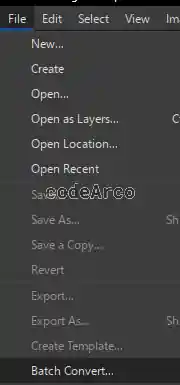
- Verify that the installation is correct by making sure that the “File” menu, “Batch convert”, is available. If the option appears, it means you have successfully installed the plugin.
If you have any problems installing it please go to the official documentation for installing Batcher.
How to reduce the size of images in bulk with Gimp and Batcher
To reduce the size of images in bulk and compress them so they take up less hard drive space, my recommendation is to export them to the WebP format with Batcher and Gimp. This extension is widely used on websites. To do so, simply follow the guide below:
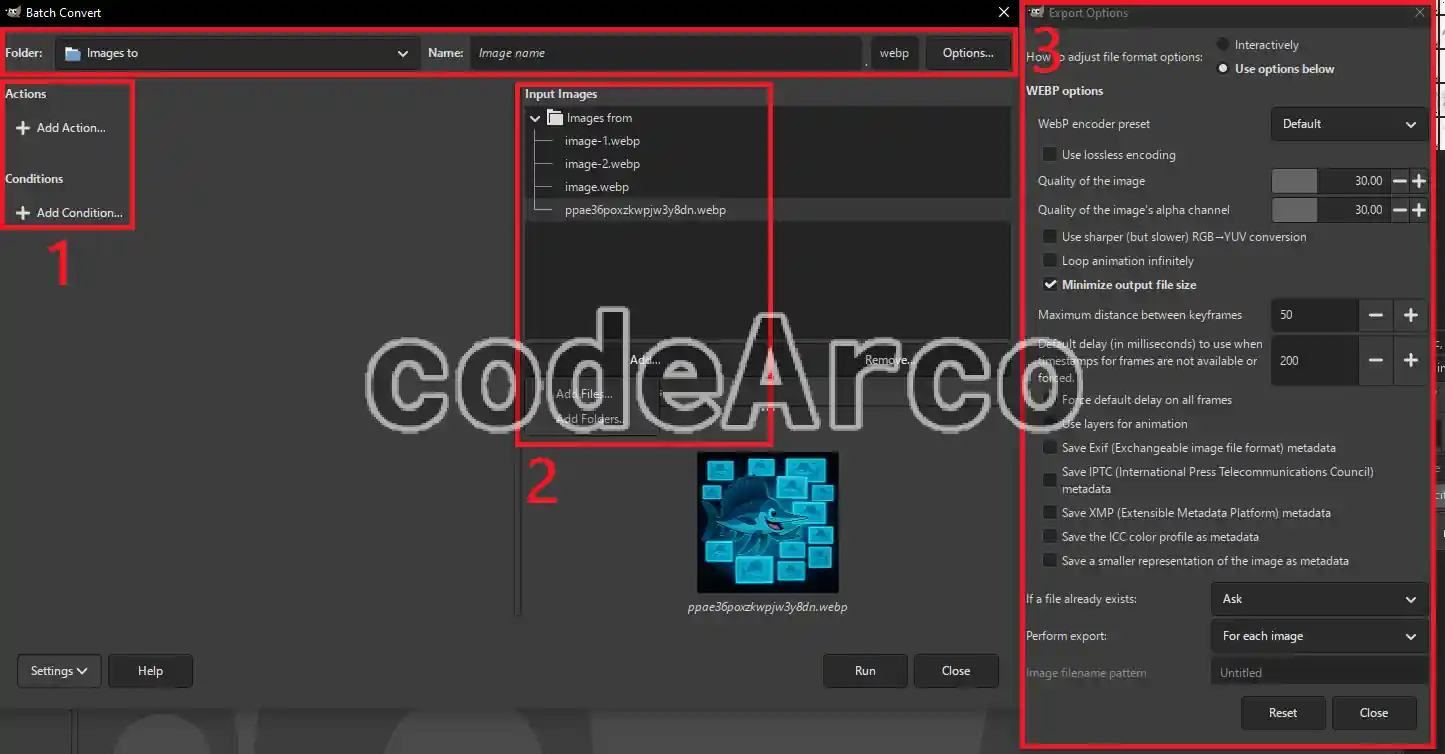
- Open the Batcher plugin to convert images in bulk using the “File” menu, “Batch convert”:

Open plugin to edit images in bulk with Batcher - Delete any steps in “Actions” and “Conditions” sections; for now, we’ll leave both sections empty.
- Add the folder containing the images to be edited in bulk using the “Input images”, “Add”, “Add folders” sections.

How to massively reduce image size with Gimp 3 - Add the destination folder via the “Folder” drop-down menu at the top.
- Change the extension to WebP via the “Name” section at the top; after the “.” type
webp. - Configure the WebP and export options as shown in the image. However, I recommend you read and play with these options to configure it to your liking.
- Click the “Run” button and wait for the process to finish.
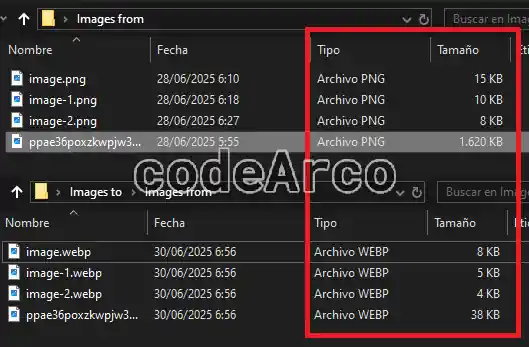
- Verify that the images now take up less space and have a different extension. To do this use your operating system’s file viewer:

Results of massively reducing image size with Gimp and WebP
Bulk image resize or scale
We’ll start with the previous example but, in addition to compressing and changing the extension of the images, we’ll configure Batcher to bulk manipulate images in one simple step, we’ll scale multiple images at once by following the instructions detailed below:
- Configure the plugin the same way we did in the previous section. Follow all the steps except for pressing the “Run” button, as we’ll do that later.
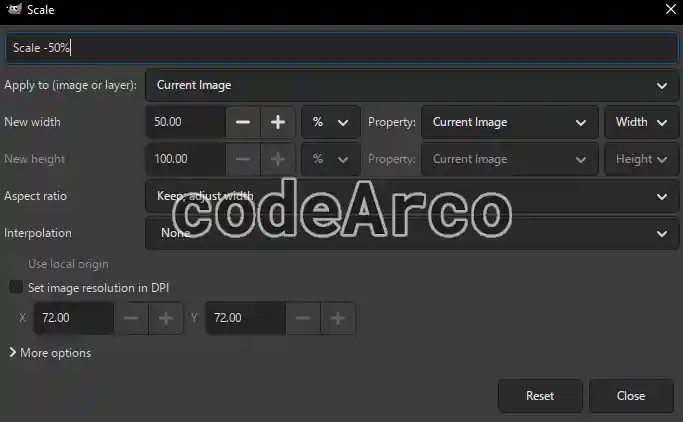
- Add the “Scale” action using the “Add Action” option.
- Configure the scaling options to your liking. The following example will scale the image to half its size:

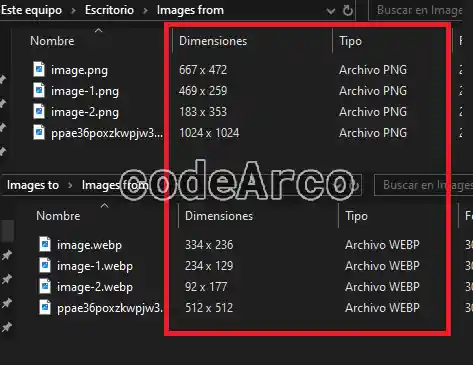
Batch scale images with Gimp and Batcher - Check the changes through your operating system’s file explorer after clicking the “Run” button. Now the dimensions of each image are half of what they were before:

Batch scale image result
Create a bulk watermark with Gimp 3 and Batcher
This step is a bit more complex or time-consuming than the previous ones and we’ll follow the instructions for creating watermarks on images in bulk with Gimp 3 and Batcher:
- Follow the steps in the previous section where we configured the source and destination folders, reduced the size of the images by exporting them to WebP and scaled them to 50% of their size.
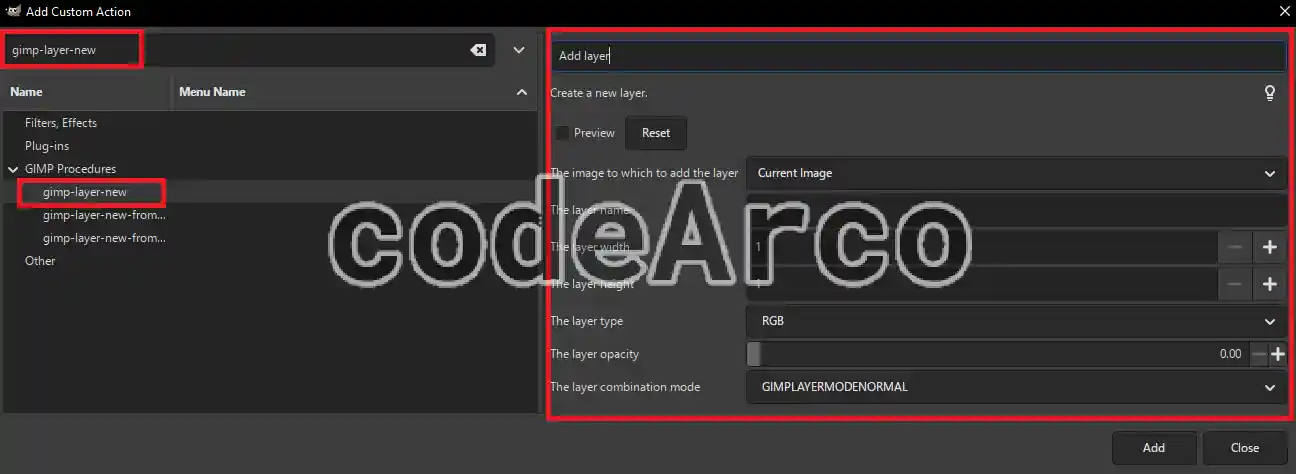
- Add a layer through the “Add Action” menu, “Add custom action”, then select the “gimp-layer-new” option and give it a coherent name, leaving the default options:

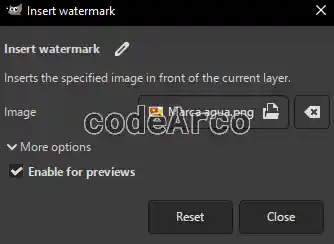
Insert layer with Batcher - Insert the watermark in image format. I recommend an image with a transparent background. To do this, add an “Insert Foreground” action with the following settings:

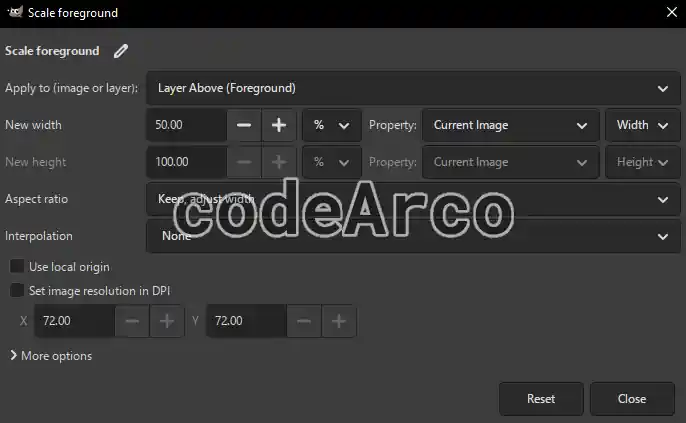
Insert bulk watermark in Gimp 3 - Scale the watermark if desired by inserting a new “Scale” action. Keep in mind that this time we will apply it to the “Foreground” instead of the “Image”:

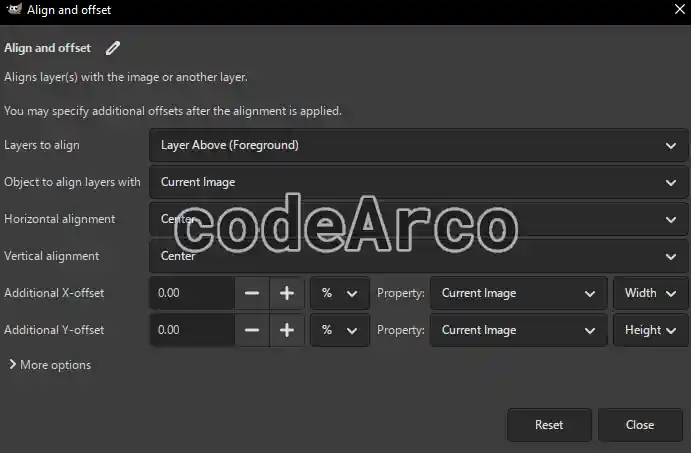
Scale watermark with Batcher - Align the watermark wherever you want using a new action of the type “Align and offset”; in my case, I’ll position it in the center of the image:

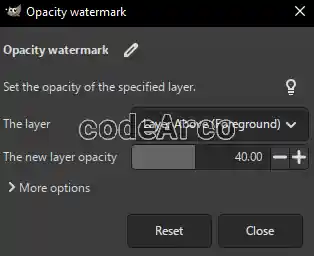
Align watermark for images in bulk - Set the watermark’s opacity using the custom action “gimp-layer-set-opacity”:

Watermark opacity with Gimp - Uncheck the scale action if you only want to add a watermark without altering the dimensions of the original images. My intention is to reuse this settings and uncheck the actions when I don’t need them and vice versa, so I won’t delete the scale option and I’ll uncheck it when I don’t need it.
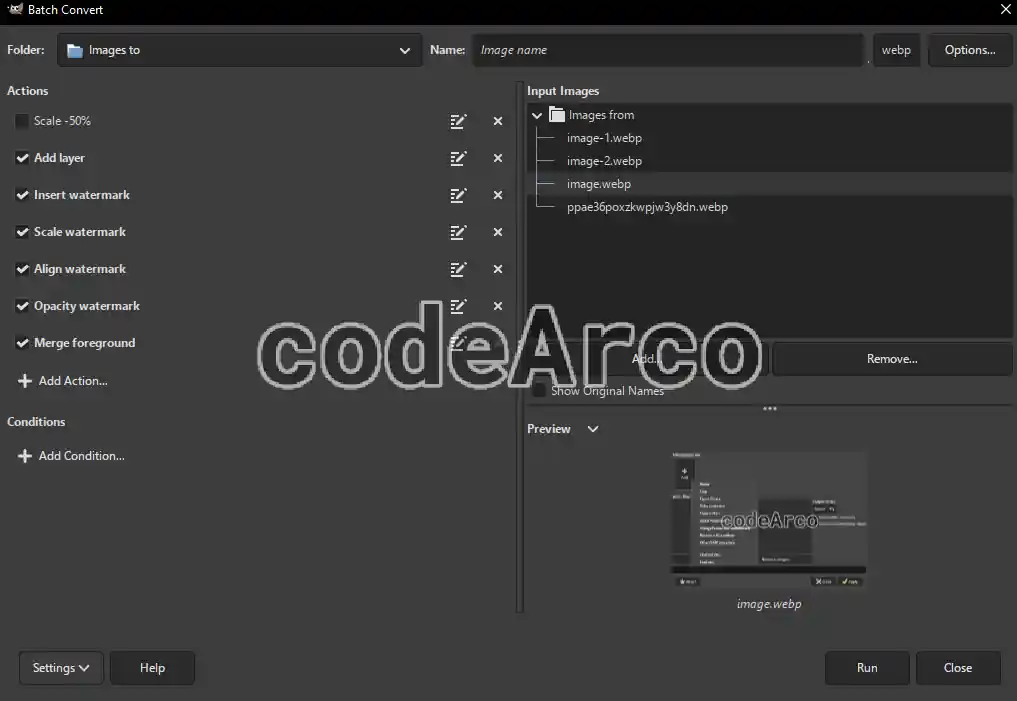
- Make sure the actions are in the correct order and review the preview to verify that the steps or actions will have the desired effect on your images.
Note that there is an additional action that we didn’t create manually: “Merge foreground” which should be last. If you want to change any step or action order, just drag and drop, but the recommended order is as follows:

Final result of bulk watermarks with Gimp 3 - Click the “Run” button and verify the changes. Check that the process was correct and that you have your images exactly as you want them in the selected output folder.
Export and save plugin settings
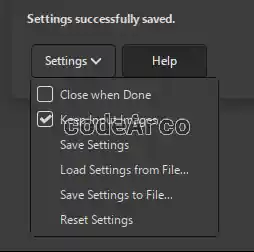
Finally, I’d like to mention a very interesting aspect of the plugin regarding saving or backing up settings. Through the “Settings” menu at the bottom, you can:
- Save settings using the “Save Settings” option. This option simply saves the settings and all the steps we’ve followed in this step-by-step guide so you have them available the next time you open the program.
- Export and import settings using the “Save Settings to File” and “Load Settings from File” options. These options will allow you to generate and load a JSON file with all the actions we’ve configured throughout this tutorial so, for example, you can load them on a computer other than your current one and avoid having to repeat the entire process again:

Gimp and Batcher save and export settings