Perhaps you have found the need to translate your WordPress page into several languages and make it compatible and optimal for the International SEO of your website. Well, below you will find a full tutorial on how to create a multilingual website in WordPress with the Polylang plugin.
This step-by-step guide is valid whether you already have your website created and published or if you are starting one from scratch. Obviously the second case is much simpler since, among other things, it costs less to translate little by little than to translate absolutely everything on a website that has hundreds of posts in a single language.
Therefore, my recommendation, if you start a WordPress page from the beginning, is that you do not leave this section for later. The first plugin you should install is Polylang so that you have all the translation menus available from the start, that you do not miss a translation of any element and that your work becomes much more enjoyable.
Before starting the tutorial, make sure you have a minimum content in your WordPress, such as two posts, two categories and two tags. This will be more than enough to test the installation of the WordPress Polylang translation plugin.
Installation and configuration of Polylang
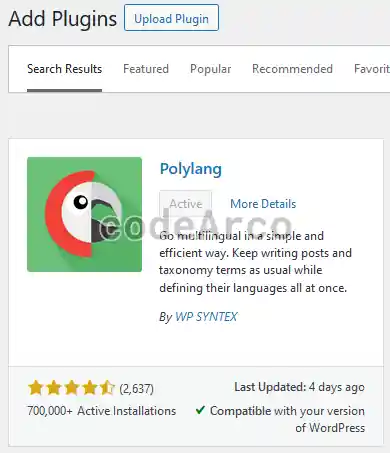
The first step is to install the Polylang plugin in WordPress. To do this we will go to “Plugins” through the side menu, search for “Polylang” and select the “Install now” button:
Initial setup of Polylang
Next we will follow the following steps to install and configure the Polylang multilingual plugin:
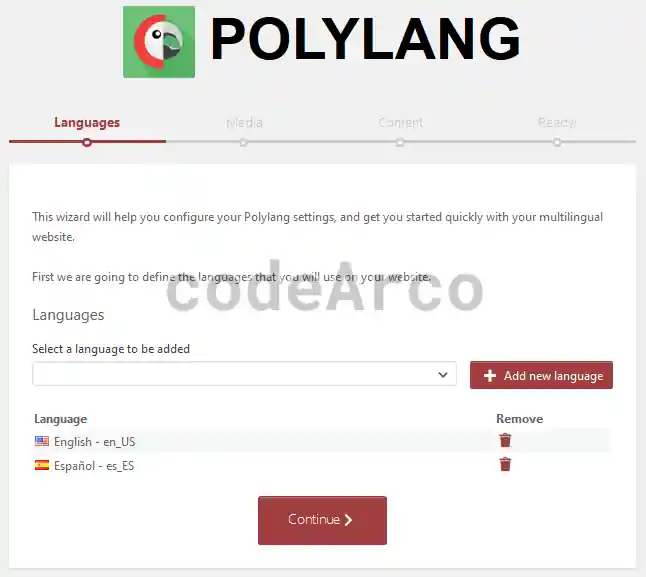
- Access the configuration wizard that is available after activating the plugin. If at any time you want to access it again, you can do so through the “Languages” side menu, “Languages” section (if you have not made the initial configuration) or “Settings” section (if you have made the initial configuration).
- Add the languages we want, in our case we will select Spanish and English.

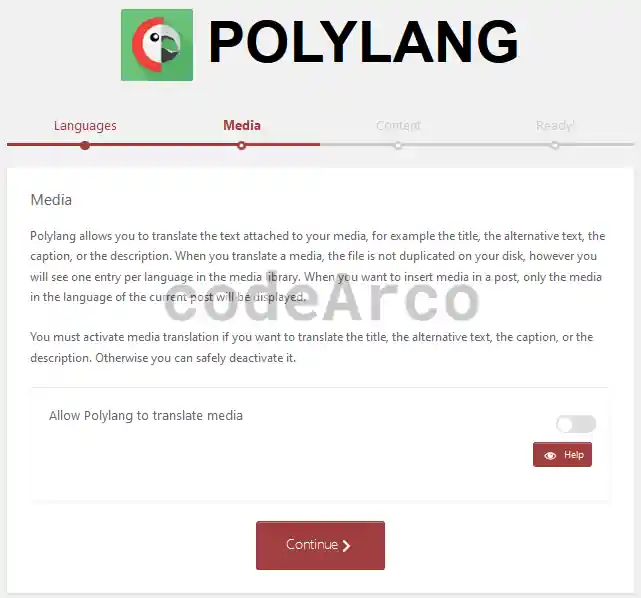
Select language WordPress Polylang - Set up media translation. This section is used so that, if we have it activated, we can translate the attributes of the media by uploading them only once.
For example, for an image, if we have this option activated, we can upload it only once and set the translation of the alternative text and the title of the image.
If you have a web page where the majority of images are different for each language, it is recommended that you do not activate this option since each image will have its own url, title and description and it will not be necessary to translate its attributes.
An example of this would be a WordPress tutorial with screenshots, the Spanish and English versions do not share images, each version has different screenshots and with its own attributes.
If, on the other hand, you have a WordPress website where most of the images are the same for all languages, it is recommended that you activate this option, upload the images once for all languages and translate their title and alt attributes.
As you can imagine, the advantage of translating media is saving storage, but on the other hand, it is very difficult and cumbersome to have different images for each language and therefore it completely depends on what website you are building.
WordPress Polylang configure media translation - Configure content without language. This section allows us to assign a language to content that currently does not have it. This means that if we have posts, pages, categories or tags without a language, all of them will be assigned the language that we select in this section.
Advanced settings of Polylang
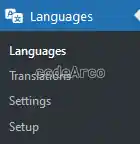
Now it is your turn to follow the following steps for advanced Polylang configuration:
- Configure permalinks through “Settings”, “Permalinks”. You should not select the “Plain” option, any configuration is valid, although I recommend the “Post name” or “Custom structure” option with the value “/%category%/%postname%/”.
- Access the WordPress languages menu that will allow us to completely modify Polylang.
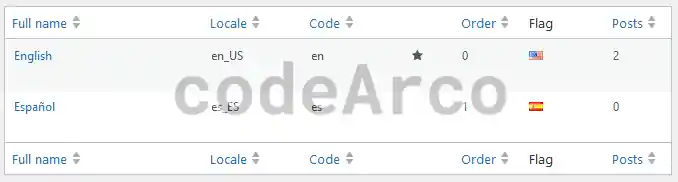
- Modify the order of the languages, so that number 0 is your default language (the one with a star) and the rest as you see fit. The order indicates in which position it appears in the language switcher that we will see later.

Polylang modify order languages switcher - Set the default language on the previous screen through the star. The default language will be the one that, if the user or his/her browser does not indicate any of those on the list, appears to the user. That is why I recommend selecting a language that is as generic as possible, such as English.
- Create translations for the website name and, optionally, the date and time formats, within the “Translations” section.
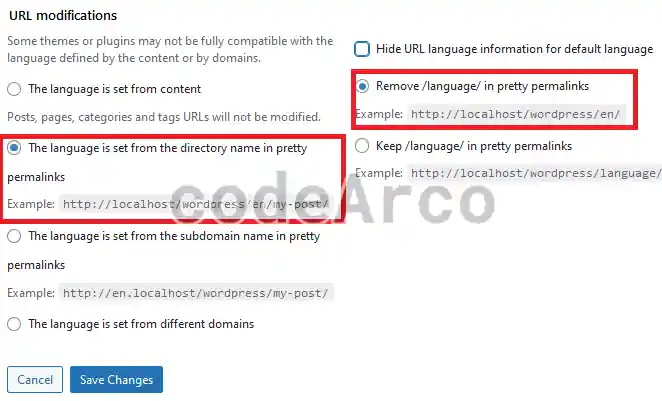
- Establish how the URLs will be by language within “Settings”, “URL Modifications”. My recommendation is that you select the option “The language is set from the directory name” to have the languages by folders and select the option “Remove /languages/” to have shorter and SEO friendly urls.
However, if you want, you can configure the plugin to allow the language to be indicated by domain or subdomain.

Multilingual web url configuration by folder - Activate the “Detect browser language” option. Although this option does not work if we have cache in WordPress, it does not hurt to have it activated.
We will leave the rest of the options as default.
How to translate categories and tags in WordPress
To translate categories and tags with Polylang we will go to “Posts”, “Categories” or “Tags”. Both menus are almost identical so we will explain only one of them.
If what we want is to translate a new category or tag, we will go to the left side where we will enter the name, the slug (how it will look in the url), the superior or parent category if it has one, the description (important for SEO) and the language of it. For now we will leave the “Translations” section blank since we do not have any translation for a new category or tag:
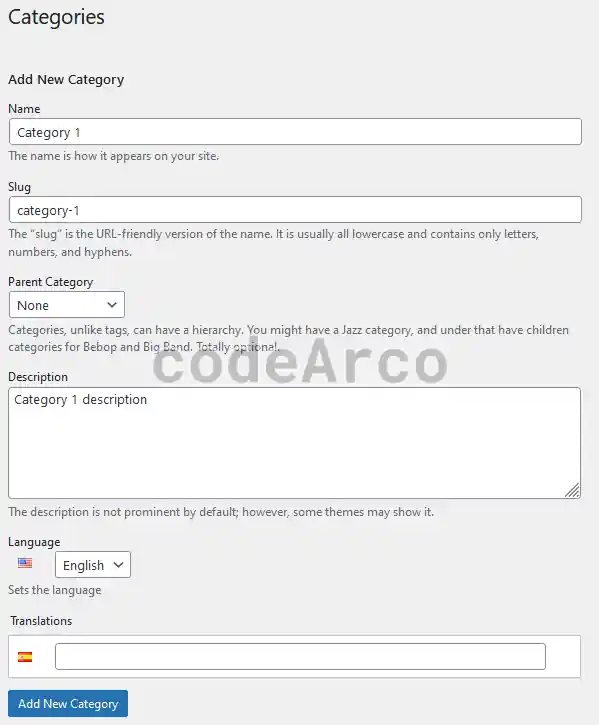
Once created in the default language of the site, we will go to the right table and click on the “+” button of the language corresponding to which we want to perform the translation:
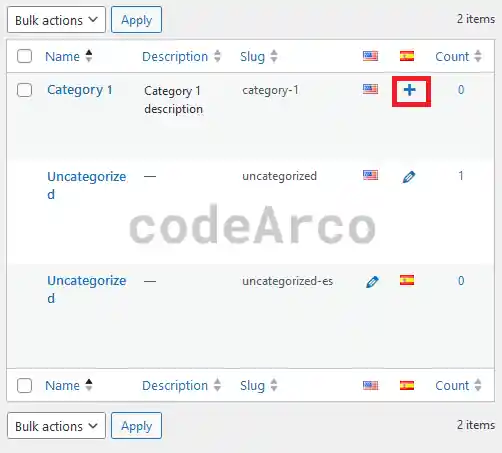
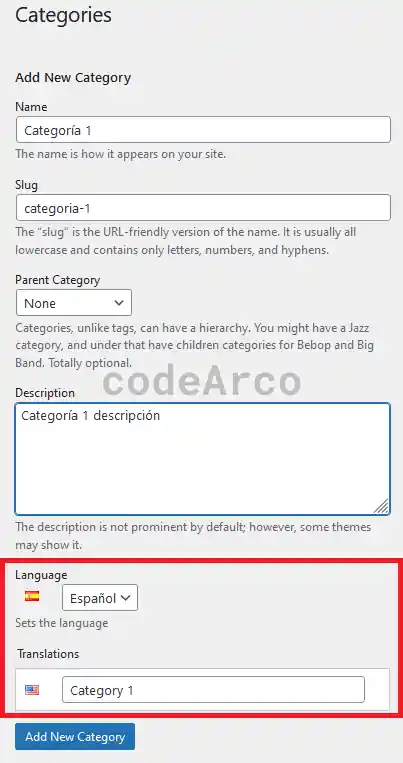
And we fill in the data the same as before except that, in the “Language” section we verify that we have selected the language to which we are translating (Spanish) and in the “Translations” section we verify that we have selected the original category, that is, the language of which we are translating (English):
If what we want is to translate an existing category or tag, that is, created before installing the plugin, we will do it the same as before, through the “+” icon located to the right of each of them.
Remember to check the default category “Uncategorized” since the plugin automatically translates it incorrectly with the same name and an incorrect slug:
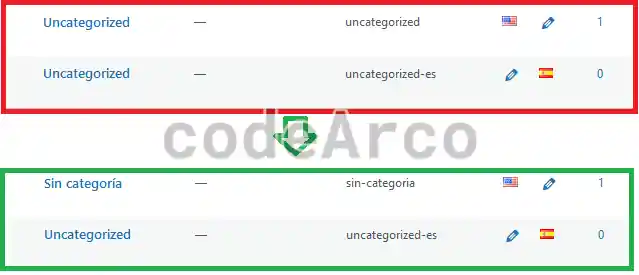
Finally, remember to check the slugs, if two categories have the same slug Polylang adds the language code below automatically. If you want them to have the same slug for different languages you will have to use the payment Polylang version.

Translate posts and pages with Polylang
The steps to translate a new page or post are:
- Create our post as always, through “Posts”, “Add new post”.
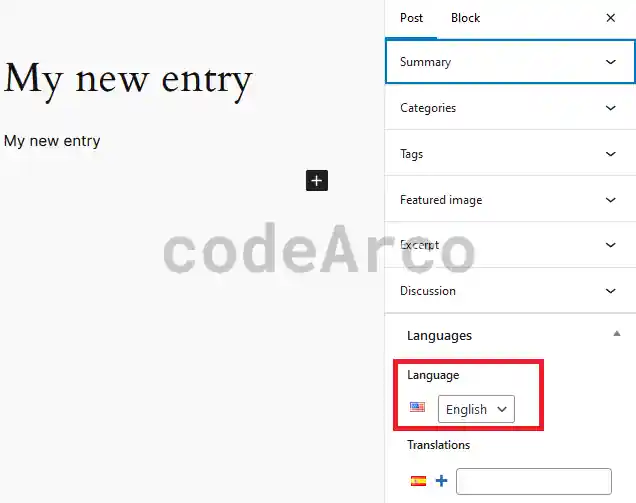
- Set the language of the post in the lower right part, within the “Languages”, “Language” section.

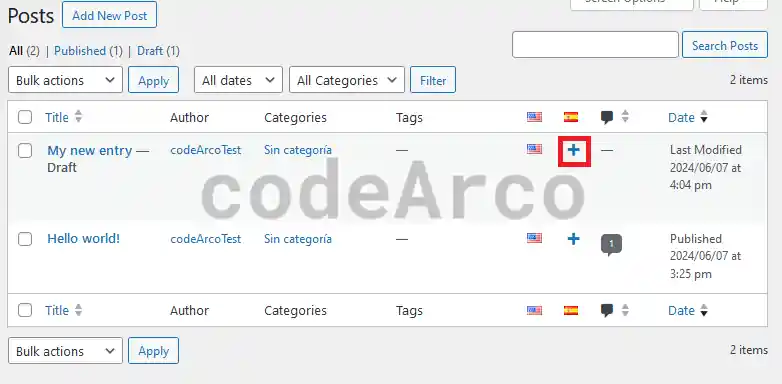
WordPress how to translate posts with Polylang - Create the translation in the rest of the languages through the “posts”, “All posts” menu by selecting the “+” button corresponding to the post we want to translate:

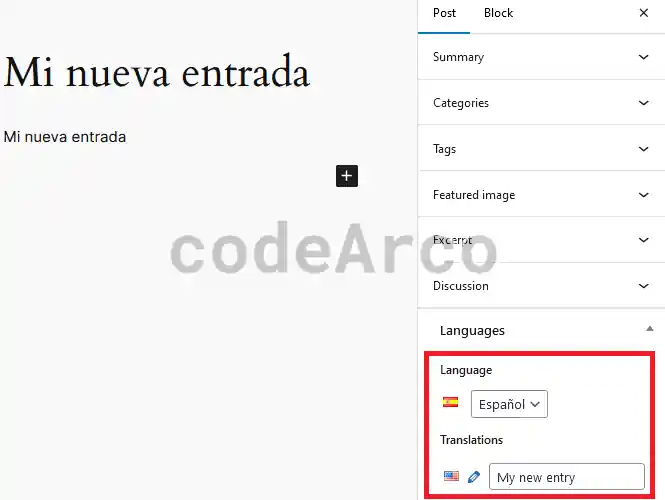
WordPress create translation for post with Polylang - Verify the language and the corresponding translation in the section below. The language is the current language of the post and the translation is the post in the rest of the languages that are not the current one.

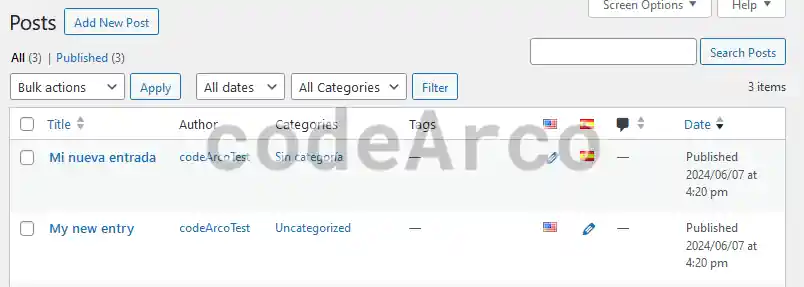
WordPress post language configuration with Polylang - Finally we verify that the posts we have created are correct and that they have the appropriate categories.

WordPress posts translated with Polylang
How to create language switcher menu in Polylang and WordPress
At this point where we have our entire WordPress website translated, you will be thinking… This is all very good, I have everything translated and so on but… How do I allow the user to change languages through a menu? Well, we will follow the following steps to create a language switcher menu for Polylang and WordPress:
- Install the WPCode plugin to be able to insert PHP code into your website through shortcodes. We will use this plugin in other articles for advanced Polylang functionalities. Additionally, this plugin is used to modify the head or body and insert the Google Tag Manager tag among other things.
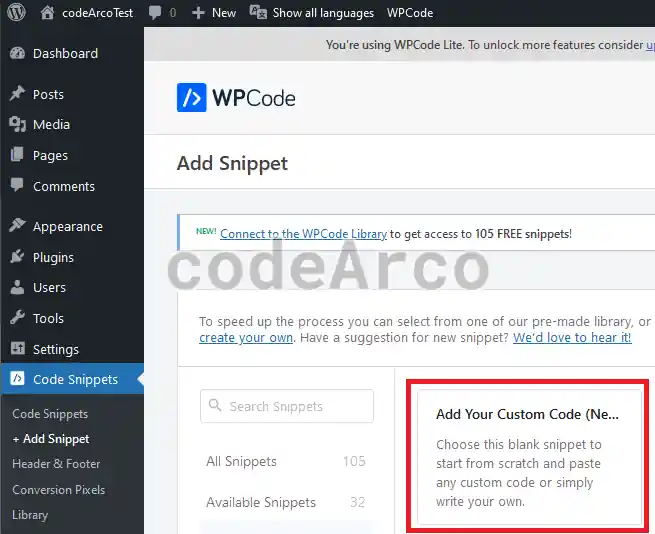
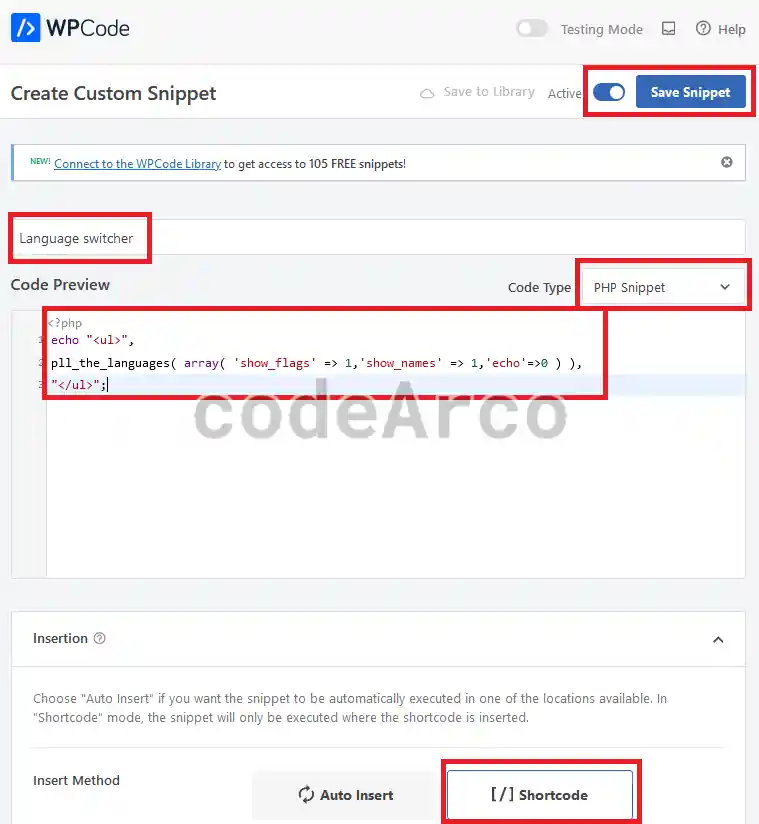
- Add the PHP code for the language switcher menu through the plugin. To do this we will go to the side menu, “Code snippets”, “Add snippet”, “Add your custom code”.

Add PHP code for Polylang language switcher menu - Select “PHP Snippet”, “Shortcode”, give it a descriptive title, activate the snippet via the button above, paste the following code in the text box and finally click “Save Snippet”:

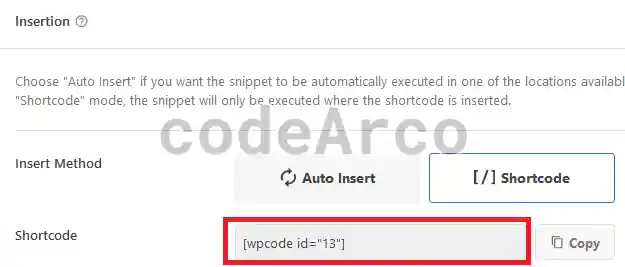
PHP shortcode snippet for Polylang echo "<ul>", pll_the_languages( array( 'show_flags' => 1,'show_names' => 1,'echo'=>0 ) ), "</ul>"; - Note the shortcode generated after saving the snippet.

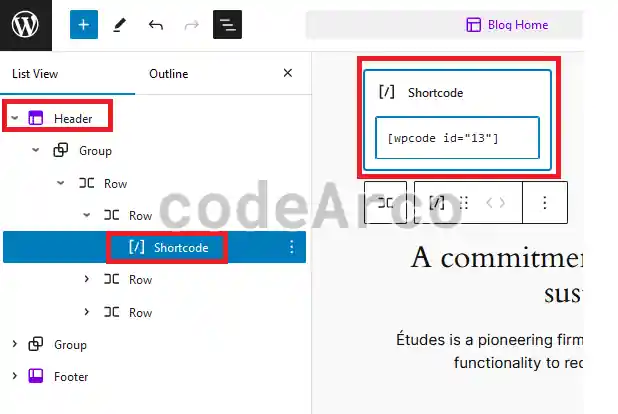
Shortcode for Polylang and WordPress - Set the shortcode through the WordPress designer in the place you want, the common thing is to put it in the header. To do this, create a “Shortcode” type block and, as a value, put the text string that you wrote down in the previous step.

Set Polylang shortcode in WordPress - Set the CSS code necessary to remove the circles from the language switcher. Through the WordPress designer, “Styles”, “Edit styles”, at the bottom right where it says “Additional CSS”, enter the following CSS code:
.lang-item {
    list-style: none;
}
Finally, we now have our language switcher working in WordPress and Polylang:
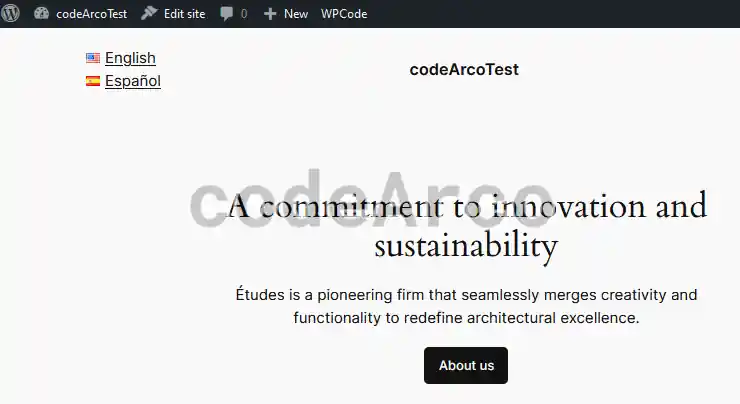
Perhaps this is a complicated way to insert the language switcher and you will see in Polylang tutorials that recommend using the “Legacy Widget”. I do not recommend the Polylang legacy widget for several reasons, the first is that it sometimes fails and the second is that this is the method we will use to translate the WordPress sidebar menu and insert conditional HTML code if necessary.
Check language switch in posts, pages, categories and tags
Once we have WordPress and Polylang configured correctly and we have inserted the language switcher, it is time to check that Polylang works correctly:
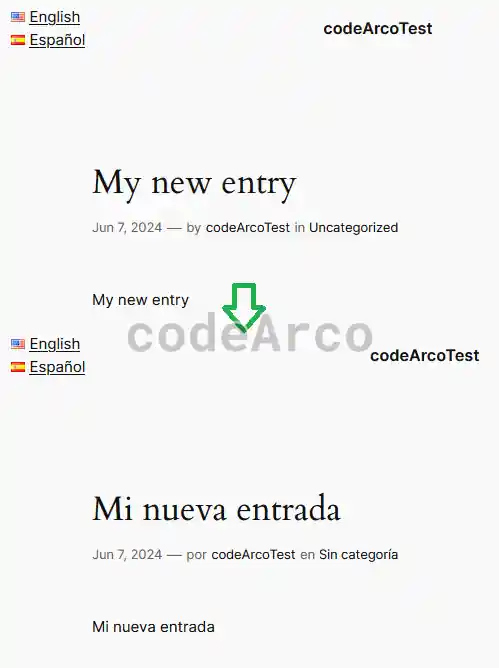
- Check the home page, change the language and verify that the change is applied correctly.
- Check a post and a specific page, again, once you are inside it, change the language and verify that all the content changes language when you use the Polylang language switcher:

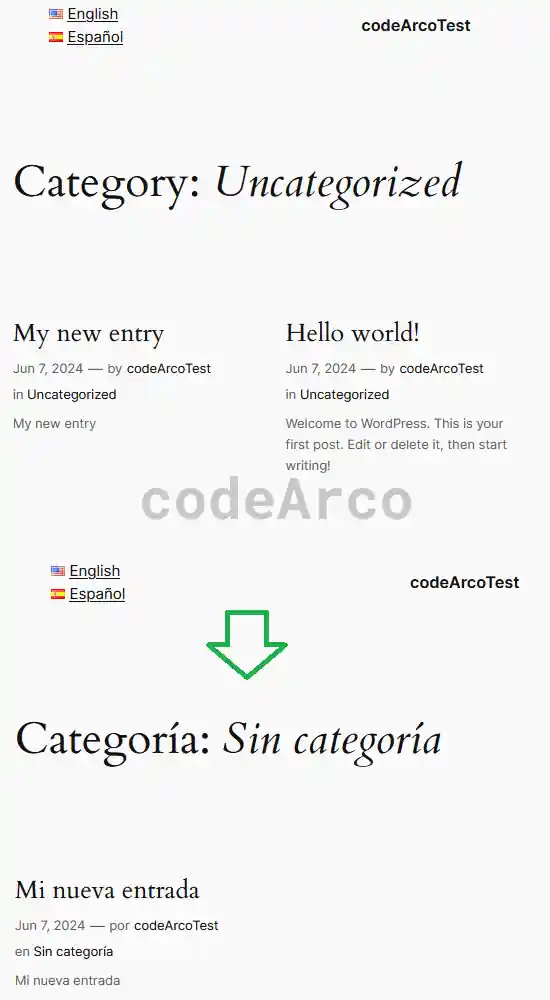
Polylang translate posts and pages - Check that, for categories and tags, the translation is correct:

Polylang translate categories and tags
Html lang, link hreflang and multilingual sitemap
Finally we are going to verify the most important part for SEO, the html lang and link hreflang tags:
- Html lang is used to indicate the current language of the WordPress page.
- Link hreflang is used to indicate where the translations of a specific page are located, including the current one.
- X-default is used to indicate what the default translation is.
An example of this would be the following:
<html lang=”es”>
    <head>
        <link rel="alternate" hreflang="es" href="http://miWeb.com/es/pagina1.html" />
        <link rel="alternate" hreflang="fr" href="http://miWeb.com/fr/pagina1.html" />
        <link rel="alternate" hreflang="pt" href="http://miWeb.com/pt/pagina1.html" />
        <link rel="alternate" hreflang="x-default" href="http://miWeb.com/es/pagina1.html" />
    </head>
</html>
If we inspect the code generated by Polylang on our website we can see all of these attributes that are so important for SEO with one exception, the “x-default” value, which is only specified on the main WordPress page, not in the posts.
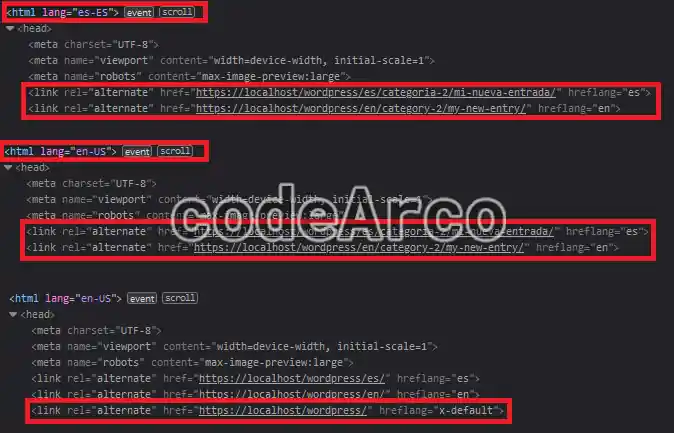
Regarding the multilingual sitemap for SEO and Polylang, the plugin does not generate a multilingual sitemap, but it is not necessary to have a multilingual sitemap as indicated by Google. Just having the tags mentioned above, html lang and link hreflang, is enough.
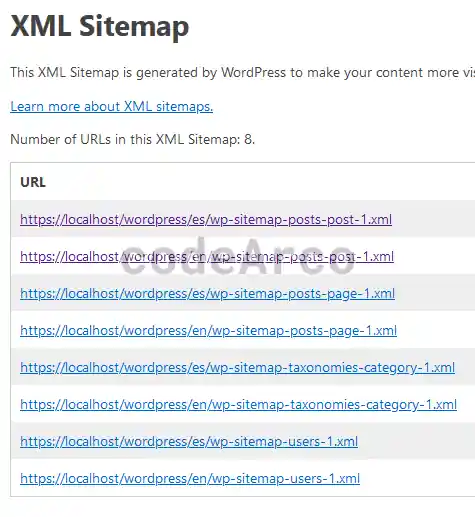
However, if you are curious, you will see that the sitemap generated by WordPress includes all the content of our website in the different languages:
Finally, if you are still wanting to learn more, I have created a tutorial to translate the WordPress sidebar menu with Polylang and create conditional HTML code, depending on the selected language.