One of the tools we software developers use most is Git and, whether in our professional or private lives, I honestly like to have a clean and concise commit history because if we have too many commits the version history becomes chaotic and not very useful.
For the above reason I have created the following tutorial on how to clear Git commit history using the following methods:
- Terminal although it is the most complex method it is also the most versatile as it will work in any environment and project since it does not depend on any tool, operating system or IDE.
- VSCode, through this powerful text and code editor we can also delete Git commits and clear their history by following a few simple steps which we will see below.
- Visual Studio, the simplest but most limited method for two reasons, the first reason is that it does not allow you to delete intermediate confirmations, only the last N, the second reason is that Visual Studio is not as widely used as VSCode or a terminal, it is used in fewer projects and environments.
Be careful when clearing history and deleting Git commits

Before proceeding to the steps for deleting Git commits and clearing their history I’d like to warn you about this method. You must be very careful with this operation and where you perform it.
If you perform the operation in a repository where only you work there is no problem, you can skip to the following sections.
If you make the change in a repository where more than one person works you must consider the branch where you are making the change:
- If it’s a branch of yours, where, again, only you work, there is no problem or precautionary measure to take into account.
This would be the case of afeatureorfixbranch where you are developing alone and, before merging todevelop, you want to merge all the commits into one to make it cleaner. - If it’s a shared branch where other people are working simultaneously, such as
developormaster, you have three options:- It’s safest to avoid this operation and not delete commits on branches of this type. Cleanup and deletion of confirmations should be done on auxiliary branches (such as
fix/fix-1507) before merging them intodevelopormaster. - If you want to cleanup on
developormastermy recommendation is to do it on old commits that no one is using or referencing. - If you still want to delete recent Git confirmations that are being referenced or used I recommend that you notify the people working on that branch and, before doing anything, they
PullandPushthe changes. Afterwards, while you perform the operation and until you finish, no one should commit changes or work on the branch. Finally, once you’ve uploaded the cleanup changes, let your colleagues know so they canPullthe changes and download the new repository structure.
- It’s safest to avoid this operation and not delete commits on branches of this type. Cleanup and deletion of confirmations should be done on auxiliary branches (such as
It’s very important that you keep the above points in mind because you can leave your colleagues in commits you’ve deleted and this is a difficult situation to resolve that can cause you quite a few headaches.
How to delete commits with the Git terminal
This is the most versatile method because it’s standard, doesn’t require any additional tools and doesn’t depend on any specific operating system. All we need is a terminal and Git installed on the device.
An important point to keep in mind is that this method allows you to combine multiple commits into a single one. I recommend that if you want to merge several different sections you should repeat the process for each section. For example, suppose we have commits a, b, c, d, e, f, g and you want to merge b and c and, on the other hand, you want to merge e and f, you will have to repeat this process twice, one for each merge.
In other words, if the confirmations to be merged are consecutive you will only need to follow the process once. However, if, on the other hand, the confirmations to be merged are not consecutive, you will have to repeat the process for each block of consecutive commits.
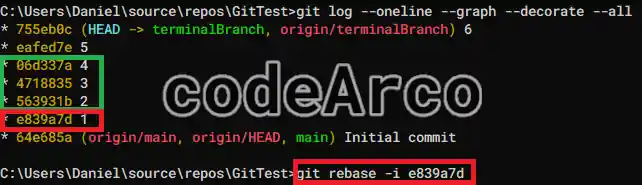
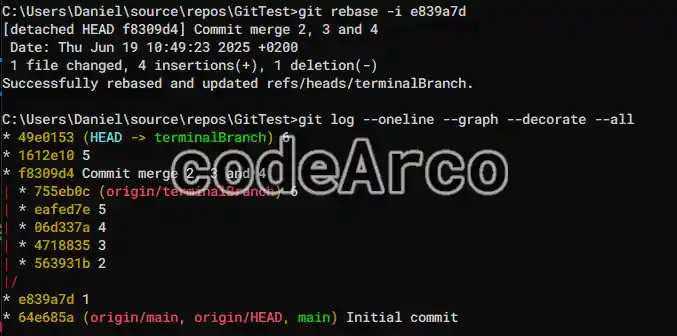
We’ll start with the following example where we’ve the terminalBranch branch from main and we’ve created 6 commits. To view the Git log or graph we’ll use the git log --oneline --graph --decorate --all command:
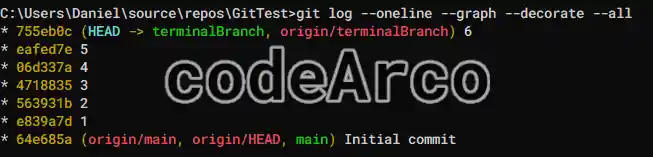
We’ll use, among others, the rebase command with the pick and squash options. We’ll explain each of these parameters later.
Let’s assume we want to merge commits 2, 3 and 4. The steps to clear Git history through the terminal and delete intermediate commits are:
- View the change history with the
git log --oneline --graph --decorate --allcommand and make sure you’re on the correct branch and on the most recent commit. - Use the
git rebase -i idcommand whereidis the Id of the confirmation before the first one you want to merge. In our example the oldest commit we want to merge is 2 so, in thegit rebase -i idcommand, theidparameter must be the Id of the commit before 2, that is, the Id of commit 1:

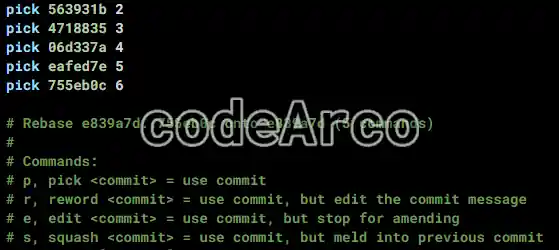
Git rebase example with terminal - Read the file to merge and delete commits. A file will open in your default text editor with the candidate confirmations to merge. Read the documentation and the available options.

File to merge Git commits - Understand the difference between
pickandsquash:- If we leave the default
pickoption on all of them, none of them will be merged and, therefore, the Git history will remain as before. - If we put
squashin one of them it will be merged with its predecessor. For example, if we putsquashbefore commit 3 it will be merged with 2.
- If we leave the default
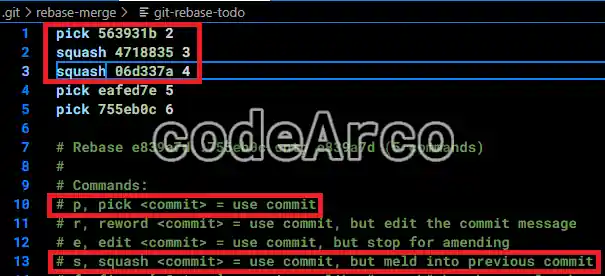
- Modify the file so that the commits you want are merged. In our example we want to merge commits 2, 3 and 4. All we need to do is add
squashbefore commit 3 so it’s merged with 2 and addsquashbefore commit 4 so it’s merged with 3. For the rest we’ll leavepick.
Save the file and close it for the changes to take effect.

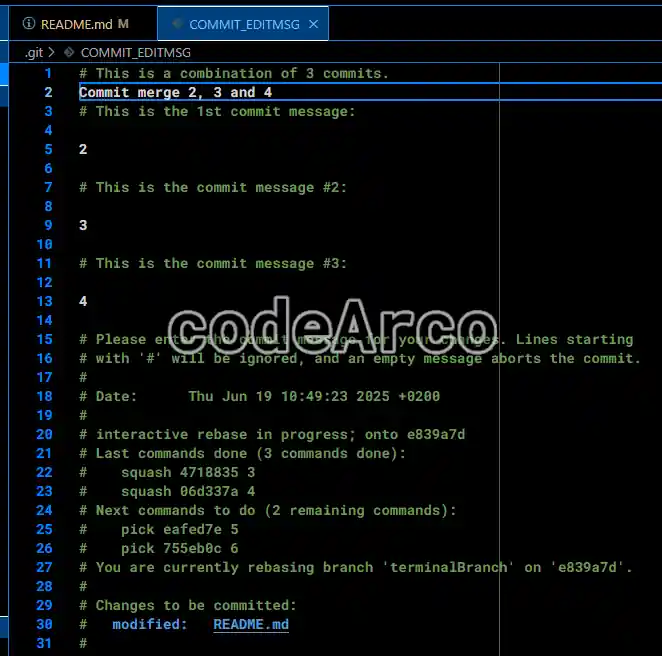
Pick and squash to clear Git history - Update the new message for the merged commits. Because we’ve merged several confirmations into one it must have a message. To modify it a new file will open in your default text editor. As before, after modifying it, save the changes and close it:

New Git message for merged confirmations - Check the changes in the local branch with the command
git log --oneline --graph --decorate --all. As you can see the local branch now has commits “1”, “merge”, “5”, and “6”:

Merging commits on a local branch with Git - Upload the changes with
git push -f. We must use the-f(force push) option because otherwise we will get an error. This is because the localterminalBranchbranch has a different structure than the same branch uploaded to Github. - Verify the changes on the remote branch with the
git log --oneline --graph --decorate --allcommand. As you can see we now have the same branch structure on both the local and remote branches with commits “2, 3, and 4” summarized in a single commit:

How to delete and merge commits in Git result

Clear Git history with VSCode
The way to clear Git history with VSCode and delete intermediate commits is very similar to what we just did with the terminal. This is because VSCode doesn’t currently have any tools or utilities that make this task easier (unlike Visual Studio, which, as we’ll see later, does simplify the process a bit).
Because of the above I strongly recommend reading the section on clearing Git history with the terminal so you understand the concepts and explanations we’ll skip over in this section.
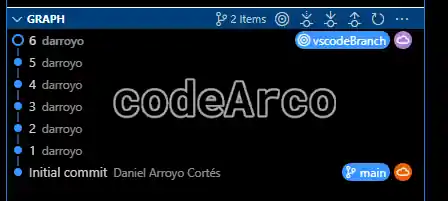
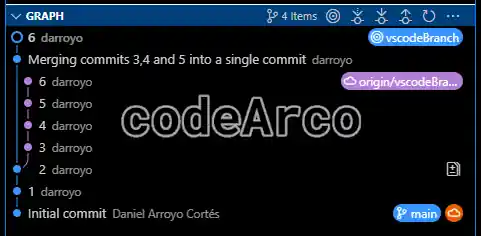
We’ll start with the following example where we have the vscodeBranch branch with 6 confirmations and we want to merge commits 3, 4 and 5:
The steps to delete commits and clean Git history with VSCode are as follows:
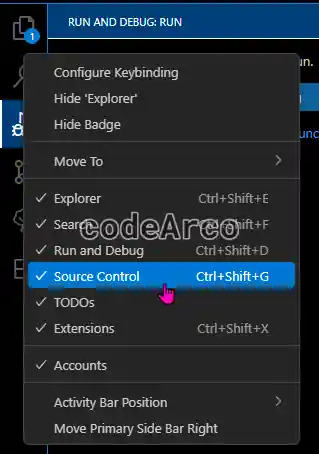
- Enable the version control section in VSCode by right-clicking on the left side menu:

How to enable the version control section in VSCode - Enable the terminal in VSCode through the “View” and “Terminal” menu at the top.
- Make sure you’re on the most recent commit and on the correct branch. Unlike the previous section, for this step, we’ll use VSCode’s Git viewer which you can find in the “Graph” section of the “Source control” section.
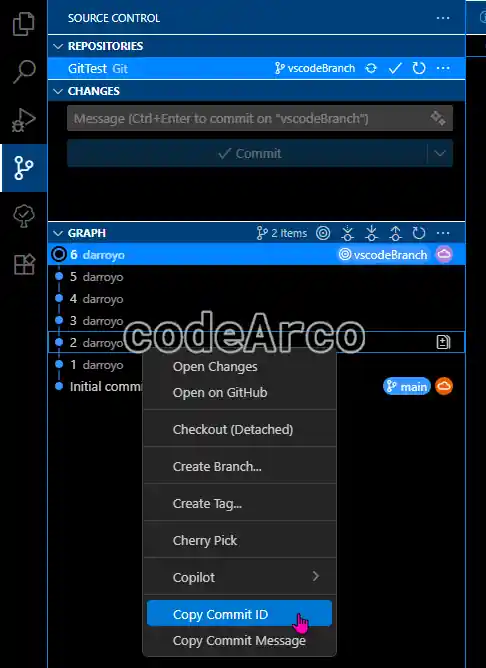
- Copy the id of the previous commit to the one you want to merge. For example, if we want to merge commits 3, 4 and 5, the Id we need to copy is 2:

Get commit id through VSCode - Run the command
git rebase -i idin the VSCode terminal where, as the name suggests, theidparameter is the value of the identifier we obtained in the previous step. - Update the file that just opened so that it appears like the following example.
Don’t forget to save and close the file for the changes to take effect.pick 307d6e7 3 squash d5d1bb8 4 squash ae1286d 5 pick 73c23e7 6 - What’s the difference between pick and squash?. Well,
pickleaves the commits unchanged, just as they were before andsquashmerges the commit with its predecessor. Following our example, if we putsquashin commit 4, it will merge with 3 and, if we put it in commit 5, it will merge with 4.
The final result will be a single merge of commits 3, 4 and 5. - Set the message of the new commit in the file that was automatically opened. Since we merged several confirmations into one, this new commit must have its own message. An example of how to set a merge message is as follows. As before, you’ll need to save and close the file for the changes to take effect.
# This is a combination of 3 commits. Merging commits 3,4 and 5 into a single commit # This is the 1st commit message: 3 # This is the commit message #2: 4 # This is the commit message #3: 5 - Check the changes on the local branch using the VSCode graph:

Merge multiple commits into one with VSCode - Push the changes to the remote branch using the
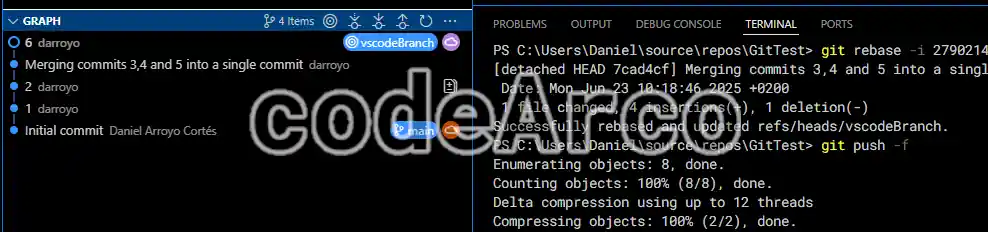
git push -fcommand and verify that both the local and remote branches are identical, have a clean history and have deleted intermediate commits:

Result of deleting commits with VSCode and terminal
How to merge commits with Visual Studio and Git
Like the previous examples we’ll start with a branch called vsBranch with 6 confirmations where we’ll merge commits 3, 4, 5 and 6.
As mentioned in the introduction this is the easiest method although it may not always be possible to use it since other IDE’s and code editors are used outside of .NET environment.
It’s also important to keep in mind that this method only merges the last N commits (e.g. 4, 5, and 6) but not intermediate commits (e.g. 2, 3, and 4).
If you want to merge intermediate confirmations you’ll notice that the “Squash commits” option is disabled and you’ll need to use the terminal method or the VSCode method.
The steps to merge Git commits with Visual Studio are as follows:
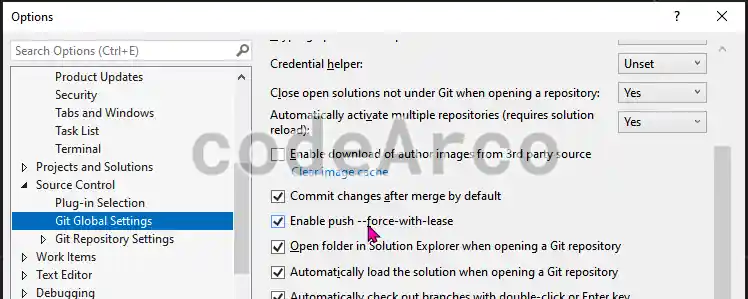
- Enable Git force push in Visual Studio via the “Tools”, “Options” menu. In the window select “Source Control”, “Git Global Settings” and enable the “Enable push –force-with-lease” option.

Enable Git force push in Visual Studio - Open the Visual Studio Git viewer via the “View”, “Git repository” menu.
- Make sure you’re on the correct branch and on the latest commit.
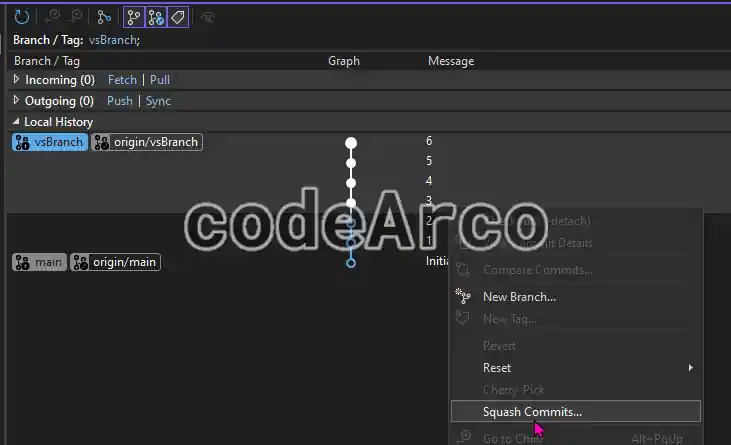
- Select the commits to merge by pressing the
Controlkey +left clickwith your mouse, then select the “Squash commits” option from the drop-down menu:

Select commits to merge with Visual Studio - Set a descriptive message for the commit into which the selected confirmations will be merged and press the
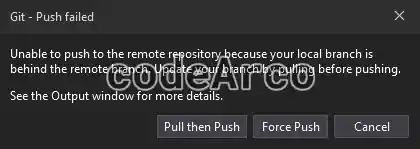
Squashbutton. - Push the changes and, in the window that appears, select the “Force push” option:

Force push in Visual Studio - Verify that the changes have been applied in the Git history:

Result of deleting commits with Visual Studio